

In this article, we will explore how to find the MAC address on Windows 11. The MAC address, also known as the Physical Address, is a unique identifier for the network adapter on your computer. It is essential for network communication and can be useful in certain situations. Discovering the MAC address on your Windows 11 device is essential for various networking tasks. Whether you need it to troubleshoot network issues or set up MAC address filtering, understanding how to find your MAC address is a must. In this article, we will guide you through the steps needed to locate your MAC address on Windows 11. By following our easy-to-understand instructions, you’ll be able to identify this unique identifier, also known as the physical address, in no time. Boost your networking prowess and gain the confidence to handle any MAC address-related tasks on your Windows 11 computer.
What is a MAC Address?
A MAC (Media Access Control) address is a special number assigned to the network interface controls on devices connected to the internet. It serves as a unique identifier for each network adapter, whether it’s for Wi-Fi or Ethernet connectivity. Typically, the MAC address is assigned by the manufacturer and expressed as a six-digit hexadecimal value (e.g., 00:3A:2G:3C:4D:5E).
Find MAC Address on Windows using Command Prompt
You can quickly find your MAC address using the command prompt. Just follow these
steps: 1. Click on the search icon and type “command prompt” to open the Command Prompt app.
Type “ipconfig /all” and hit Enter.
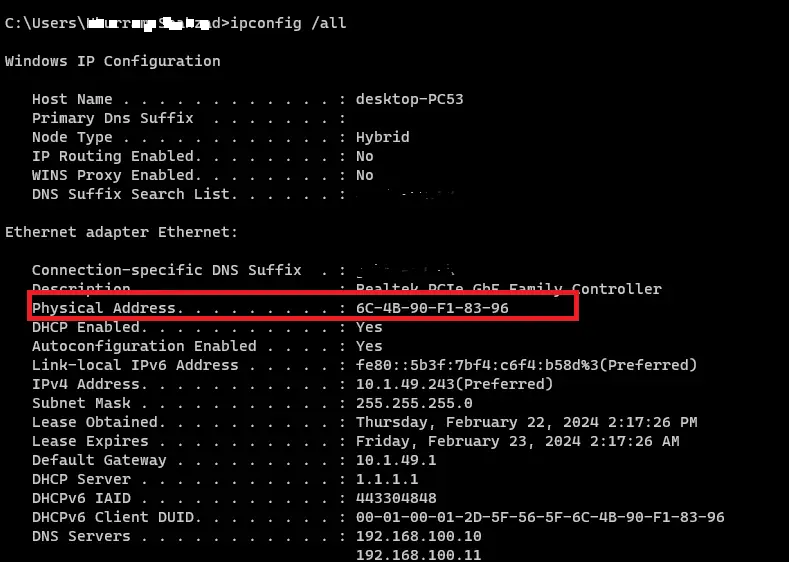
Look for the “Physical Address” section under the network connection you want to check.
- The MAC address will be displayed next to the “Physical Address” label. Find Your MAC Address Using PowerShell PowerShell is another useful tool to find your MAC address on Windows 11. Here’s how you can do it:
Click on the search icon and type “PowerShell” to open the PowerShell app.Type “getmac /v /fo list” and hit Enter.

The MAC address for each network adapter will be listed under the “Physical Address” section.
How to Find MAC Address from Settings
Windows 11 also allows you to find the MAC address through the Settings menu. Here’s how:
- Right-click on the Windows icon and select “Settings.”
- Click on “Network & Internet.”
- Choose either “Ethernet” or “Wi-Fi” depending on your network connection.
- Under the “Physical Address (Mac)” section, you will find the MAC address. Determine MAC for all Adapters If you want to find the MAC address of all your network adapters, you can follow these steps:
- Click on the search icon and type “Advanced network settings” to open the Network & Internet settings.
- Click on “Hardware and connection properties” under the More settings interface.
- Identify the name of your network adapter.
- Confirm the MAC address under the “Physical Address (MAC)” section.
To Find the MAC Address via Control Panel
If you prefer using the Control Panel, you can find the MAC address by following these
steps: 1. Open the Control Panel and click on the “Network and Sharing Center” link.
- Click on the active network adapter (ethernet or Wi-Fi).
- Click on the “details” button.
- Under “Network connection details,” you will find the MAC address for the adapter.
To Find the MAC with the System Information on Windows 11
Windows 11’s System Information app can also help you find the MAC address by following these
steps: 1. Press the Windows key + R to open the Run box.
- Type “msinfo32” and hit Enter to open the System Information app.
- Expand the component settings and then expand the network settings.
- Select the adapter you want and scroll down to find the MAC address. By following these methods, you can easily find the MAC address of your network adapters on Windows 11.
Remember that the MAC address is a permanent identifier and is crucial for certain network-related tasks.
- Design