Introduction to cron jobs
Cron jobs are an essential tool for automating repetitive tasks in Ubuntu. Whether you are a system administrator or a developer, understanding how to harness the power of cron jobs can greatly enhance your productivity and efficiency. In this step-by-step tutorial, we will explore the basics of cron jobs in Ubuntu, learn how to create and schedule them using cron expressions, discover techniques for managing and troubleshooting common issues, delve into advanced cron job techniques, and explore how to automate system tasks. By the end of this tutorial, you will have a comprehensive understanding of cron jobs and be able to leverage their full potential.
Understanding the basics of cron jobs in Ubuntu
Before we dive into creating and scheduling cron jobs, it is important to understand the underlying concepts and components. At its core, cron is a time-based job scheduler in Unix-like operating systems. It allows you to schedule tasks to run automatically at specific intervals, such as daily, weekly, or monthly. In Ubuntu, cron is implemented through the cron daemon, which runs in the background and executes scheduled tasks.
Cron jobs are defined in crontab files, which store the schedule and command(s) to be executed. Each user on the system can have their own crontab file, allowing for individualized scheduling. The crontab files are located in the /var/spool/cron/crontabs directory and can be edited using the crontab command.
To view the existing cron jobs for a user, you can use the crontab -l command. This will display the contents of the user’s crontab file. By default, cron jobs are written in the standard cron syntax, but there are also extensions available, such as cron expressions, which provide more flexibility in defining schedules.
Prerequisites
Before we begin, ensure you have:
- A system running Ubuntu.
- Basic familiarity with the Linux command line.
Step 1: Understanding Cron
Cron is a daemon used to execute scheduled commands automatically at fixed intervals or specific times. It reads its configuration from a series of files known as crontabs.
Step 2: Accessing the Cron Configuration
Cron jobs are managed through crontab files. To access the current user’s crontab, open a terminal and run:
crontab -e
Step 3: Editing the Crontab
Once inside the crontab editor, you can add, modify, or remove cron jobs. Each line in the crontab represents a scheduled task.
The syntax for a cron job is as follows:
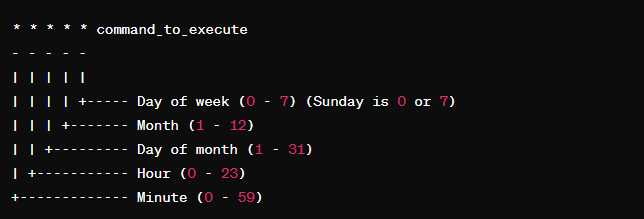
The syntax for a cron job consists of six fields, representing various time intervals:
- Minute (0 – 59): The minute of the hour when the command will run.
- Hour (0 – 23): The hour of the day when the command will run.
- Day of month (1 – 31): The day of the month when the command will run.
- Month (1 – 12): The month of the year when the command will run.
- Day of week (0 – 7): The day of the week when the command will run. (Note: Both 0 and 7 represent Sunday).
- Command to execute: The actual command or script that will be executed on the specified schedule.
For each field:
- Asterisk (*): Represents all possible values for that field. For example, “*” in the minute field means “every minute.”
- Ranges (e.g., 1-5): Represents a range of values. For example, “1-5” in the day of month field means the command will run on the 1st, 2nd, 3rd, 4th, and 5th days of the month.
- Commas (e.g., 1,15): Specifies individual values. For example, “1,15” in the day of month field means the command will run on the 1st and 15th days of the month.
- Step Values (e.g., /2): Specifies a step value. For example, “/2″ in the hour field means every two hours.
Example:
Let’s say you want to schedule a task to run a backup script every day at 2:00 AM. The crontab entry would look like this:
0 2 * * * /path/to/backup_script.sh
Explanation:
- Minute (0): 0th minute of the hour.
- Hour (2): 2 AM.
- Day of month (*): Every day.
- Month (*): Every month.
- Day of week (*): Every day of the week.
- Command:
/path/to/backup_script.shis the script that will be executed.
Step 4: Examples of Cron Jobs
Let’s explore some practical examples:
Backup Script: Schedule a backup of your important files every night at 2:00 AM:
0 2 * * * /path/to/backup_script.sh
System Maintenance: Perform system maintenance tasks every Sunday at midnight:
0 0 * * 0 /path/to/maintenance_script.sh
Step 5: Saving and Exiting
After adding or modifying cron jobs, save your changes and exit the crontab editor. The changes will take effect immediately.
Step 6: Viewing Existing Cron Jobs
To view the current crontab entries, use the command:
crontab -l
Conclusion
Cron jobs are a powerful tool for automating repetitive tasks in Ubuntu. By understanding the basics of cron jobs, creating and scheduling them using cron expressions, managing and troubleshooting common issues, exploring advanced techniques and best practices, automating system tasks, and monitoring their execution and logs, you can unlock their full potential and greatly enhance your productivity and efficiency.
Now that you have completed this step-by-step tutorial, you are equipped with the knowledge and skills to harness the power of cron jobs in Ubuntu. Start exploring the possibilities and unlock the full potential of automation in your Ubuntu environment.