In the world of big data, effective management and processing of extensive information are crucial. Hadoop, an open-source framework, has emerged as a robust tool for the distributed storage and processing of data. If you’re eager to leverage Hadoop’s potential for your data projects but find the installation process intimidating, worry not! This blog will guide you through the steps to install Hadoop on your Ubuntu system, demystifying the process and paving the way for you to explore the boundless possibilities of big data analytics. Whether you’re an experienced data professional or just embarking on your data journey, this guide will assist you in getting started with Hadoop on Ubuntu, making big data more accessible than ever. Let’s delve into it and unlock the realm of distributed data processing.
Step 1 : Install Java Development Kit
The Ubuntu default repositories include both Java 8 and Java 11. I have opted for Java 8 as Hive is compatible only with this version. To install Java 8, use the following command.
sudo apt update && sudo apt install openjdk-8-jdk
Step 2 : Verify the Java version
Once you have successfully installed it, check the current java version.
java -version
Step 3 : Install SSH
The installation of SSH (Secure Shell) is crucial for Hadoop, as it establishes a secure communication channel among nodes within the Hadoop cluster. This guarantees the integrity and confidentiality of data, facilitating the effective distributed processing of information across the entire cluster.
sudo apt install ssh
Step 4 : Create the hadoop user
All the Hadoop components will run as the user that you create for Apache Hadoop, and the user will also be used for logging in to Hadoop’s web interface.
Run the command to create user and set password:
sudo adduser hadoop
Step 5 : Switch user
Switch to the newly created hadoop user:
su – hadoop
Step 6 : Configure SSH
Set up password-less SSH access for the recently established Hadoop user by configuring SSH access without the need to enter a key, save a file, or provide a passphrase. Start by generating an SSH key pair.
ssh-keygen -t rsa
Step 7 : Set permissions
Paste the generated public key into the authorized key file and configure the appropriate permissions.
cat ~/.ssh/id_rsa.pub >> ~/.ssh/authorized_keys
chmod 640 ~/.ssh/authorized_keys
Step 8 : SSH to the localhost
ssh localhost
You will be asked to authenticate hosts by adding RSA keys to known hosts. Type yes and hit Enter to authenticate the localhost.
Step 9 : Switch user
Again switch to hadoop.
su – hadoop
Step 10 : Install hadoop
Download hadoop 3.3.6
wget https://dlcdn.apache.org/hadoop/common/hadoop-3.3.6/hadoop-3.3.6.tar.gz
Once you’ve downloaded the file, you can unzip it to a folder.
tar -xvzf hadoop-3.3.6.tar.gz
Change the name of the extracted folder to eliminate version details. This step is not mandatory, but if you prefer not to rename it, make the necessary adjustments to the remaining configuration paths.
mv hadoop-3.3.6 hadoop
Afterwards, you must set up Hadoop and Java Environment Variables on your system. Open the ~/.bashrc file in your preferred text editor. In this case, I am using the nano editor. To paste the code, use ctrl+shift+v, and to save the file, press ctrl+x, then ctrl+y, and finally, hit enter.
nano ~/.bashrc
Append the below lines to the file
export JAVA_HOME=/usr/lib/jvm/java-8-openjdk-amd64
export HADOOP_HOME=/home/hadoop/hadoop
export HADOOP_INSTALL=$HADOOP_HOME
export HADOOP_MAPRED_HOME=$HADOOP_HOME
export HADOOP_COMMON_HOME=$HADOOP_HOME
export HADOOP_HDFS_HOME=$HADOOP_HOME
export HADOOP_YARN_HOME=$HADOOP_HOME
export HADOOP_COMMON_LIB_NATIVE_DIR=$HADOOP_HOME/lib/native
export PATH=$PATH:$HADOOP_HOME/sbin:$HADOOP_HOME/bin
export HADOOP_OPTS=”-Djava.library.path=$HADOOP_HOME/lib/native”
Load the above configuration in the current environment.
source ~/.bashrc
You also need to configure JAVA_HOME in hadoop-env.sh file. Edit the Hadoop environment variable file in the text editor.
nano $HADOOP_HOME/etc/hadoop/hadoop-env.sh
Search for the “export JAVA_HOME” and configure it .
JAVA_HOME=/usr/lib/jvm/java-8-openjdk-amd64
Step 11 : Configuring Hadoop
Initially, you must establish the namenode and datanode directories within the Hadoop user home directory. Execute the provided command to generate both directories.
cd hadoop/
mkdir -p ~/hadoopdata/hdfs/{namenode,datanode}
Next, edit the core-site.xml file and update with your system hostname.
nano $HADOOP_HOME/etc/hadoop/core-site.xml
Change the following name as per your system hostname:
<configuration>
<property>
<name>fs.defaultFS</name>
<value>hdfs://localhost:9000</value>
</property>
</configuration>
Save and close the file.
- Then, edit the hdfs-site.xml file:
nano $HADOOP_HOME/etc/hadoop/hdfs-site.xml
Change the NameNode and DataNode directory paths as shown below:
<configuration>
<property>
<name>dfs.replication</name>
<value>1</value>
</property>
<property>
<name>dfs.namenode.name.dir</name>
<value>file:///home/hadoop/hadoopdata/hdfs/namenode</value>
</property>
<property>
<name>dfs.datanode.data.dir</name>
<value>file:///home/hadoop/hadoopdata/hdfs/datanode</value>
</property>
</configuration>
Then, edit the mapred-site.xml file
nano $HADOOP_HOME/etc/hadoop/mapred-site.xml
Make the following changes
<configuration>
<property>
<name>yarn.app.mapreduce.am.env</name>
<value>HADOOP_MAPRED_HOME=$HADOOP_HOME/home/hadoop/hadoop/bin/hadoop</value>
</property>
<property>
<name>mapreduce.map.env</name>
<value>HADOOP_MAPRED_HOME=$HADOOP_HOME/home/hadoop/hadoop/bin/hadoop</value>
</property>
<property>
<name>mapreduce.reduce.env</name>
<value>HADOOP_MAPRED_HOME=$HADOOP_HOME/home/hadoop/hadoop/bin/hadoop</value>
</property>
</configuration>
Then, edit the yarn-site.xml file
nano $HADOOP_HOME/etc/hadoop/yarn-site.xml
Make the following changes.
<configuration>
<property>
<name>yarn.nodemanager.aux-services</name>
<value>mapreduce_shuffle</value>
</property>
</configuration>
Save the file and close it.
Step 12 : Start Hadoop cluster
Before starting the Hadoop cluster. You will need to format the Namenode as a hadoop user. Run the following command to format the Hadoop Namenode
hdfs namenode -format
After the HDFS file system has been successfully formatted for the namenode directory, you will receive the message “Storage directory /home/hadoop/hadoopdata/hdfs/namenode has been formatted successfully.”
Then start the Hadoop cluster with the following command.
start-all.sh
You can now check the status of all Hadoop services using the jps command
jps
Step 13 : Access Hadoop Namenode and Resource Manager
Initially, it is essential to determine our IP address. In Ubuntu, the installation of net-tools is required to execute the ipconfig command. If you are installing net-tools for the first time, switch to the default user.
sudo apt install net-tools
Then run ifconfig command to know our ip address
ifconfig
Here my ip address is 192.168.1.6
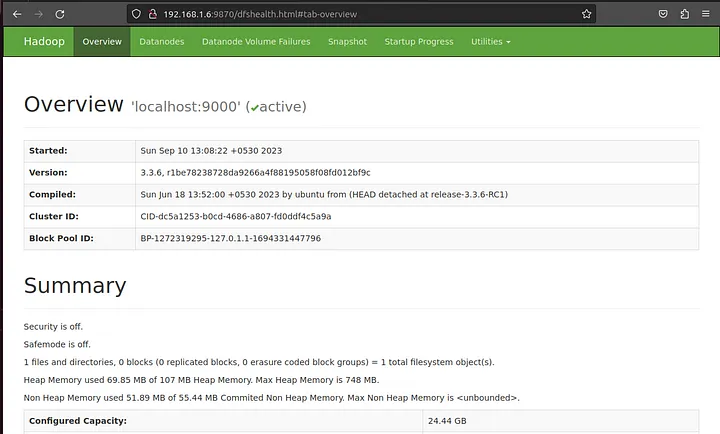
To access the Namenode, open your web browser and visit the URL http://your-server-ip:9870. You should see the following screen
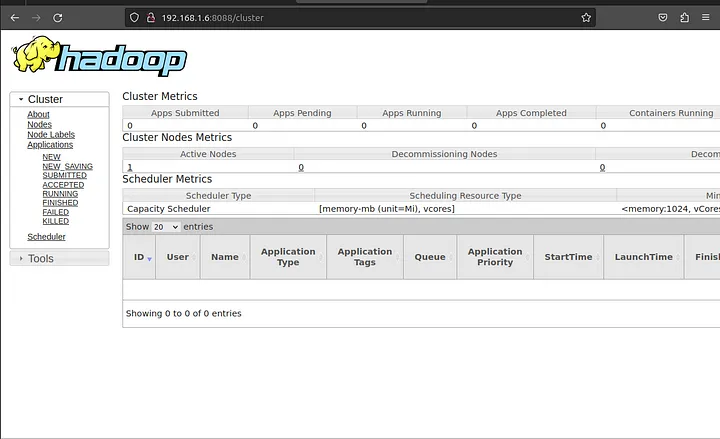
To access Resource Manage, open your web browser and visit the URL http://your-server-ip:8088. You should see the following screen
Step 13 :Verify the Hadoop Cluster
Now that the Hadoop cluster has been successfully installed and configured, the next step involves creating directories in the HDFS filesystem for testing the Hadoop setup. Using the provided command, we can establish directories within the HDFS filesystem.
hdfs dfs -mkdir /test1
hdfs dfs -mkdir /logs
Next, run the following command to list the above directory.
hdfs dfs -ls /
You should get the following output:

Also, put some files to hadoop file system. For the example, putting log files from host machine to hadoop file system.
hdfs dfs -put /var/log/* /logs/
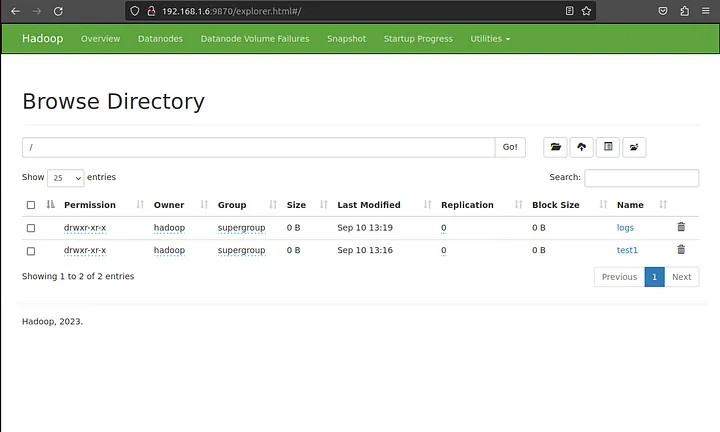
You can also verify the above files and directory in the Hadoop web interface.
Go to the web interface, click on the Utilities => Browse the file system. You should see your directories which you have created earlier in the following screen
Step 14 : To stop hadoop services
To stop the Hadoop service, run the following command as a hadoop user:
stop-all.sh
This tutorial explained to you step-by-step tutorial to install and configure Hadoop on Ubuntu 23.04 Linux system.
Conclusion
In summary, you’ve learned how to install Hadoop on Ubuntu. Now, you’re ready to unlock the potential of big data analytics. Happy exploring!