VMware vCenter plays a crucial role in the VMware vSphere virtual setup, enabling the use of sophisticated VMware functionalities. The prevalent method of setting up vCenter involves deploying the vCenter Server Appliance (VCSA) as a virtual machine on an ESXi host.
This article details the process of setting up VMware vCenter as a virtual gadget to avail of the business features in your vSphere system.
What is VMware vCenter server?
VMware vCenter serves as the essential tool needed to centrally supervise a vSphere environment and activate corporate functionalities.
The features it offers are diverse and include but are not limited to:
- Unified management, featuring Single Sign-On (SSO) authentication
- Central control over permissions
- Unified task and event logging Resource allocation and control.
- Single point for managing and executing administrative duties across ESXi hosts
- Ensuring High Availability.
- Implementing Distributed Resource Scheduling.
- Guaranteeing Fault Tolerance
- Unified updates through the update manager.
- Core functionality to access other VMware offerings, such as the vRealize suite of products, Site Recovery Manager (SRM), NSX network virtualization, among others.
Although a complimentary ESXi installation allows for the creation of virtual machines, accessing the essential enterprise features, especially for mission-critical scenarios, necessitates a vCenter Server. The majority of additional VMware products also demand vCenter. Therefore, let’s proceed to our guide on installing a VMware vCenter server.
VMware vCenter installation and options
In the past, there were two methods for setting up vCenter Server:
- On a Windows Server, regardless of it being physical or virtual in nature.
- Utilizing an OVA Linux tool within the virtual framework itself, recognized as the vCenter Server Virtual Appliance or VCSA.
During vCenter’s initial stages, the preferred installation method was through a Windows server as it was considered to provide superior performance. However, as the virtual appliance evolved, VMware declared that the VCSA is now as sturdy as its Windows counterpart. It’s even been pointed out that VMware only utilizes VCSA for managing its own virtual machine resources.
As of vCenter 6.7, the installation support on Windows got terminated. The succeeding version, VMware vCenter 7.0, doesn’t provide a provision for Windows installation and can only be installed as a virtual appliance based on Linux (Photon OS) also referred to as VCSA. Consequently, in this walkthrough of VMware vCenter server installation, we demonstrate the deployment of vCenter as a virtual device on an ESXi host. This installation guide is relevant for both vCenter 7 and 8.
To install vCenter 7.0 or higher in a vSphere environment, you must first prepare an ESXi host.
VMware vCenter appliance installation
We’ll now examine how to implement a standard vCenter Server Virtual Appliance (VCSA) in our virtual setting:
- Acquire the vCenter installation bundle from the VMware web page. Be aware that the download link is accessible only to registered VMware users. The VCSA you download will be in ISO format, not an OVA file.
- Next, attach this ISO image to a Windows device and execute the vCenter installation software in the graphical user interface (GUI).
The screenshot below illustrates the ISO image we have successfully mounted, allowing us to peruse its content. The necessary action is to initiate the installer.exe file through Windows Explorer. This launching file for Windows is located in the D:\vcsa-ui-installer\win32 directory, where D: signifies the virtual DVD drive where we mounted the vCenter ISO installation image. Your drive letter might vary. To commence the installer, you just need to double-click the file.
Be aware that an alternative way to install vCenter on a virtual machine is by using the OVA template file found at:
D:\vcsa\VMware-vCenter-Server-Appliance-7.0.0.10300-16189094_OVF10.ova
This particular OVA file could be quite handy if you’re setting up vCenter in a VMware home lab. Additionally, it’s worth noting that VCSA can also be installed via the command line interface (CLI).

- When the vCenter installation interface appears, it presents you with options to either Install, Upgrade, Migrate or Restore the vCenter Server appliance.
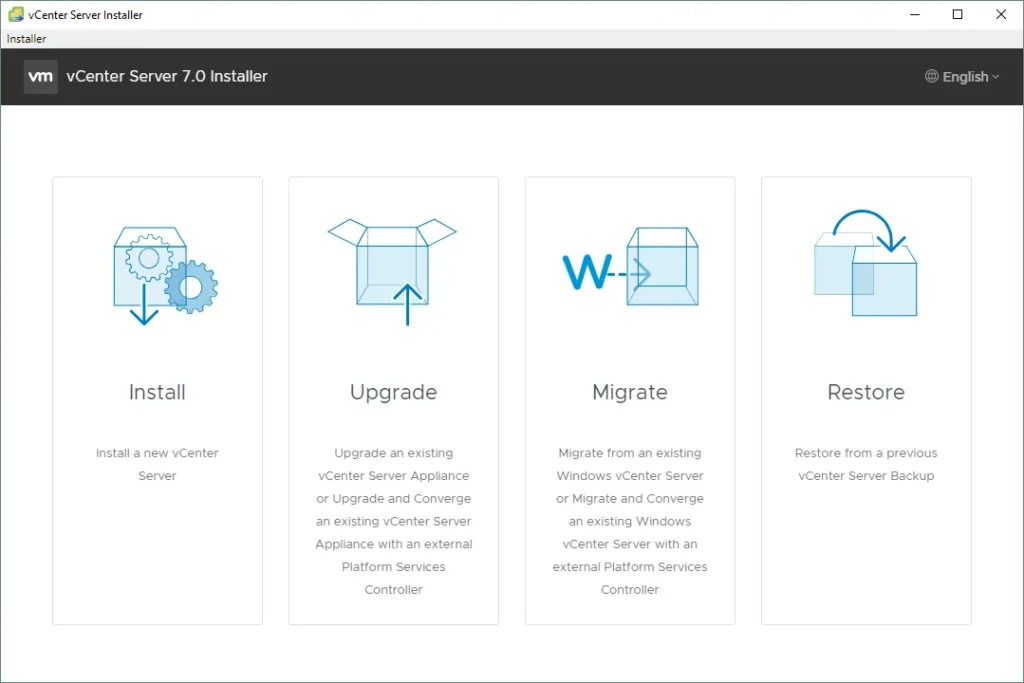
Select Install to initiate the installation of a new device. The vCenter Server Installer guide will appear in the installation window, commencing with Stage 1: Deploy vCenter Server. The VMware vCenter server installation process is divided into two stages.
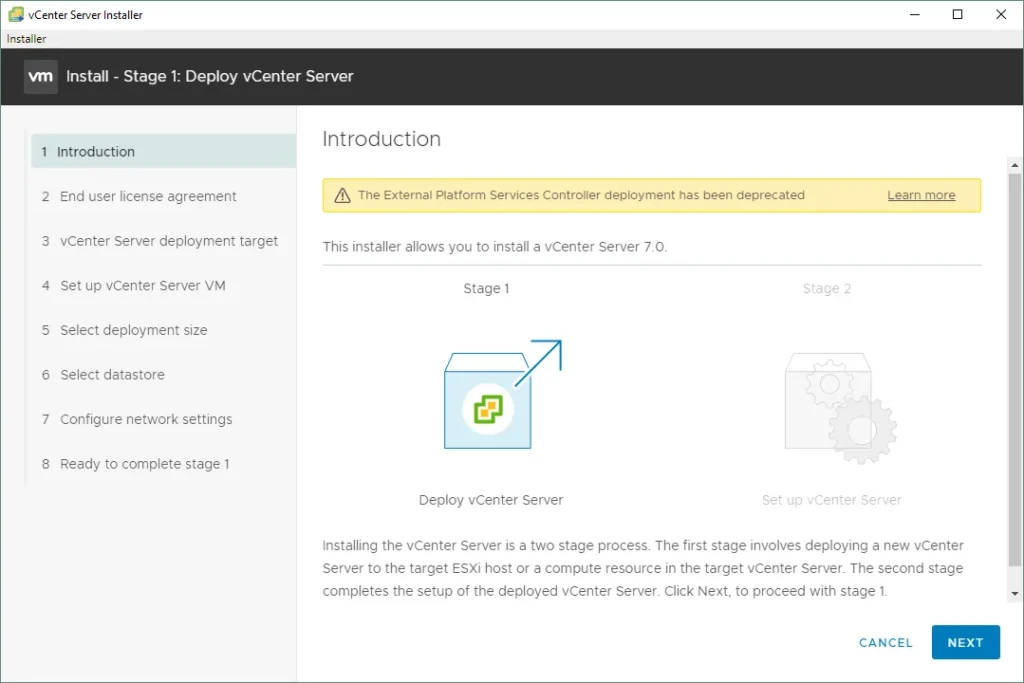
Stage 1: Deploy vCenter Server
Begin by carefully going through the details shown on your screen, which includes an alert regarding the Platform Services Controller. To proceed, click ‘Next‘ on each stage of the wizard.
In previous versions of VMware vSphere 6.x, you had the option to launch vCenter with an External Platform Services Controller. However, starting with vSphere 7.0, the use of an External Platform Services Controller is no longer supported and only an embedded Platform Services Controller can be utilized now.
The Platform Services Controller comprises collaborative services like Single Sign-On, Licensing, and the administration of certificates. You have the option to host this entirely on one device (both the vCenter server and Platform services controller).
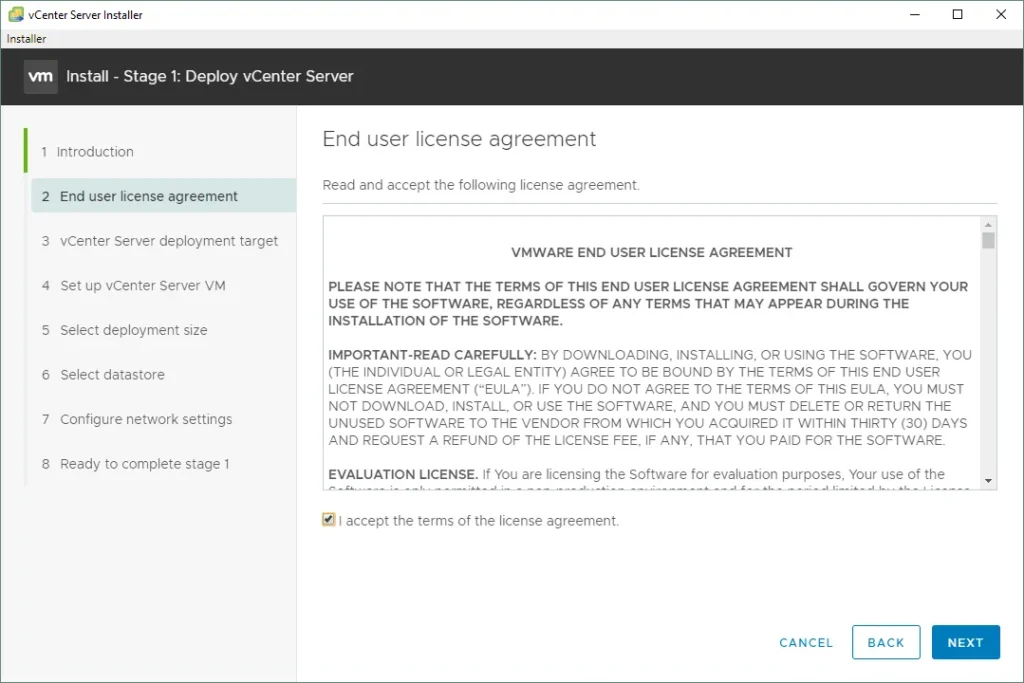
2. End user license agreement. The EULA, or end user license agreement, is the second tab you’ll come across. To proceed, tick the box adjacent to the statement “I accept the terms of the license agreement” and then hit Next.
3. vCenter Server deployment target. The following stage is setting up the vCenter Server deployment target. This step requests you to input connection details to link with the ESXi server host, which will ultimately house the appliance VM. You have the option to provide an IP address or a FQDN (Fully Qualified Domain Name), followed by the necessary user credentials for host connection.
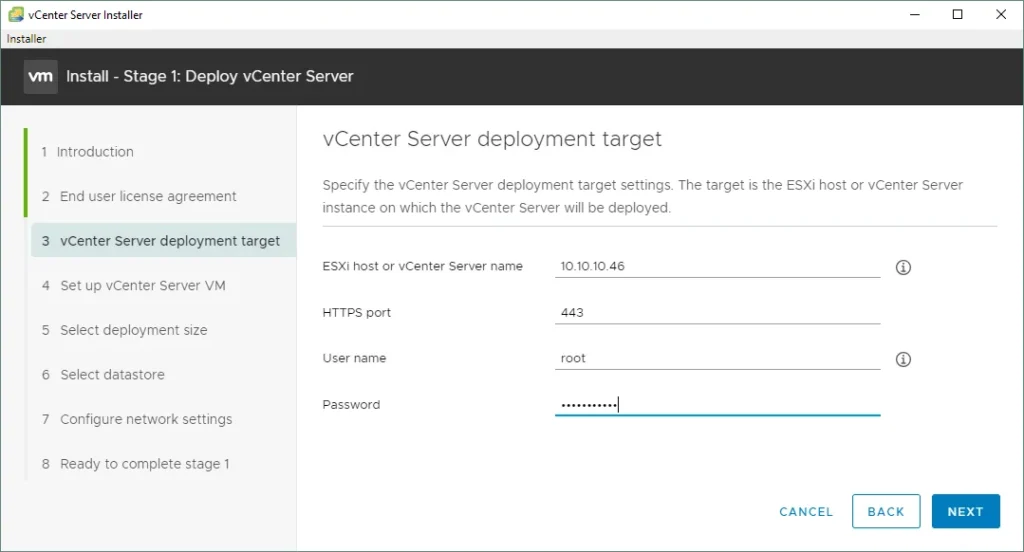
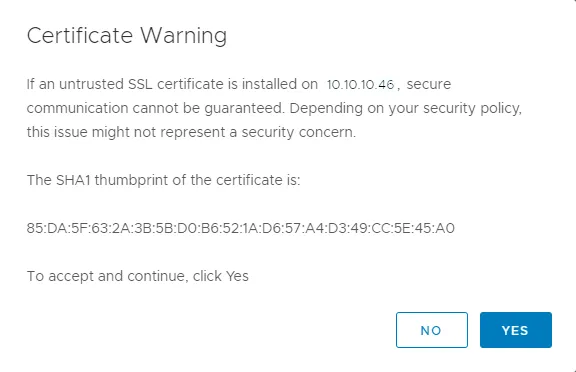
A caution about the host’s certificate may appear if a self-signed certificate is in use. Feel free to acknowledge this and proceed.
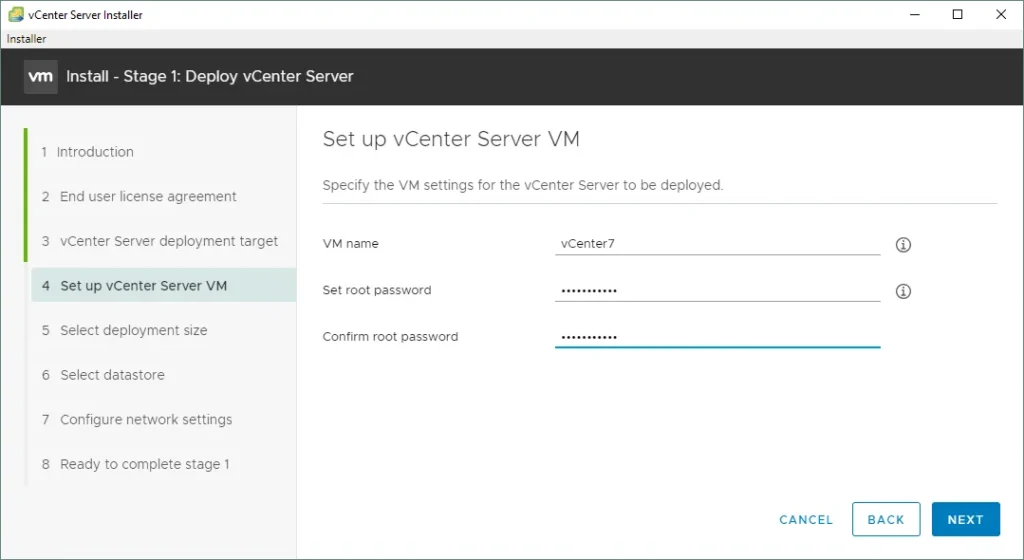
4. Set up vCenter Server VM.
You’re now ready to delve deeper into the details of establishing the virtual machine using vCenter. This is where you set up the appliance name (also known as the VM name) and the operating system password for the root user (the root user in a Linux-based Photon OS that’s utilized for VCSA).
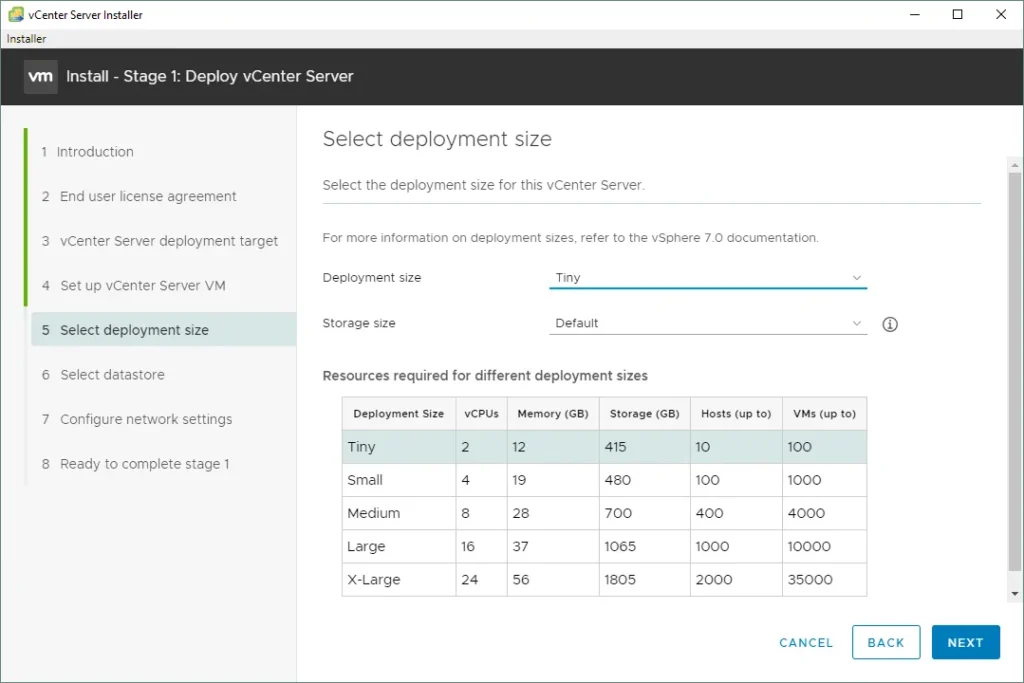
5. Select deployment size. This phase is an essential element of the setup procedure. Here, the dropdown menu is expanded for you to view the possible selections. As you choose from these diverse choices, varying levels of resources are assigned to the VM that’s being set up for vCenter.
- Tiny (up to 10 hosts, 100 VMs)
- Small (up to 100 hosts, 1000 VMs)
- Medium (up to 400 hosts, 4000 VMs)
- Large (up to 1000 hosts, 10000 VMs)
- X-Large (up to 2000 hosts, 35000 VMs)
We select the Tiny option in this VMware vCenter Server installation guide.
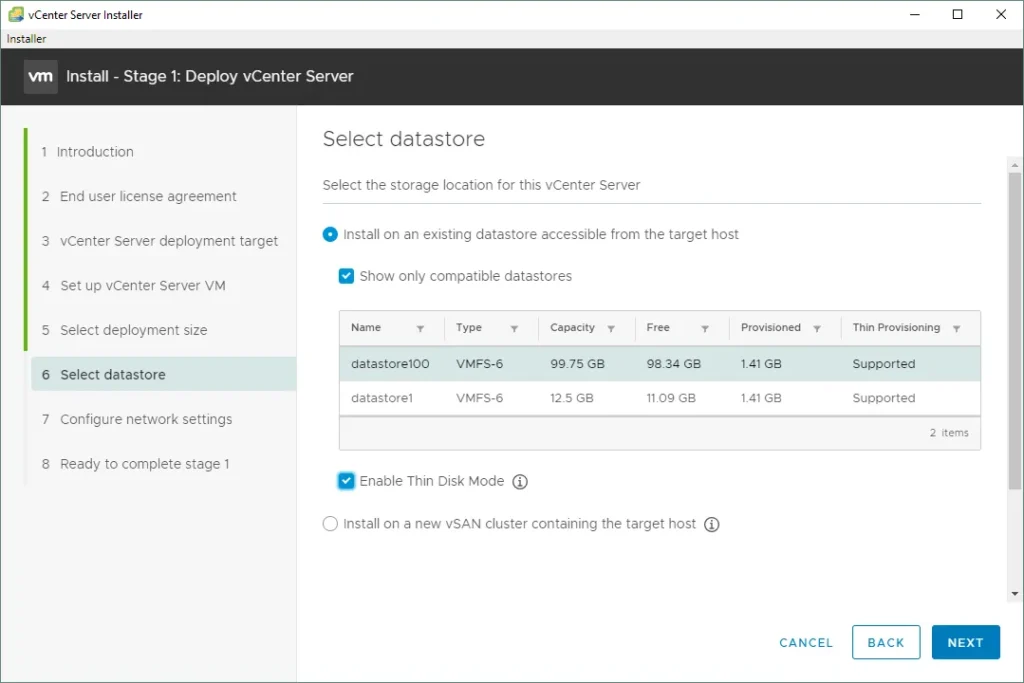
6. Select datastore. The settings you need to adjust for the ESXi host to set up the VM are as follows. At this point, you’ll establish the destination datastore for deploying the vCenter appliance. Choose the requisite datastore which has ample spare storage capacity. By activating Thin Disk Mode, you can utilize thin provisioned virtual disks for the VCSA VM, thereby conserving storage space.
7. Configure network settings. Adopt the fixed IP setup. It’s vital to ensure that your system name FQDN has a functioning DNS record, since the installation will consistently fail if the FQDN cannot be resolved. Prior to proceeding, it’s important to confirm this.
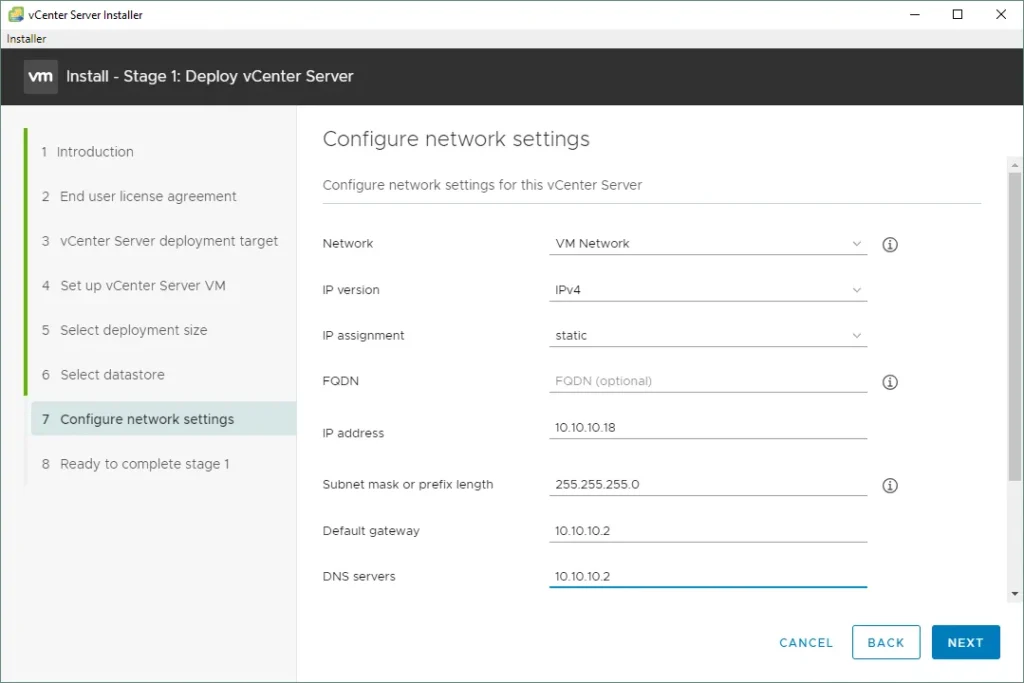
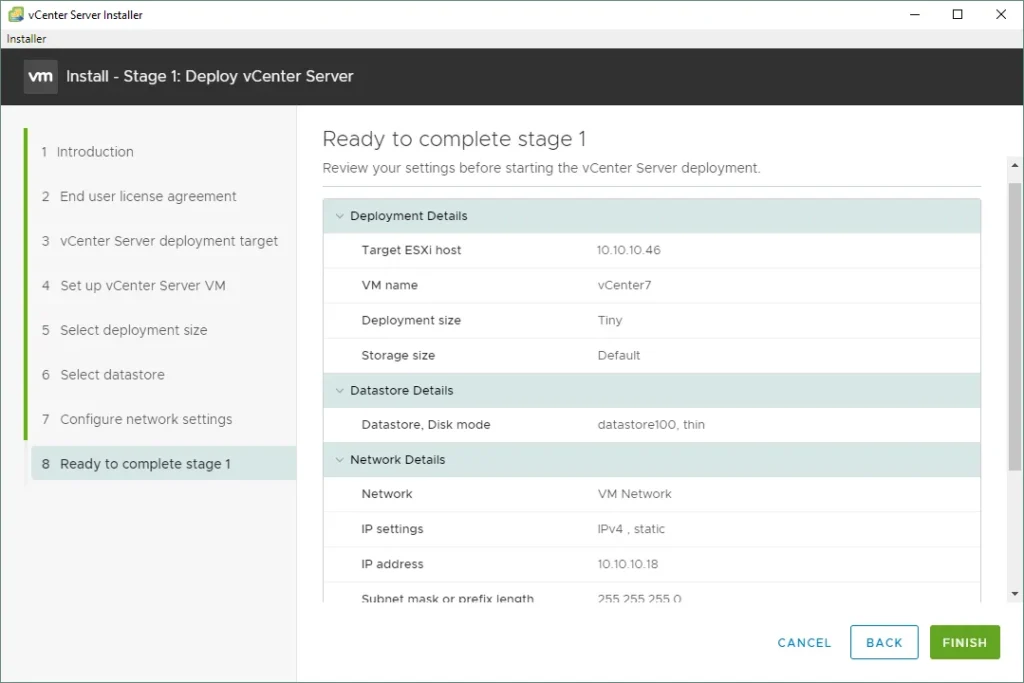
8. Ready to complete stage 1. This serves as a brief overview of the setup and tasks needed to provide the vCenter appliance VM. Verify the settings and hit Finish to wrap up the first stage.
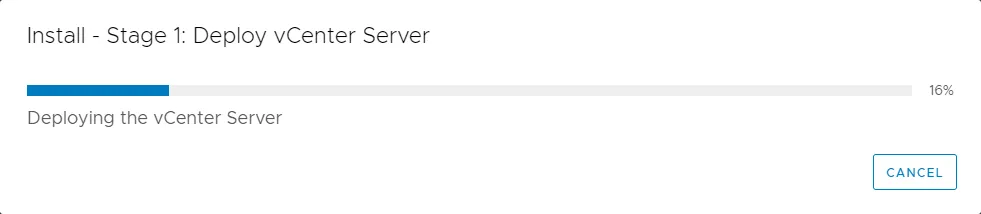
Once you select ‘Complete’, the process to implement the OVA on your ESXi host kicks off, and the progression bar will start to advance.
If there are no issues in the vCenter deployment process, especially with DNS, you should eventually get a message about successful deployment of the appliance.Click Continue to proceed with stage 2.
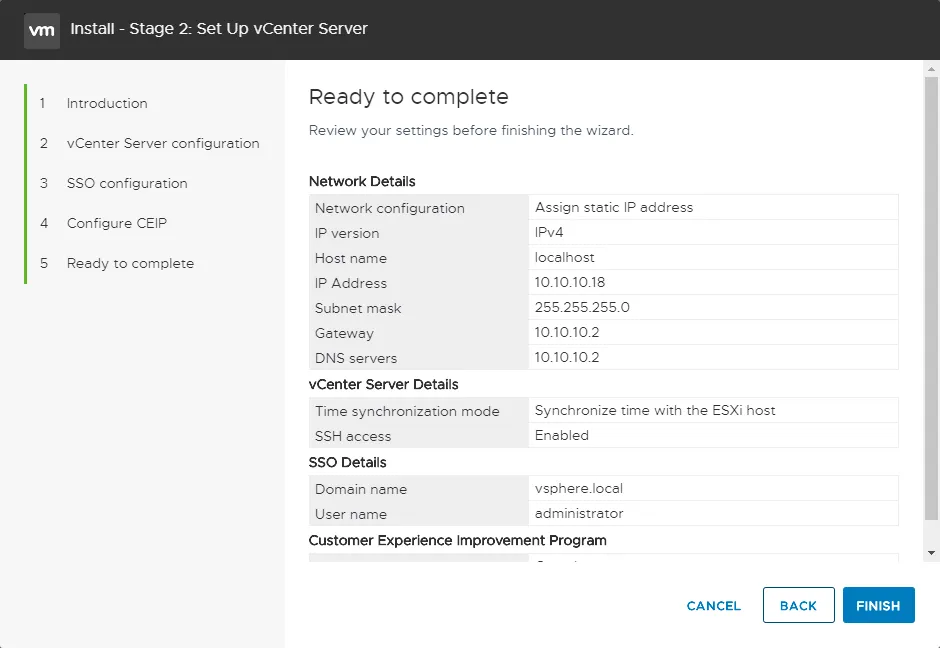
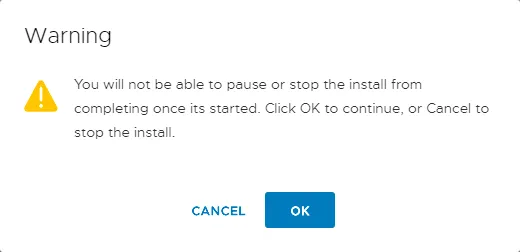
6. Take note of the alert and understand that it’s impossible to halt or take a break from the VMware vCenter server setup procedure. Press OK to proceed.
7. Wait until the VMware vCenter server installation process is completed.
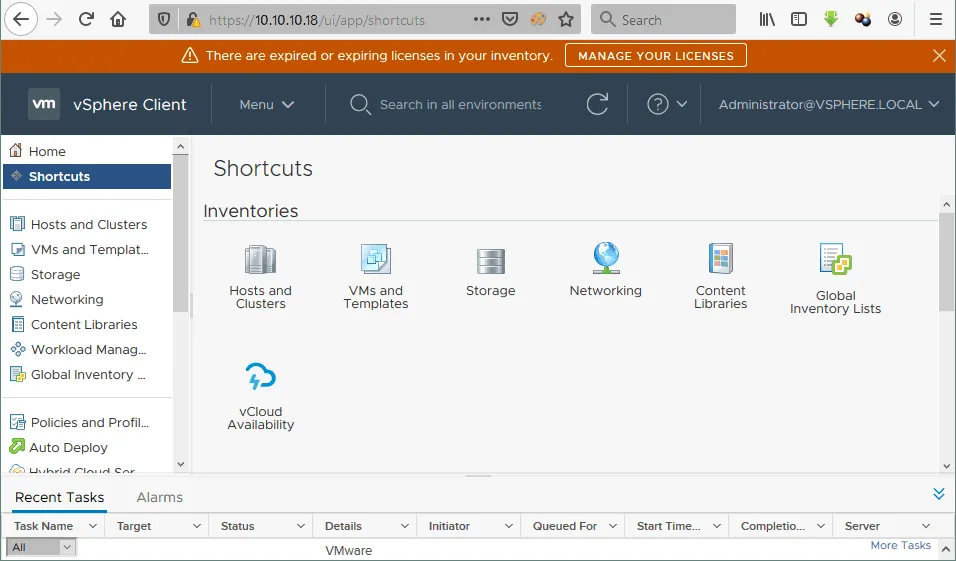
8. After finalizing the vCenter installation, you’re able to launch a web browser and access the VMware vSphere Client. Do this by inputting the IP address of the VMware VCSA that you established during the vCenter setup. For instance, navigate to https://10.10.10.18 using your web browser and sign in using the username administrator@vsphere.local. Be aware that only the HTML5 vSphere Client is currently accessible.
9. Once you’ve purchased your vCenter license, you’re free to input the vCenter license key, include ESXi hosts in the vCenter inventory, generate VMs, set up clusters, and execute other functions. A fully-functional trial period of 60 days is provided for you to activate the license.
10. Go to https://<vCenterFQDN_or_IP>:5480 in your web browser and set the root password expiration date in the administration settings (https://10.10.10.18 in our case). If your password expires, you will not be able to log in to https://<vCenterFQDN_or_IP>:5480 that contains some important VCSA settings.
VMware vCenter Server Installation Best Practices
In this manual, it’s suggested that certain ideal practices should be adhered to while setting up vCenter:
- You should ensure that your target ESXi host is appropriately provisioned with reachable datastores, networking and so on. These are essential for deploying vCenter via the wizard process.
- Before initiating the installation, make sure you have the necessary SSO domain and information. It should differ from your Active Directory domain name.
- Opting for a static IP configuration for the vCenter Server is recommended.
- Before installing vCenter, think about size requisites and resource demands.
- Contemplate on the database type you wish to proceed with (internal PostgreSQL or external Oracle database or a database on MS SQL Server).
- A plethora of options are available, even among the Linux and Windows installations.
- While working with Microsoft SQL server, it’s crucial to decide whether you’ll use SQL express installation or opt for the full-fledged SQL server.
- Ensure that your DNS is properly set up to resolve the Fully Qualified Domain Name (FQDN) of the vCenter server you wish to configure, as improper setup can lead to installation failure.
- If you’re considering installing vCenter as a VM appliance, it’s key to ponder over the high availability of that VM. Given the conundrum of running vCenter in your virtual environment, akin to a chicken-and-egg situation, it becomes indispensable to have a thorough ESXi backup plan. This plan should guarantee data protection for both vCenter-managed and standalone ESXi workloads. Lastly, keep a backup of the vCenter server in a secure location (like a disaster recovery facility).
- Select a high-performance datastore, for example, a datastore based on SSD storage devices for high performance of vCenter.
Learn more about VMware vSphere
Conclusion
VMware vCenter streamlines the administration of ESXi hosts and virtual machines, making it user-friendly and efficient. It’s crucial to frequently back up your virtual machines in the vSphere setting. The NAKIVO backup system is designed to enhance the backup procedure and safeguard all virtual machines overseen by vCenter, including those within clusters.