Physical Address
304 North Cardinal St.
Dorchester Center, MA 02124
Physical Address
304 North Cardinal St.
Dorchester Center, MA 02124
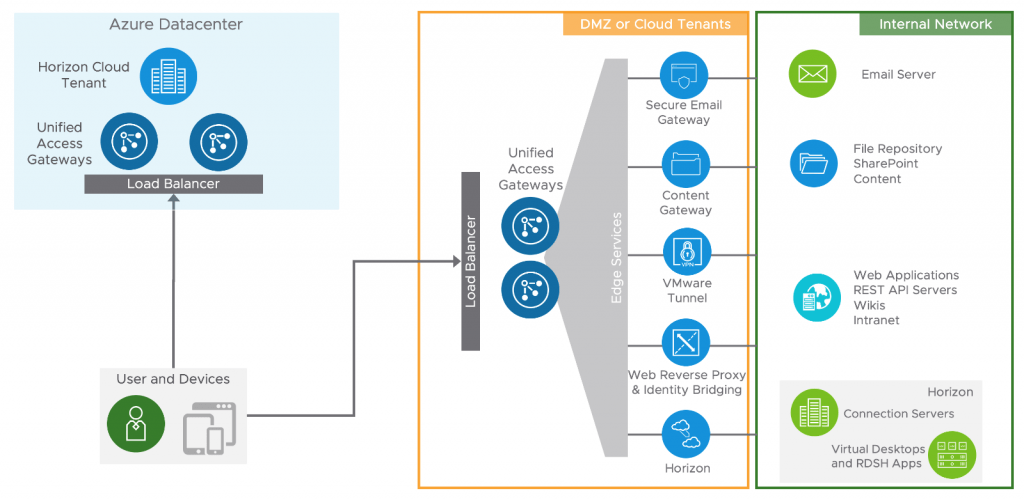
VMware Unified Access Gateway (UAG) is an appliance that acts as a security gateway for the internal network. It is normally installed in a demilitarized zone (DMZ) to ensure that the only traffic entering the corporate data center is traffic on behalf of a strongly authenticated remote user to enable secure remote access from an external network to a variety of internal resources for end users.

Unified Access Gateway or UAG is the key to VMware Horizon and Workspace ONE deployment, it provides multiple essential services for different use cases and protocols, including:

There are two ways to deploy the UAG: manually deploying the OVA through vCenter or using Powershell to automate the process. In this example, I prefer to deploy the OVA manually via vCenter.
1- Download the VMware Unified Access Gateway 2209 OVA file.
There are two versions of the Unified Access Gateway OVA, Non-FIPS version and FIPS version. Normally you need the non-FIPS version.

2- After downloading the OVF file, log in to vCenter, right-click Cluster, and select Deploy OVF Template.

3- On the Select an OVF Template page, select the Local file and click Upload files. Navigate to the downloaded file and click Open. The selected file will be displayed and click Next.

4- Give a proper name and select a folder for the virtual machine and click Next.

5- On the Select a compute resource page, select a host or cluster and click Next.

6- On the Review Details page, click Next.

7- On the Configuration page, select your desired deployment configuration and click Next. Unified Access Gateway supports deployments with one, two, or three Network Interface Cards (NICs).

You can find more info about the type of deployment configuration here. In a two-NIC deployment as shown in the picture above, One NIC is used for unauthenticated Internet access or External network and the other NIC is used for authenticated back-end and management traffic. This type of deployment is suitable for production environments. I have also chosen this type of configuration for this example.

8- On the Select storage page, select virtual disk format and a data store and then click Next.

9- On the Select networks page, select the destination of each source and click Next. Because I selected Two-NIC configurations, the Internet should go through one NIC, and management and backend traffic should go through another NIC.

10- On the Customize template page, set IPMode STATICV4 for NIC1 and NIC2 and scroll down.

11- Enter the IPv4 address of NIC1 (eth0) used for the internet network (external network) interface and scroll down.

12- Enter DNS addresses, Subnet Mask, and Default Gateway. (I pointed to the internal DNS server, which is located in the DMZ)

13- Enter the IPv4 address of NIC2 (eth1) used for the management and backend network interface and scroll down.

14- Enter the Unified Gateway Appliance Name and scroll down.

15-Specify a username and password for the UAG VM for access to the console and scroll down.

16- Enter the password for the admin user.

17- Leave other settings as default and click Next and then Finish. After the virtual machine is deployed successfully, power it on. It should detect both IP addresses you entered during deployment.

1- Access to the UAG Administration Console Login using the IP address of UAG with port 9443.
Https://IP of UAG:9443/admin/index.html

2-Log in with the admin user and the password you entered during deployment. After A successful login, you redirect to the window where you can import settings or manually configure the UAG appliance. Click Select under Configure Manually.

3- Under General Settings, click on the show toggle next to Edge Service Settings, it switches to green after you clicked, and then click the gear icon next to Horizon Settings.

4- Enable Horizon and configure the following parameters and click Save.

In the Connection Server URL field, enter the FQDN of the connection server or load balancer if your connection server is behind the load balancer. Since my domain contains .local and it appears that the new systemd-resolved method uses .local exclusively for multicast DNS, I need to edit resolve.conf. For more information and instructions visit this link.

In the Connection Server URL Thumbprints field, enter “sha1=Horizon Certificate Thumbprint “. To obtain the thumbprint, browse to the Horizon Connection and click the certificate to open the certificate properties, on the Details tab, you can find the thumbprint.

Enable PCoIP, Blast, and Tunnel.
In the PCoIP External URL field, enter the external IP address of UAG with the port number (4172). If you are using a load balancer to balance between multiple UAGs, enter the IP address of the load balancer. Clients that use the PCoIP display protocol can use the PCoIP Secure Gateway.
In the Blast External URL field, enter the FQDN of the load balancer or UAG (https://:8443). It enables users to make secure connections through Blast Secure Gateway.
In the Tunnel External URL field, enter the FQDN of the load balancer or UAG (https://:443). Clients that use the RDP display protocol can use the secure tunnel.


We have detected that you are using extensions to block ads. Please support us by disabling these ads blocker.