vCenter Deployment and Setup
Table of Contents
Introduction to vCenter Deployment and Setup
VMware vCenter Server is the centralized platform for managing VMware vSphere environments, offering administrators a powerful and intuitive way to control all aspects of virtual infrastructure. Whether managing a handful of virtual machines (VMs) or thousands across different locations, vCenter Server provides the necessary tools to streamline operations, enhance security, and enable scalability within a virtualized data center.
Deploying and setting up vCenter is a critical first step in building a stable, efficient VMware environment. This process involves careful planning, understanding system requirements, and selecting the appropriate deployment model for the organization’s needs. With deployment options like the vCenter Server Appliance (VCSA) and installation on Windows Server, administrators have the flexibility to choose the setup that best fits their infrastructure and operational preferences.
In this guide, we’ll cover the entire vCenter deployment and setup process, from determining system requirements to completing the initial configurations. By following this roadmap, you’ll be equipped to install, configure, and optimize your vCenter environment for seamless management of virtualized resources. Whether you’re new to VMware or expanding an existing setup, this comprehensive approach ensures you’re prepared to get the most from your vCenter Server deployment.
System Requirements and Compatibility
Before deploying VMware vCenter, it’s essential to understand its system requirements and compatibility to ensure a successful setup and avoid potential issues.
Hardware Requirements:
- CPU: Minimum of 2 CPUs; 4 CPUs recommended for production.
- Memory (RAM): 12-16 GB is the minimum, depending on the deployment size; larger environments may need up to 28 GB.
- Disk Space: The vCenter Server Appliance (VCSA) requires between 300 GB and 2 TB of disk space, depending on the environment size.
- Network: A reliable 1 Gbps network connection is recommended; for larger environments, 10 Gbps may be necessary.
- Software Requirements:
- Operating System: For VCSA, a Linux-based virtual appliance is provided by VMware, so no separate OS is required. For Windows-based vCenter, it is compatible with Windows Server (specific versions vary depending on vCenter version).
- Database: VCSA uses the embedded PostgreSQL database by default, supporting up to 2,000 hosts and 35,000 virtual machines. External databases (such as SQL Server and Oracle) are supported only with the Windows version.
- Compatibility:
Ensure compatibility with ESXi hosts and VMware tools in your environment. Using the VMware Compatibility Guide can help you verify if your hardware, storage, and network devices are supported.
vSphere License: Ensure you have the appropriate vSphere license to run vCenter and associated services.
vCenter Deployment Models
VMware offers two main deployment models for vCenter to suit different types of infrastructures:
Embedded Platform Services Controller (PSC)
The Embedded PSC model means that both the Platform Services Controller (PSC) and vCenter Server are combined into a single virtual appliance or server.
Best for: Smaller environments where high availability and fault tolerance are less critical.
Advantages: Simpler to deploy and manage. All vCenter services, including Single Sign-On (SSO), licensing, and certificate management, are consolidated.
Limitations: Scalability is limited compared to the external PSC model.
External Platform Services Controller (PSC)
In the External PSC model, the PSC is deployed as a separate virtual appliance or server, distinct from the vCenter Server.
Best for: Large-scale environments that require multiple vCenter instances, high availability, or fault tolerance.
Advantages: Allows you to set up Enhanced Linked Mode (ELM), which enables multiple vCenter instances to be managed as a single entity.
Limitations: More complex to deploy and manage; requires additional configuration and resources.
Installing vCenter Server Appliance (VCSA)
The VCSA is the preferred deployment option because it’s simple, Linux-based, and includes an embedded database. Follow these steps to install the VCSA.
Step-by-Step Installation Guide for VCSA:
Download the VCSA ISO: Get the VCSA installation ISO from VMware’s website and mount it on the machine you’ll use for deployment.
Run the Installer: Open the ISO and navigate to the vcsa-ui-installer directory. Run the installer executable (Windows, Linux, or MacOS versions available).
Choose Deployment Option:
- Select Install to start a new vCenter Server Appliance installation.
- Stage 1: Deploy the appliance. This includes basic setup of the VM for the VCSA.
Specify Deployment Target:
- Connect to the ESXi host or an existing vCenter where you want the VCSA deployed.
- Accept the certificate warning to proceed.
Configure Appliance Details:
- VM Name: Provide a unique name for the VCSA VM.
- Root Password: Set a secure root password.
Choose Deployment Size:
- Select the size of the deployment (Tiny, Small, Medium, Large, or X-Large) based on your environment.
Select Storage and Network Settings:
Choose storage type (Default or Thin provisioned). Configure network settings (IP address, DNS, Gateway, and Subnet Mask).
Complete Deployment: Review and confirm your settings, then start the deployment. Once complete, Stage 1 is done.
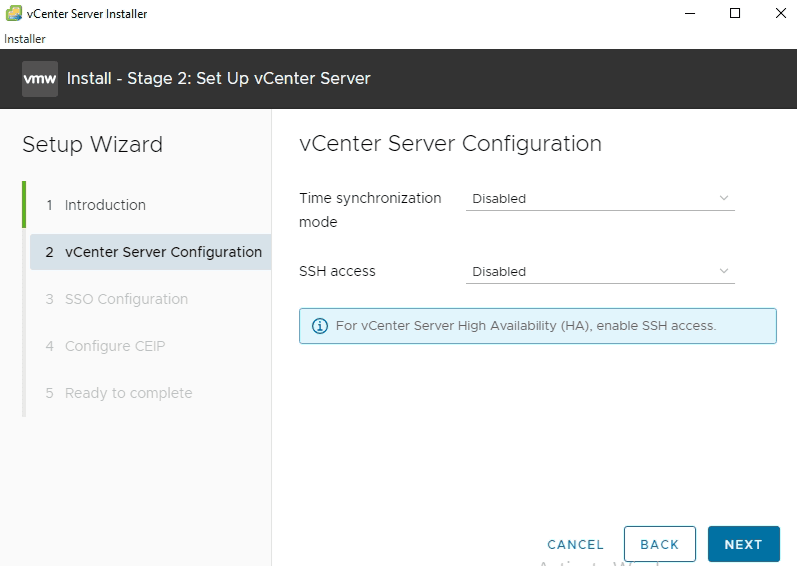
Complete Initial Configuration (Stage 2):
Configure the SSO domain (Single Sign-On), set the SSO password, and configure time synchronization.

- Optionally, enable SSH for troubleshooting and management.
- Complete and wait for vCenter to initialize.
Once completed, you can log into the vCenter Server through the vSphere Web Client.
Completion and First Login:
Once the deployment completes, open a web browser and log in to the vSphere Client. We assigned ip address 192.168.100.114 to perform initial configurations. Type username and password to login to the vCenter.
vCenter Server Installation on Windows
While VCSA is the preferred method, vCenter Server on Windows is still supported in some environments, allowing you to deploy vCenter on a Windows Server.
Installation Process for vCenter Server on Windows
Prepare the Windows Server:
Install a compatible version of Windows Server. Ensure network connectivity and join the Windows Server to an Active Directory domain if required.
Download the vCenter Server Installer:
Download the vCenter installer from the VMware website and extract the ISO.
Run the Installer:
Launch the installer and select Install vCenter Server. Follow the prompts to install the Platform Services Controller (PSC) or External PSC if applicable.
Database Setup:
For environments with high scalability requirements, you may configure an external database like SQL Server or Oracle. Otherwise, vCenter Server will use its embedded PostgreSQL database.
Configure vCenter Settings:
Set up the SSO domain, time synchronization, and other basic settings. After installation, open the vSphere Client or vSphere Web Client to perform initial configuration tasks.
Initial Configuration Steps After Installation
After deploying vCenter, there are several essential configuration steps to ensure proper operation.
Step-by-Step Guide for Initial Configuration:
Review and configure the firewall and security settings to protect the vCenter environment.
Access the vSphere Web Client:
Open a browser and log in to the vSphere Web Client using the IP or FQDN of the vCenter Server.
Log in with the administrator account created during the setup.
Add License Key:
Navigate to Administration > Licensing. Add and assign your vCenter Server license to avoid expiration of the trial period.
Add ESXi Hosts:
Go to Hosts and Clusters. Right-click on the datacenter and select Add Host.
Enter the ESXi host IP address, credentials, and complete the wizard to add hosts under management.
Configure Datacenter and Cluster:
In the Hosts and Clusters view, create a datacenter and cluster. Add hosts to the cluster and enable features like DRS and HA for automated workload management.
Network Configuration:
Set up network configurations, including distributed switches if needed. Configure port groups, VLANs, and any specific network policies.
Set Up Storage:
Add and configure datastores for VM storage. Use either local storage, NFS, or shared SAN storage depending on your environment.
Set Up Backup and Monitoring:
Configure a backup schedule for the vCenter Server Appliance to avoid data loss. Set up alarms, notifications, and performance monitoring to detect issues early.
Set Up SSO and User Management:
Integrate with Active Directory for easier user management. Create roles and permissions to grant the necessary access to administrators and operators.
Configure Time Synchronization:
Ensure time synchronization is correctly set up using NTP to maintain time consistency across all hosts and VMs.
Enable Enhanced Security Settings:
Enable multifactor authentication (MFA) if possible.
Conclusion
Setting up VMware vCenter involves understanding system requirements, selecting the right deployment model, and configuring settings to match your environment’s needs. By following the steps in this guide, you can create a stable and scalable vCenter setup that allows for efficient management of your virtual infrastructure. These steps ensure that your vCenter Server is configured with best practices in mind, providing a strong foundation for managing vSphere resources effectively.


[…] Use the vCenter Server installer to deploy a new appliance. […]