In this article we will learn how to change VMWARE ESXi hostname through different methods. The ESXi hostname refers to the unique name assigned to an ESXi host, which is a type-1 hypervisor developed by VMware for deploying and serving virtual computers. The hostname is used to identify the ESXi host within a network environment and is essential for network communication and management of the virtualization infrastructure. It’s important to note that changing the ESXi hostname should be done carefully to avoid any disruption to the network and virtual machines hosted on the ESXi host.
There are several reasons why you might need to change the hostname of an ESXi host.
Organizational Naming Conventions
The need to align the ESXi hostname with organizational naming standards or conventions may arise. This can help maintain consistency and clarity within the IT infrastructure.
Mergers and Acquisitions
In scenarios involving mergers, acquisitions, or organizational restructuring, it may be necessary to change the ESXi hostname to reflect the new organizational structure or naming conventions.
Resolving Naming Conflicts
If there are naming conflicts within the network, changing the ESXi hostname can help avoid such conflicts and ensure smooth network operations.
Security Best Practices
Changing the hostname can be part of security best practices to prevent unauthorized access or to mitigate potential security risks associated with predictable hostnames.
Rebranding or Renaming
Organizations undergoing rebranding or those that need to rename their IT assets for business reasons may need to change the ESXi hostname to reflect the new branding or naming conventions.
Changing ESXi hostname
To change esxi hostname we will use different approaches. First approach is to change through vCenter server.
Accessing the ESXi Host
Log in to the ESXi host using the vSphere Client or the vSphere Web Client.
Navigating to the Host Configuration Tab
In the vSphere Client, select the ESXi host from the inventory and navigate to the “Configure” tab.
Changing the Hostname
Under the “System” section, click on “General” to expand the general system settings.
Click on “Edit” in the “System” section to change the hostname.
Entering the New Hostname
In the “Edit Settings” dialog, enter the new hostname for the ESXi host in the “System Name” field.
Applying the Changes
Click “OK” to save the new hostname.
Verifying the Changes
After changing the hostname, it’s important to verify the changes by pinging the new hostname to ensure it resolves to the correct IP address.
Rebooting the ESXi Host (if necessary)
In some cases, a reboot of the ESXi host may be required for the hostname change to take effect. This can be done through the vSphere Client or Web Client by selecting the host and clicking “Reboot.”
Updating DNS
If the ESXi host is registered in DNS, ensure to update the DNS record with the new hostname.
By following these steps, you can successfully change the hostname of an ESXi host.
Change hostname through ssh
To change the hostname of an ESXi host through SSH, you can follow these steps.
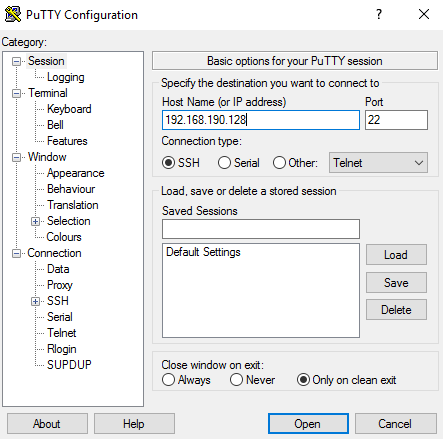
SSH into the ESXi host using an SSH client such as PuTTY. We set ip address of Esxi is 192.168.190.128

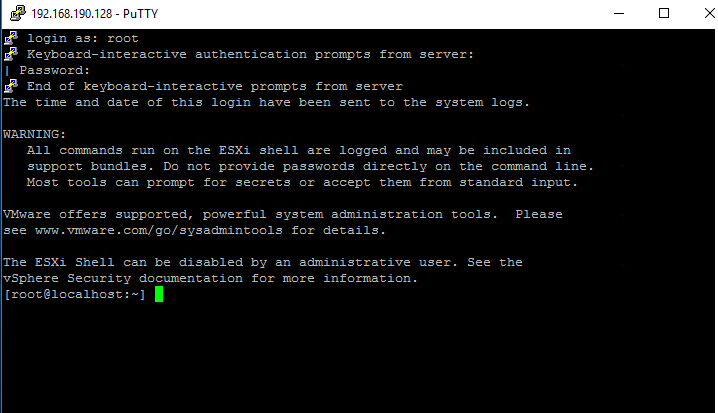
Enter Login name and password. Hit enter to login as root user.

Once logged in, type the following command to change the hostname of Esxi.
esxcli system hostname set –host=newhostname

Replace “newhostname” with the desired hostname for the ESXi host. By default, our Esxi hostname was set to localhost during installation. Now we set it to esxi.
After running the command, you can verify the change by running.
esxcli system hostname get

This command will display the current hostname. Optionally, you may need to update the /etc/hosts file to reflect the hostname change. You can edit this file using a command-line text editor like vi or nano.

We can see that our Esxi hostname has been changed from hostname to Esxi.
Restart the ESXi host for the changes to take effect
reboot
Ensure to perform these steps during a maintenance window, as changing the hostname might temporarily disrupt services running on the host.


