Physical Address
304 North Cardinal St.
Dorchester Center, MA 02124
Physical Address
304 North Cardinal St.
Dorchester Center, MA 02124
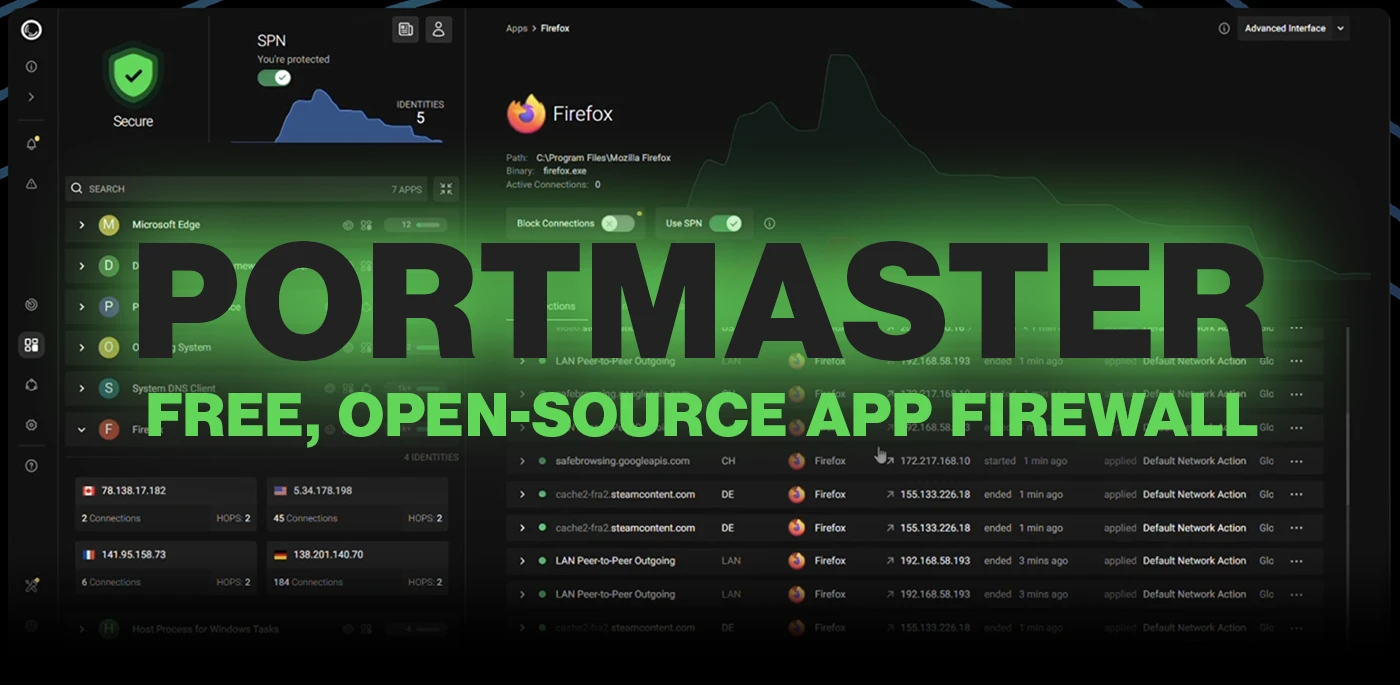
Every time you connect to the internet, dozens of applications on your computer are making network connections you almost certainly have no visibility into. Your browser is obvious, but what about your code editor phoning home with telemetry? Your PDF reader checking for updates? Background services reaching out to analytics servers? On a standard Windows or Linux desktop, without specialized tooling, all of this outbound traffic happens silently — there is no system-level view of which applications are connecting to what, and no easy mechanism to control it on a per-application basis.
Portmaster is a free, open-source application firewall developed by Safing, an Austrian company based in the EU, that solves exactly this problem. Unlike traditional network firewalls that think in terms of ports and IP ranges, Portmaster operates at the application level — it knows which process is making each network connection and can enforce different rules per application. It monitors all connections in real time, blocks trackers and malvertising domains system-wide (including inside apps, not just browsers), encrypts your DNS queries by default, and gives you granular control over exactly what each application on your computer can and cannot reach on the network.
This guide walks you through everything you need to know to get started with Portmaster: what it does and how it works under the hood, how to install it on Windows and Linux, how to navigate the interface, how to configure DNS, how to set application-specific rules, how to use filter lists for ad and tracker blocking, and how to troubleshoot the most common issues. Whether you are new to application firewalls or migrating from another solution, this guide covers the complete getting-started journey.
| PLATFORM NOTE | Portmaster is available for Windows and Linux as of 2026. macOS support has been discussed but is not yet available due to the complexity of macOS network stack integration. On Linux, Portmaster requires kernel 5.7 or newer. On Windows, it uses the Windows Filtering Platform (WFP) kernel driver. Both platforms receive equal feature support. |
Linux installation requires slightly more attention, particularly around kernel version compatibility and potential conflicts with existing DNS services.
Verify these before running the installer. Check kernel version — 5.7+ required
uname -r
Check if another service is using port 53 (DNS)
sudo ss -tulpn | grep ':53'
If systemd-resolved is using port 53, you'll need to reconfigure it after Portmaster installation covered in the DNS section below.
Confirm NetworkManager is running (recommended).
systemctl status NetworkManager
| PORT 53 CONFLICT | systemd-resolved on Ubuntu and many other modern Linux distributions listens on port 53 by default. Portmaster also needs port 53. This conflict causes DNS failures after Portmaster installation. The fix is to disable systemd-resolved’s DNS stub listener — covered step-by-step in the DNS Configuration section below. Do not skip this step on Ubuntu. |
Download the latest .deb package from safing.io/download or from the GitHub Releases page at github.com/safing/portmaster/releases.
Install the package using dpkg or apt:
Install with dpkg
sudo dpkg -i portmaster_VERSION_amd64.deb
Or double-click the .deb file in your file manager to install via GUI. Reboot the system. The Core Service should start automatically on the next boot
sudo reboot
After reboot, verify the service is running:
systemctl status portmaster
Launch the Portmaster UI from your application menu, or start it from the command line:
portmaster-app
Download the latest .rpm package from safing.io/download.
Install the package:
sudo rpm -i portmaster_VERSION_amd64.rpm
# Or use dnf:
sudo dnf install ./portmaster_VERSION_amd64.rpm
Reboot and verify the service status as shown for the Debian installation above.
If the Portmaster service does not start automatically after installation, enable it explicitly:
# Enable Portmaster to start at boot
sudo systemctl enable portmaster
Start it now without rebooting
sudo systemctl start portmaster
Verify it is running
sudo systemctl status portmaster
The status output should show: Active: active (running). If it shows failed or dead, check the journal:
journalctl -u portmaster -n 50 --no-pager
If you want that is intuitive and easy – Portmaster might be the one.
sudo pacman -Syu portmaster
Launch the application from your systems launcher panel
Compared to OpenSnitch, setting up Portmaster is extremely easy, You are asked a couple of questions then you are all set.
The default free version of the service it provides
The applications provides extensive information about your connections.


| Feature | Traditional Firewall | Portmaster |
|---|
| App-level control | Limited | ✅ Full control |
| Real-time visibility | ❌ | ✅ |
| Tracker blocking | ❌ | ✅ |
| DNS protection | ❌ | ✅ |
| User-friendly UI | ⚠️ Basic | ✅ Advanced |
Portmaster occupies a unique position in the open-source security tool landscape: powerful enough to provide genuine application-level network control for security-conscious users, but designed with sensible defaults so that a complete beginner can install it, leave it running with default settings, and immediately benefit from encrypted DNS and system-wide tracker blocking without configuring a single rule. That combination powerful when you want it, invisible when you do not — is what makes it worth installing as a first step on any Windows or Linux system.
We have detected that you are using extensions to block ads. Please support us by disabling these ads blocker.