Integrating vCenter with Windows Server ADFS

What is Identity Federation in vCenter
As enterprises move toward centralized identity and access management, integrating VMware vCenter with Windows Active Directory Federation Services (ADFS) offers a powerful solution. This integration enables Single Sign-On (SSO) capabilities using SAML 2.0, improving user experience, security, and operational efficiency in hybrid cloud environments.
In this guide, we’ll walk you through the process of integrating VMware vCenter Server with Windows ADFS, ensuring your infrastructure benefits from federated identity and seamless authentication.
Table of Contents
📌What is SAML-Based Identity Federation?
SAML (Security Assertion Markup Language) is an XML-based open standard used for single sign-on (SSO) and secure federated identity management. It allows identity and access information to be securely transferred between an Identity Provider (IdP) and a Service Provider (SP) in this case, AD FS (as IdP) and VMware vCenter (as SP).
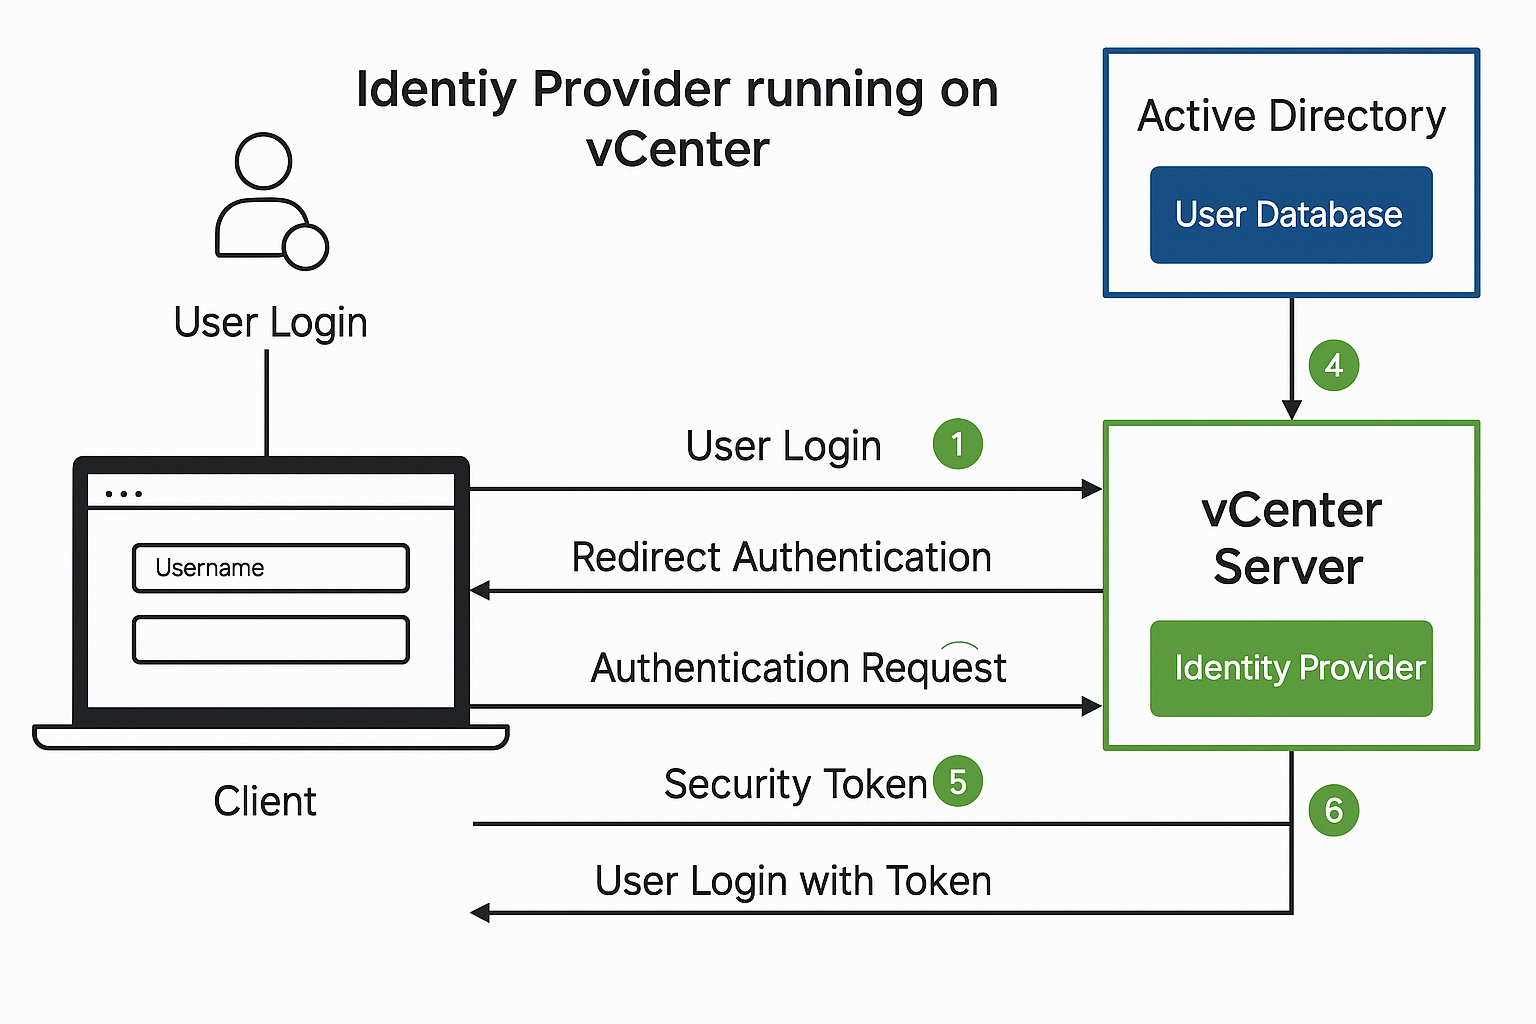
Here’s how it works in a real-world setup: When a user attempts to log into the vCenter UI, they’re automatically redirected to the AD FS login portal. This is where the magic of SAML begins. The user enters their corporate credentials, which AD FS then authenticates against Active Directory. Once verified, AD FS generates a SAML assertion a digitally signed XML document that contains the user’s identity information and, optionally, their group memberships.
🔐How the SAML Flow Works
The user navigates to https://<vcenter-FQDN>/ui and selects the External Identity Provider login option. vCenter redirects the user to the AD FS login page, where the user enters their Active Directory credentials. AD FS authenticates the user using Active Directory (via Kerberos or NTLM, depending on the configuration).
Upon successful authentication, AD FS generates a SAML assertion (a signed XML file) that includes:
- User’s identity (usually via
NameID) - Group membership or roles (optional but often used)
- Validity period
- Digital signature for integrity
The SAML token is returned to vCenter via the user’s browser (using POST or Redirect binding).
vCenter validates the signature, extracts the user identity and any group information, then:
- Maps the user to a local vCenter role if a match exists
- Grants appropriate access based on that role
Benefits of Using AD FS for Identity Federation in vCenter
- No LDAP required: No need to add AD as an identity source manually
- Secure authentication: Uses trusted certificates and HTTPS
- Centralized management: Control user permissions via AD groups
- Supports MFA: If MFA is enforced in AD FS, vCenter respects it
Requirements to Enable Identity Federation in vCenter
Before starting, ensure:
- vCenter Server is version 7.0 or later
- A supported Identity Provider like Azure AD or Okta. In Our case we will be using Windows Server 2022.
- Access to VMware vSphere Client
- An SSL certificate on vCenter (recommended for production)
- Enterprise or higher license tier may be required
Step-by-Step: Identity Federation with AD FS in vCenter
🔁Step 1: Install and Configure AD FS on Windows Server 2022
- Open Server Manager
- Add the Active Directory Federation Services role
- Follow the post-installation wizard to create the first AD FS farm
- Use a valid SSL certificate (can be self-signed for lab)
- Set vmorecloud.com as your Federation Service Name
Verify access by opening:
https://fs.vmorecloud.com/adfs/ls/IdpInitiatedSignOn.aspx
📤 Step 2: Create a Relying Party Trust for vCenter
- Open AD FS Management
- Navigate to Trust Relationships > Relying Party Trusts
- Click Add Relying Party Trust
- Choose Claims Aware
- Import vCenter’s SAML metadata:
- Download from:
https://<vcenter-FQDN>/ui/saml/websso/sso/metadata
- Download from:
- Assign a Display Name (e.g.,
VMware vCenter) - Set access control policy (e.g., permit all authenticated users)
🎯 Step 3: Create Claim Rules in AD FS
- After trust creation, open Edit Claim Rules
- Add rule:
- Send LDAP Attributes as Claims
- Map:
SAM-Account-NametoName IDToken-Groups - Unqualified NamestoGroups
Step 4: Configure Identity Federation in vCenter
- Log in to vSphere Client
- Go to:
Administration > Single Sign-On > Configuration > Identity Provider - Under Identity Federation, click “Setup”
- Upload Federation Metadata XML from AD FS:
- URL:
https://fs.vmorecloud.com/FederationMetadata/2007-06/FederationMetadata.xml
- URL:
- Review issuer ID, endpoint URL, and signing certificate
- Click Finish
Step 5: Assign Permissions in vCenter
- Navigate to:
Menu > Administration > Access Control > Global Permissions - Click Add
- In Domain, select the federated domain (e.g.,
vmorecloud.com) - Add AD users or groups (e.g.,
vmorecloud.com\vmadmins) - Assign roles such as Administrator, Read-Only, etc.
Step 6: Test Login
- Open browser in incognito
- Navigate to:
https://<vcenter-FQDN>/ui - Choose External Identity Provider
- You’ll be redirected to the AD FS login page
- Login using your AD credentials and access vCenter
Conclusion
By federating vCenter with your Windows Server 2022-based AD FS, you unlock modern, secure authentication without needing cloud platforms like Azure. It keeps access centralized, supports existing security policies, and reduces identity management complexity.


