- Advertisement -
Since updating my VMware vSphere Packer build template for Windows Server 2025 (you can read that here: Windows Server 2025 Packer Build for VMware vSphere), I decided to tackle Proxmox, which wasn’t as straightforward. I wanted to share with you what I have come up with for automated installations of Windows Server 2025 in Proxmox VE Server. There are a few moving parts, but this is the first stab at getting some automation with Server 2025 into my Proxmox environment.
Table of Contents
Overview of steps
- Advertisement -
As the old saying goes, “there is more than one way to skin a cat”. So keep that in mind as there may be a better way to do some of this and I generally start out with automation a bit rough around the edges and then you find better ways to do things. But, in my home lab environment, this definitely got me up and running with an automated Packer build for Windows Server 2025 running on Proxmox.
- Create an API token
- Download ISOs and Tools
- Modify your Windows Server 2025 ISO to include additional files
- Create your Packer files
- Run packer init and packer build
1. Create an API token
The first step is to create an API token in Proxmox. This is so Packer can authenticate and interact with the Proxmox API endpoint. You can find your tokens in Datacenter >


You will only be shown the API token once, so we need to copy this value and paste it somewhere to use in our sensitve-variables.pkr.hcl file which I will show below.
2. Download ISOs and Tools
There are two ISOs that we need to download:
First, I downloaded the latest Windows Server 2025 ISO. You can get that from the Microsoft Evaluations Center if you want. After you get your ISO, you will want to have the Windows Assessment and Deployment Kit downloaded and installed so you have access to the WADK Deployment Tools, including the Command Prompt: Deployment and Imaging Tools Environment. This will make creating a custom ISO extremely easy and painless.
3. Modify your Windows Server 2025 ISO to include additional files
This is the step that I am not too thrilled about since I would rather not have to mess with the media and just download the ISO and be done with that part. However, with the proxmox-iso packer module, I just kept running into limitation after limitation with getting the files where I needed them. So, this is the “sledgehammer” approach to solve the problem.
Mount the downloaded Windows Server 2025 ISO in Windows or another OS where you can literally copy the files to a folder. I am using Windows, so I mounted the ISO in Windows Explorer and copied the files to a folder on my D:\ drive which has a lot of storage.

Now, there are 3 mods we need to make to this folder that contains the “copied” Windows Server 2025 files:
- Add the autounattend.xml file
- Add the setup.ps1 file
- Add the VirtIO drivers to a $WinpeDriver$ folder in the root of the ISO
autounattend.xml
Ok let’s look at the autounattend.xml file. Below is the generic file that I am using. I have bolded a few places to make it a bit easier to pick out. You need to change the passwords to what you want them to be and also the d:\setup.ps1 is the drive letter of the additional ISO that I mounted in my environment. If yours is different using my packer build file, you will need to adjust accordingly. Also, the product key is the documented Microsoft KMS key for Windows Server 2025 standard.
<?xml version="1.0" encoding="utf-8"?>
<unattend xmlns="urn:schemas-microsoft-com:unattend">
<settings pass="windowsPE">
<component name="Microsoft-Windows-International-Core-WinPE" processorArchitecture="amd64" publicKeyToken="31bf3856ad364e35" language="neutral" versionScope="nonSxS" xmlns:wcm="http://schemas.microsoft.com/WMIConfig/2002/State" xmlns:xsi="http://www.w3.org/2001/XMLSchema-instance">
<SetupUILanguage>
<UILanguage>en-US</UILanguage>
</SetupUILanguage>
<InputLocale>en-US</InputLocale>
<SystemLocale>en-US</SystemLocale>
<UILanguage>en-US</UILanguage>
<UserLocale>en-US</UserLocale>
</component>
<component name="Microsoft-Windows-Setup" processorArchitecture="amd64" publicKeyToken="31bf3856ad364e35" language="neutral" versionScope="nonSxS" xmlns:wcm="http://schemas.microsoft.com/WMIConfig/2002/State" xmlns:xsi="http://www.w3.org/2001/XMLSchema-instance">
<DiskConfiguration>
<Disk wcm:action="add">
<CreatePartitions>
<CreatePartition wcm:action="add">
<Type>EFI</Type>
<Size>512</Size>
<Order>1</Order>
</CreatePartition>
<CreatePartition wcm:action="add">
<Extend>false</Extend>
<Type>MSR</Type>
<Order>2</Order>
<Size>128</Size>
</CreatePartition>
<CreatePartition wcm:action="add">
<Order>3</Order>
<Type>Primary</Type>
<Extend>true</Extend>
</CreatePartition>
</CreatePartitions>
<ModifyPartitions>
<ModifyPartition wcm:action="add">
<Format>FAT32</Format>
<Order>1</Order>
<PartitionID>1</PartitionID>
</ModifyPartition>
<ModifyPartition wcm:action="add">
<Order>2</Order>
<PartitionID>2</PartitionID>
</ModifyPartition>
<ModifyPartition wcm:action="add">
<Format>NTFS</Format>
<Label>Windows</Label>
<Order>3</Order>
<PartitionID>3</PartitionID>
</ModifyPartition>
</ModifyPartitions>
<DiskID>0</DiskID>
<WillWipeDisk>true</WillWipeDisk>
</Disk>
</DiskConfiguration>
<ImageInstall>
<OSImage>
<InstallFrom>
<MetaData wcm:action="add">
<Key>/IMAGE/NAME</Key>
<Value>Windows Server 2025 Standard (Desktop Experience)</Value>
</MetaData>
</InstallFrom>
<InstallTo>
<DiskID>0</DiskID>
<PartitionID>3</PartitionID>
</InstallTo>
<WillShowUI>OnError</WillShowUI>
<InstallToAvailablePartition>false</InstallToAvailablePartition>
</OSImage>
</ImageInstall>
<UserData>
<AcceptEula>true</AcceptEula>
<ProductKey>
<WillShowUI>Never</WillShowUI>
<Key>TVRH6-WHNXV-R9WG3-9XRFY-MY832</Key>
</ProductKey>
</UserData>
</component>
</settings>
<settings pass="specialize">
<component name="Microsoft-Windows-Shell-Setup" processorArchitecture="amd64" publicKeyToken="31bf3856ad364e35" language="neutral" versionScope="nonSxS" xmlns:wcm="http://schemas.microsoft.com/WMIConfig/2002/State" xmlns:xsi="http://www.w3.org/2001/XMLSchema-instance">
<TimeZone>Central Standard Time</TimeZone>
</component>
<component name="Microsoft-Windows-Deployment" processorArchitecture="amd64" publicKeyToken="31bf3856ad364e35" language="neutral" versionScope="nonSxS" xmlns:wcm="http://schemas.microsoft.com/WMIConfig/2002/State" xmlns:xsi="http://www.w3.org/2001/XMLSchema-instance">
<RunSynchronous>
<RunSynchronousCommand wcm:action="add">
<Description>disable product key request</Description>
<Order>1</Order>
<Path>reg add "HKEY_LOCAL_MACHINE\SOFTWARE\Microsoft\Windows\CurrentVersion\Setup\OOBE" /v SetupDisplayedProductKey /t REG_DWORD /d 1 /f</Path>
</RunSynchronousCommand>
</RunSynchronous>
</component>
<component name="Microsoft-Windows-TerminalServices-LocalSessionManager" processorArchitecture="amd64" publicKeyToken="31bf3856ad364e35" language="neutral" versionScope="nonSxS" xmlns:wcm="http://schemas.microsoft.com/WMIConfig/2002/State" xmlns:xsi="http://www.w3.org/2001/XMLSchema-instance">
<fDenyTSConnections>false</fDenyTSConnections>
</component>
<component name="Networking-MPSSVC-Svc" processorArchitecture="amd64" publicKeyToken="31bf3856ad364e35" language="neutral" versionScope="nonSxS" xmlns:wcm="http://schemas.microsoft.com/WMIConfig/2002/State" xmlns:xsi="http://www.w3.org/2001/XMLSchema-instance">
<FirewallGroups>
<FirewallGroup wcm:action="add" wcm:keyValue="RemoteDesktop">
<Active>true</Active>
<Group>Remote Desktop</Group>
<Profile>all</Profile>
</FirewallGroup>
</FirewallGroups>
</component>
<component name="Microsoft-Windows-TerminalServices-RDP-WinStationExtensions" processorArchitecture="amd64" publicKeyToken="31bf3856ad364e35" language="neutral" versionScope="nonSxS" xmlns:wcm="http://schemas.microsoft.com/WMIConfig/2002/State" xmlns:xsi="http://www.w3.org/2001/XMLSchema-instance">
<SecurityLayer>2</SecurityLayer>
<UserAuthentication>1</UserAuthentication>
</component>
<component name="Microsoft-Windows-ServerManager-SvrMgrNc" processorArchitecture="amd64" publicKeyToken="31bf3856ad364e35" language="neutral" versionScope="nonSxS" xmlns:wcm="http://schemas.microsoft.com/WMIConfig/2002/State" xmlns:xsi="http://www.w3.org/2001/XMLSchema-instance">
<DoNotOpenServerManagerAtLogon>true</DoNotOpenServerManagerAtLogon>
</component>
</settings>
<settings pass="oobeSystem">
<component name="Microsoft-Windows-Shell-Setup" processorArchitecture="amd64" publicKeyToken="31bf3856ad364e35" language="neutral" versionScope="nonSxS" xmlns:wcm="http://schemas.microsoft.com/WMIConfig/2002/State" xmlns:xsi="http://www.w3.org/2001/XMLSchema-instance">
<AutoLogon>
<Password>
<Value>password</Value>
<PlainText>true</PlainText>
</Password>
<LogonCount>2</LogonCount>
<Username>Administrator</Username>
<Enabled>true</Enabled>
</AutoLogon>
<FirstLogonCommands>
<SynchronousCommand wcm:action="add">
<Order>1</Order>
<CommandLine>powershell -ExecutionPolicy Bypass -File d:\setup.ps1</CommandLine>
<Description>Enable WinRM service</Description>
<RequiresUserInput>true</RequiresUserInput>
</SynchronousCommand>
</FirstLogonCommands>
<UserAccounts>
<AdministratorPassword>
<Value>password</Value>
<PlainText>true</PlainText>
</AdministratorPassword>
</UserAccounts>
<OOBE>
<HideEULAPage>true</HideEULAPage>
<HideLocalAccountScreen>true</HideLocalAccountScreen>
<HideOEMRegistrationScreen>true</HideOEMRegistrationScreen>
<HideOnlineAccountScreens>true</HideOnlineAccountScreens>
</OOBE>
</component>
</settings>
<cpi:offlineImage cpi:source="wim:c:/wims/install.wim#Windows Server 2025 SERVERDATACENTER" xmlns:cpi="urn:schemas-microsoft-com:cpi" />
</unattend>setup.ps1
Now, the setup.ps1 file which is used to be called after Windows is installed to do things like install VirtIO tools, etc. Below, I am assuming you are mounting the VirtIO ISO as an additionnal ISO image to your Proxmox VM getting built. For me this was mounted to the E drive.
- Advertisement -
$ErrorActionPreference = "Stop"

# Switch network connection to private mode
$profile = Get-NetConnectionProfile
Set-NetConnectionProfile -Name $profile.Name -NetworkCategory Private

# Create a folder for installation logs
$logFolder = 'C:\install_logs'
if (-not (Test-Path -Path $logFolder)) {
    Write-Host "Creating log folder at $logFolder..."
    New-Item -Path $logFolder -ItemType Directory -Force | Out-Null
}

# Mount VirtIO ISO and install drivers silently
$virtioDrive = "E:"  # Assuming the VirtIO ISO is mounted as drive E:
$virtioInstaller = Join-Path -Path $virtioDrive -ChildPath "virtio-win-gt-x64.msi"
$qemuInstaller = Join-Path -Path $virtioDrive -ChildPath "guest-agent\qemu-ga-x64.msi"

# Install VirtIO drivers
if (Test-Path $virtioInstaller) {
    Write-Host "Running VirtIO driver installation from $virtioInstaller..."
    try {
        # Execute the silent installation
        Start-Process -FilePath "msiexec.exe" -ArgumentList "/i `"$virtioInstaller`" /qn ADDLOCAL=ALL /norestart" -Wait -NoNewWindow
        Write-Host "VirtIO driver installation completed successfully."
    }
    catch {
        Write-Error "Failed to run VirtIO driver installation: $_"
        exit 1
    }
}
else {
    Write-Error "VirtIO installer not found at $virtioInstaller. Exiting..."
    exit 1
}

# Install QEMU Guest Agent
if (Test-Path $qemuInstaller) {
    Write-Host "Installing QEMU Guest Agent from $qemuInstaller..."
    try {
        Start-Process -FilePath "msiexec.exe" -ArgumentList "/i `"$qemuInstaller`" /qn" -Wait -NoNewWindow
        Start-Service -Name qemu-ga
        Set-Service -Name qemu-ga -StartupType Automatic
        Write-Host "QEMU Guest Agent installed and configured successfully."
    }
    catch {
        Write-Error "Failed to install QEMU Guest Agent: $_"
        exit 1
    }
}
else {
    Write-Error "QEMU Guest Agent installer not found at $qemuInstaller. Skipping installation."
}

# Install PS Windows Update Module
Write-Host "Installing PSWindowsUpdate module..."
Get-PackageProvider -Name nuget -Force | Out-Null
Install-Module PSWindowsUpdate -Confirm:$false -Force

# Install Windows updates without user interaction and suppress reboot prompts
Write-Host "Running Windows Update..."
Get-WindowsUpdate -MicrosoftUpdate -Install -IgnoreUserInput -AcceptAll -IgnoreReboot | Out-File -FilePath "$logFolder\windowsupdate.log" -Append

# WinRM Configuration
Write-Host "Configuring WinRM..."
winrm quickconfig -quiet
winrm set winrm/config/service '@{AllowUnencrypted="true"}'
winrm set winrm/config/service/auth '@{Basic="true"}'

# Reset auto logon count
Write-Host "Resetting auto logon count..."
Set-ItemProperty -Path 'HKLM:\SOFTWARE\Microsoft\Windows NT\CurrentVersion\Winlogon' -Name AutoLogonCount -Value 0

# Trigger a single reboot at the end
Write-Host "Rebooting the system..."
Restart-Computer -Force
$WinpeDriver$ folder
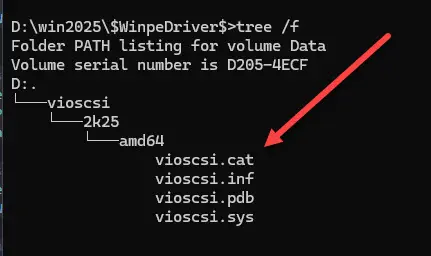
I created a $WinpeDriver$ folder to house the VirtIO drivers needed when Windows Server 2025 boots into the PE setup. You know how when you manually install Windows Server in Proxmox, it will not find the hard drive. You have to mount the VirtIO drivers and point the installer at the drivers. By adding this folder to the root of our ISO for Windows we are taking care of that problem. What files does it contain? Note below.

Where did I get these files? You mount the VirtIO ISO that you download from Oracle here: Windows VirtIO Drivers.
Navigate in that mounted ISO to the folder structure you see in the screenshot above: vioscsi\2k25\amd64 and you will find the files there. Just copy the who directory structure to the $WinpeDriver$ folder.
Ok so after creating the files above and downloading what we need, your folder where you copied everything into from the ISO image should look like this with the underlined, being the custom files, I have added.

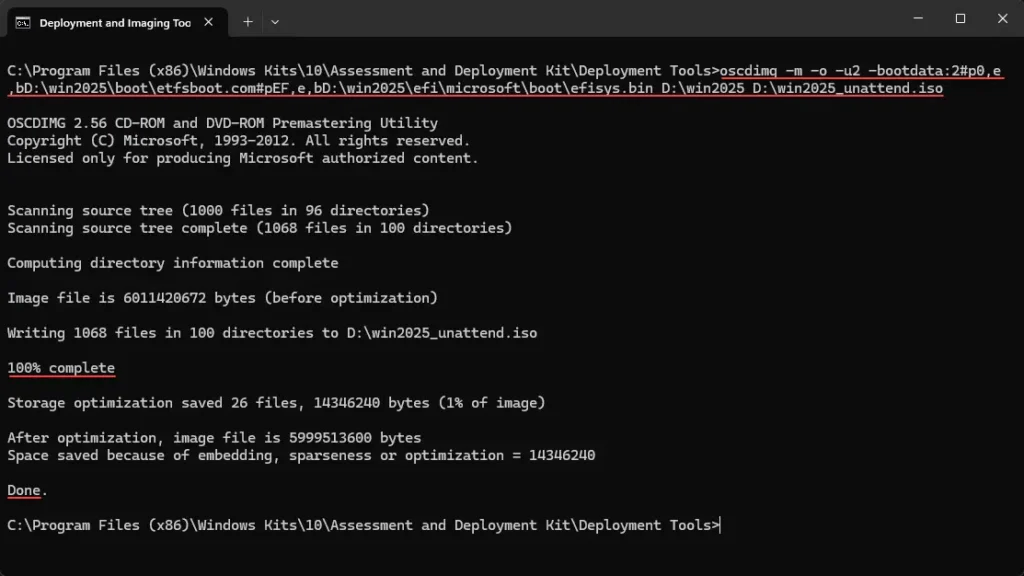
Now, how do we turn this back into an ISO? Now we can use the Command Prompt: Deployment and Imaging Tools Environment shell which gets installed when you install the WADK. Use the command below, replacing paths as needed. D:\win2025 is my custom folder where I copied everything:
oscdimg -m -o -u2 -bootdata:2#p0,e,bD:\win2025\boot\etfsboot.com#pEF,e,bD:\win2025\efi\microsoft\boot\efisys.bin D:\win2025 D:\win2025_unattend-noupdates.isoThe output is our new ISO image file: D:\win2025_unattend.iso.

Upload this file to your Proxmox VE Server ISO storage:

4. Create your Packer files
For Packer, I created 3 files:
- sensitive-variables.pkr.hcl
- variables.pkr.hcl
- windows-server-2025.pkr.hcl
The sensitive-variables.pkr.hcl file looks like this:
# Proxmox API Sensitive Variables
variable "proxmox_api_url" {
  type    = string
  default = "https://10.3.33.52:8006/api2/json" ##your proxmox server address
}

variable "proxmox_api_token_id" {
  type    = string
  default = "root@pam!packer" ##needs to match your token description
}

variable "proxmox_api_token_secret" {
  type      = string
  default   = "ed419d55-bb1a-4b31-a188-4599888fae7d" ##your token that you are creating
  sensitive = true
}

# Windows-specific sensitive variable
variable "admin_password" {
  type      = string
  default   = "password" ##replace with your admin password for winrm
  sensitive = true
}
Next, the variables.pkr.hcl file:
# Windows Server-specific non-sensitive variables

variable "vm_name" {
  type    = string
  default = "windows-server-2025"
}

variable "disk_size" {
  type    = number
  default = 61440
}

variable "memory" {
  type    = number
  default = 4096
}

variable "cpus" {
  type    = number
  default = 2
}

variable "http_server_ip" {
  type    = string
  default = "10.3.33.224"  # Replace with your actual IP
}

variable "http_server_port" {
  type    = number
  default = 8000             # Replace with your desired port
}
Finally, the windows-server-2025.pkr.hcl file:
# Windows Server 2025 Packer Template for Proxmox

packer {
  required_plugins {
    proxmox = {
      version = "~> 1"
      source  = "github.com/hashicorp/proxmox"
    }
  }
}

source "proxmox-iso" "windows2025" {

  # Proxmox Host Connection
  proxmox_url              = var.proxmox_api_url
  insecure_skip_tls_verify = true
  username                 = var.proxmox_api_token_id
  token                    = var.proxmox_api_token_secret
  node                     = "pvetest" # Replace with your Proxmox node's actual hostname

  # BIOS - UEFI
  bios    = "ovmf"
  machine = "q35"

  efi_config {
    efi_storage_pool  = "local-lvm"
    pre_enrolled_keys = true
  }

  # Windows Server ISO File
  iso_file    = "local:iso/win2025_unattend-noupdates.iso"
  unmount_iso = true

  additional_iso_files {

    device       = "ide3"                             # Mount as another CD-ROM
    iso_file     = "local:iso/virtio-win-0.1.262.iso" # Path to VirtIO ISO
    unmount      = true                               # Automatically unmount after build
    iso_checksum = "your_iso_checksum_here"
  }

  # VM General Settings
  vm_name              = "win2025-template"
  template_name        = "win2025-template"
  template_description = "Windows Server 2025 Template"
  memory               = 4096 # Adjust memory as needed
  cores                = 2    # Adjust cores as needed
  cpu_type             = "host"
  os                   = "win11"
  scsi_controller      = "virtio-scsi-pci"
  qemu_agent           = true

  # Network Configuration
  network_adapters {
    model  = "virtio"
    bridge = "vmbr0" # Replace with your actual bridge name
  }

  # Disk Configuration
  disks {
    storage_pool = "local-lvm"
    type         = "scsi"
    disk_size    = "40G"
    cache_mode   = "writeback"
    format       = "raw"
  }

  # WinRM Configuration
  communicator   = "winrm"
  winrm_username = "Administrator"
  winrm_password = var.admin_password
  winrm_timeout  = "12h"
  winrm_use_ssl  = false    # Ensure no SSL if using unsecured connections
  winrm_insecure = true     # Allow insecure connections

  # Boot Settings
  boot_wait = "3s"
  boot_command = [
    "<spacebar><spacebar>" # Simulate pressing "any key" to boot from CD-ROM
  ]
}

build {
  name    = "Proxmox Windows Server 2025 Build"
  sources = ["source.proxmox-iso.windows2025"]

}
5. Run packer init and packer build
Finally, after we have everything in place, we run the following from within the directory where your hcl files are located:
packer init .
packer build .

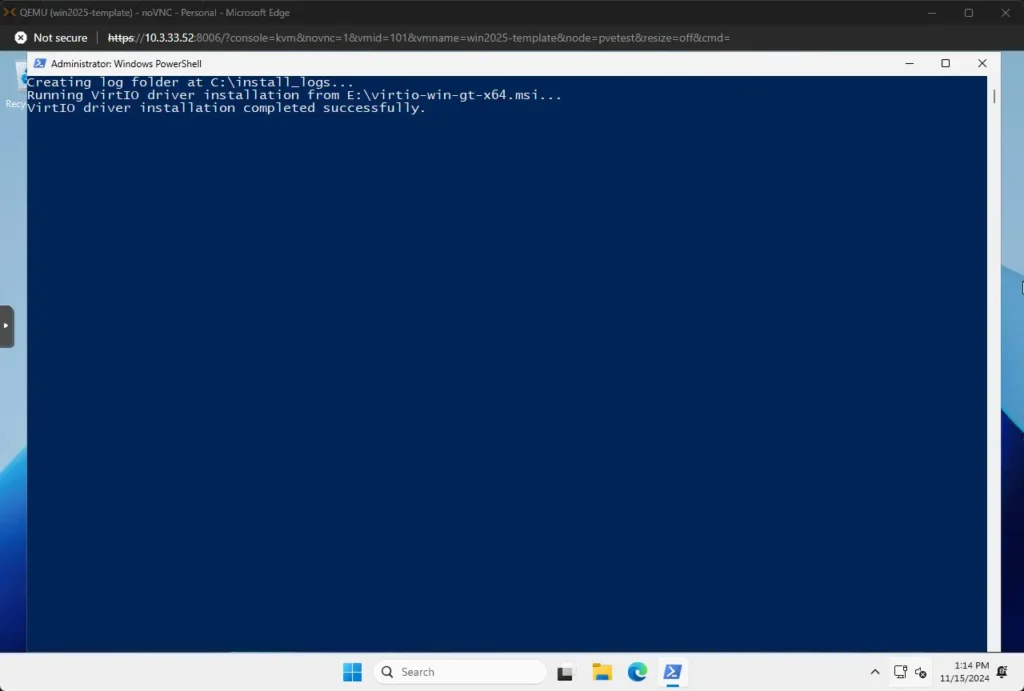
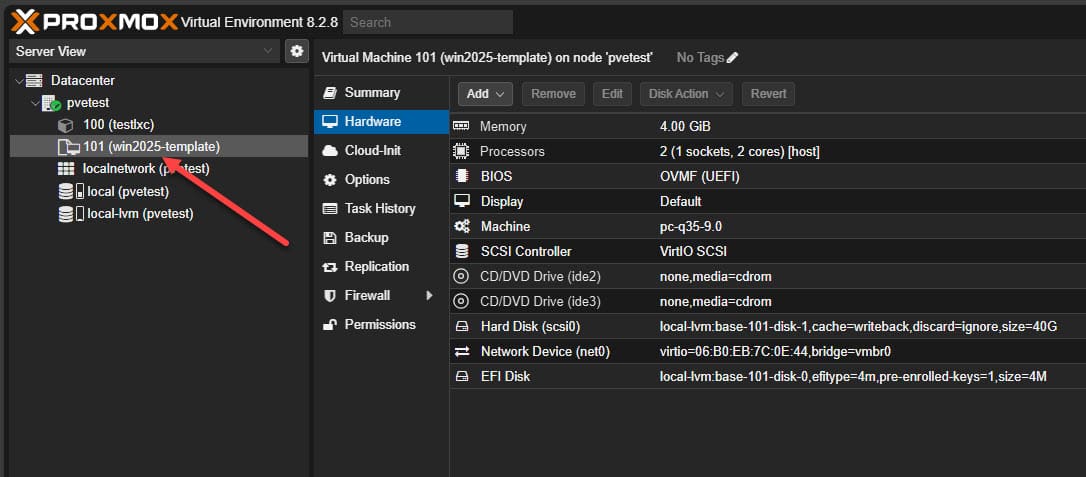
Windows server 2025 automated installation running in proxmox.

The setup.ps1 script running in the first run command stage of the proxmox packer build of windows server 2025.

Wrapping up
This project will likely evolve as I discover new and improved methods along the way. While I’m not a fan of modifying ISOs, the reality is that Proxmox’s automation tools still don’t quite match up to VMware’s capabilities. I’ve had to resort to some creative workarounds to ensure things run smoothly, but that’s just part of the process. Proxmox is advancing quickly, and as more users adopt Proxmox VE, these workflows will become more streamlined. In the meantime, enjoy the fully automated Windows Server 2025 deployment with Packer in Proxmox VE Server!
- Advertisement -


