Physical Address
304 North Cardinal St.
Dorchester Center, MA 02124
Physical Address
304 North Cardinal St.
Dorchester Center, MA 02124
Learn about Proxmox replication and how it helps with data integrity and makes sure of high availability. Learn to config step-by-step.

Proxmox offers excellent built-in disaster recovery tools that require no additional add-ons or licensing. One notable feature is its replication capability, which enables the replication of VMs stored on local ZFS storage to a target node, even without shared storage. Let’s explore Proxmox replication in detail and learn how to configure it.
Proxmox replication facilitates the duplication of VM data across multiple nodes within a cluster. This process is integral to maintaining data integrity and ensuring that services remain available even in the event of a node failure.
Replication has long been a helpful element of a successful disaster recovery strategy since it duplicates your virtual disks from a source host to a target. In the event the source virtual host goes down for whatever reason, the replication task has created the virtual machine or container on the second node and you can start up the virtual resource on the second node.
It also provides the following advantages for system administrators building their virtualization solution on top of Proxmox:
Proxmox replication is configured based on several key prerequisites:
ZFS storage is known for the built-in data protection capabilities that you can take advantage of, nicluding block-level data replication, which is more frequent and accurate than file-level replication, ensuring that all replicated data remains consistent and up-to-date across different storage media.

Replication of Proxmox VMs cannot be performed on the same node; it requires at least two Proxmox nodes to set up a replication task. During replication, the VM’s underlying storage is transferred from the source node to a different node.
Furthermore, the same storage cannot be used for replication. A separate storage location must be designated as the target for the replication task.
To set up a replication task in Proxmox, administrators can use the command line tool to specify the source VM, target node, and replication schedule. They can also use the web interface as we will demonstrate below.
Note the following overview of steps to create a Proxmox replication task:
replicate --vmid --target-node --schedule.
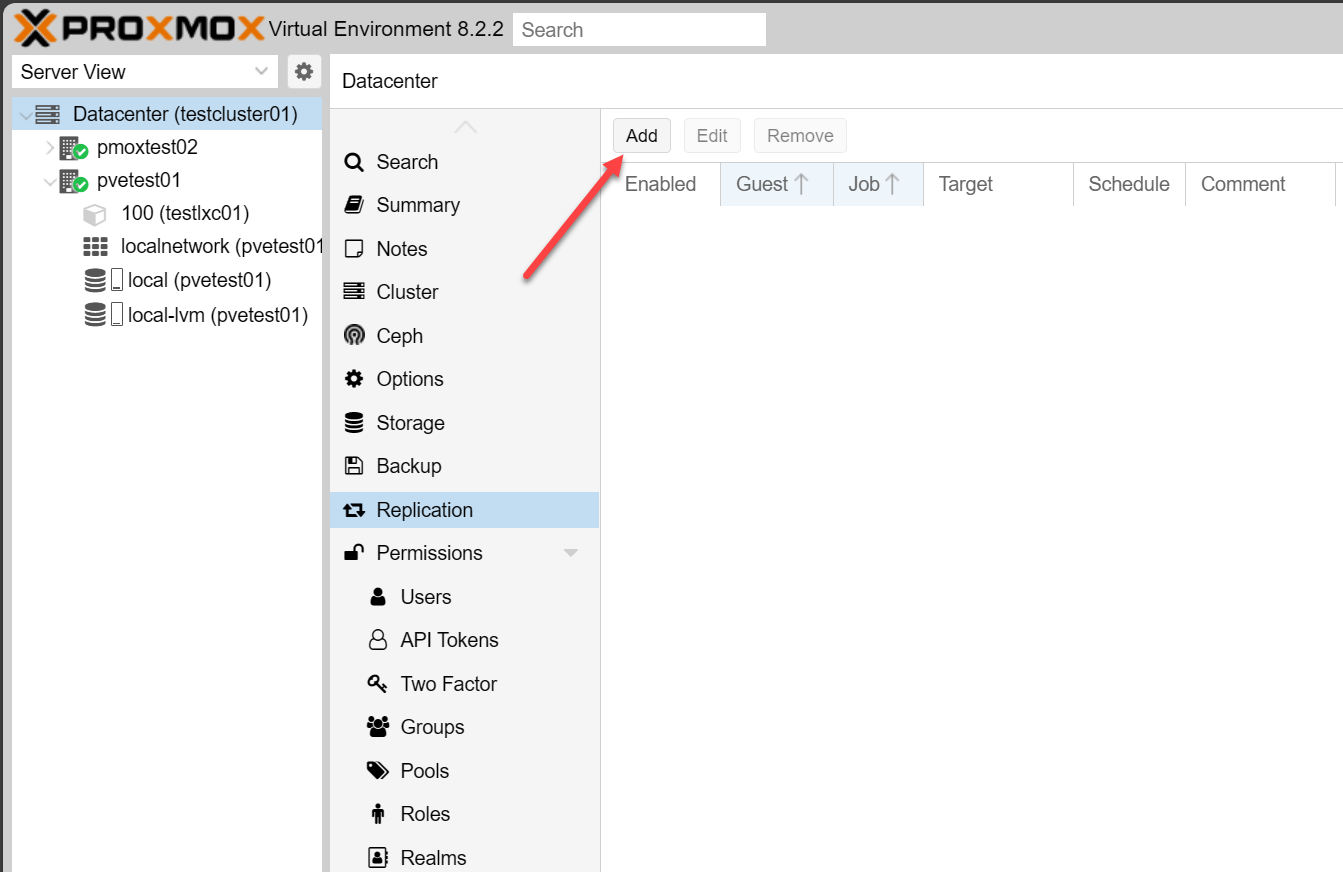
To begin adding the replication task in Proxmox, navigate to Datacenter > Replication > Add.
Select the virtual machine or LXC container ID you want to replicate:

Under the schedule drop down list, you will see the various options you can choose for scheduling the replication task to start automatically.

As you can see below, you can also set a rate limit on the replication task in addition to the other configuration options to minimize impact on the public network.

A replication job is identified by a cluster-wide unique ID. This ID is composed of the VMID in addition to a job number. This ID must only be specified manually if the CLI tool is used.

While Proxmox replication is powerful, you may run into the need to troubleshoot when it doesn’t work as expected
The next steps when you want to get a feel for Proxmox replication is to first make sure you have the prerequisites met:
Replication is an excellent way to enhance your disaster recovery strategy. It supports the 3-2-1 backup best practice by creating multiple copies of your data, ensuring at least one copy is stored offsite when replicating to a different data center.
Proxmox makes this process even more accessible by including replication tools directly within Proxmox VE Server, without requiring a subscription license. However, it’s important to meet the prerequisites: your virtual machines must be stored on ZFS storage, and you need more than one Proxmox VE Server added to your Proxmox data center.
We have detected that you are using extensions to block ads. Please support us by disabling these ads blocker.