Create and Configure VMware HA and DRS
Table of Contents
Introduction
VMware vSphere High Availability (HA) is a critical component of enterprise virtualization infrastructure, providing automated failover capabilities that ensure business continuity in the event of host failures. This comprehensive guide explores the advanced features, configuration options, and best practices for implementing robust HA solutions in production environments.
Understanding vSphere HA Architecture
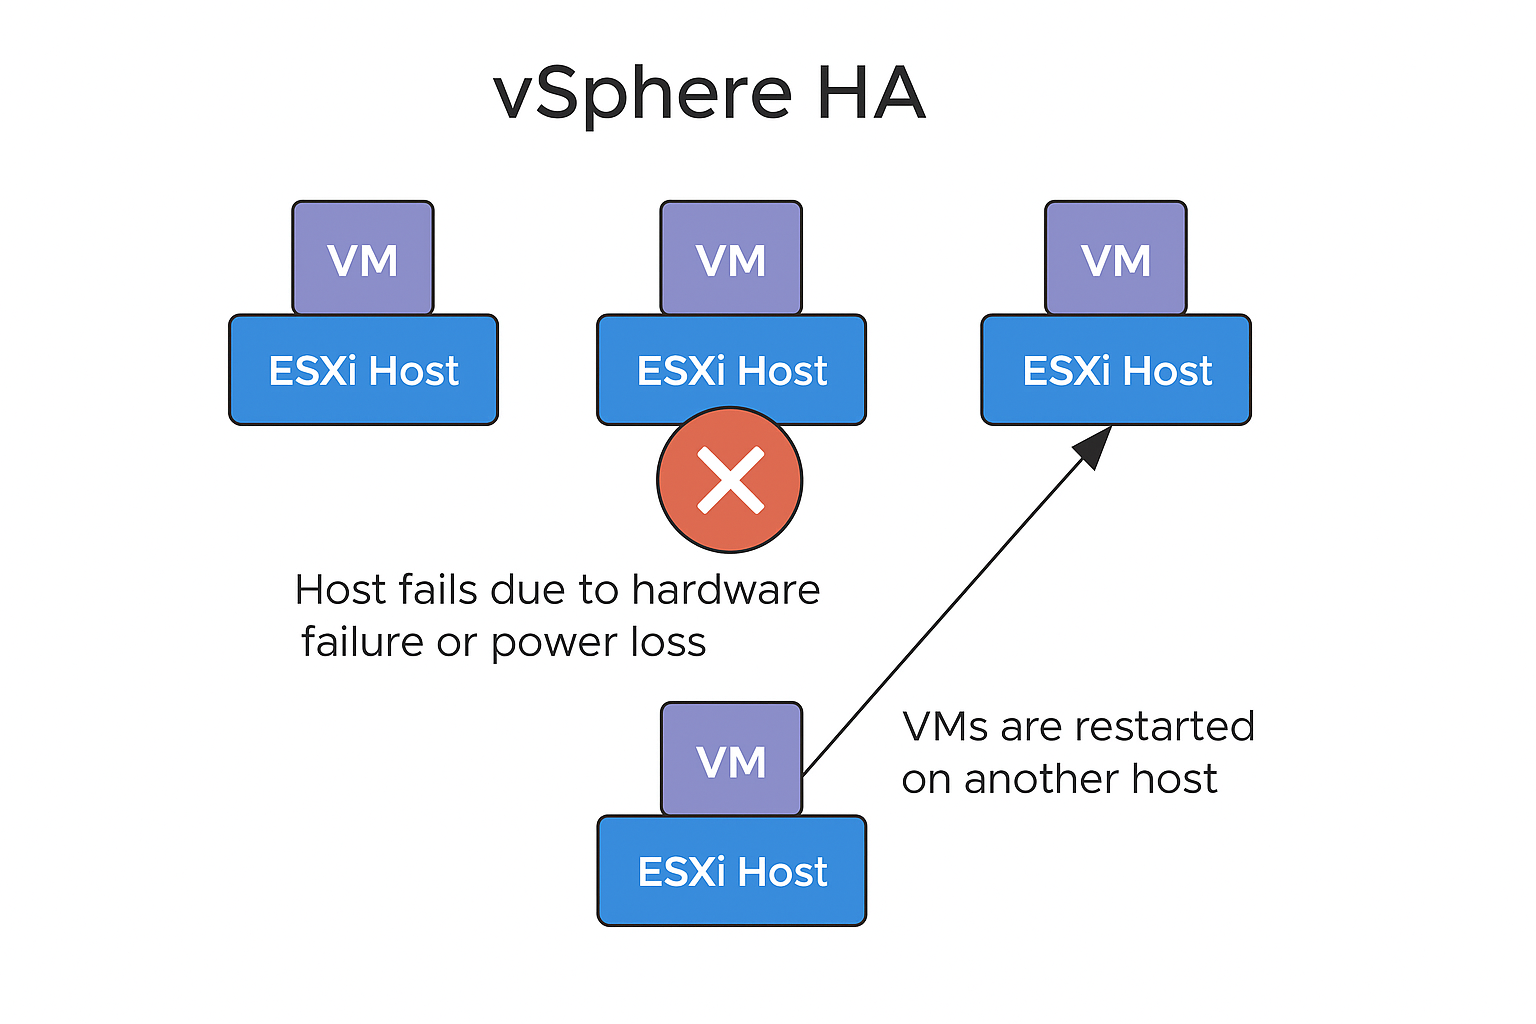
vSphere HA operates at the cluster level, creating a distributed fault-tolerance mechanism across multiple ESXi hosts. When enabled, HA transforms individual ESXi hosts into a coordinated cluster that can automatically respond to various failure scenarios, from complete host failures to individual application crashes.
The HA architecture relies on a master-slave model where one host acts as the primary coordinator (master) while others serve as secondary nodes (slaves). This distributed approach ensures that failure detection and response mechanisms remain operational even when individual hosts experience issues.
Enabling HA at the Cluster Level
Configuring HA begins with cluster-level activation through the vSphere Client. Navigate to the cluster configuration and enable the “vSphere HA” option under cluster services. This activation triggers several background processes:
The cluster election process automatically selects a master host based on factors including host connectivity, datastore accessibility, and resource availability. The master host maintains the authoritative view of cluster state and coordinates all HA operations.
During initial configuration, HA creates agent processes on each ESXi host that communicate through both network and storage channels. These agents continuously monitor host health, virtual machine status, and application availability.
Key Benefits:
- Reduces manual intervention during hardware failure
- Supports automated VM restart
- Works well with other features like DRS and vMotion
Step-by-Step: Create a Cluster with HA
Prerequisites:
- vCenter Server installed
- At least two ESXi hosts
- Shared storage (e.g., iSCSI, NFS, vSAN)
Steps:
Login to vCenter Server:
Open your web browser and go to the vCenter address (like https://vcenter.vmorecloud.com) or IP address. I have assigned 192.168.119.130 to vCenter. Enter your username and password to log in.
Go to Hosts and Clusters:
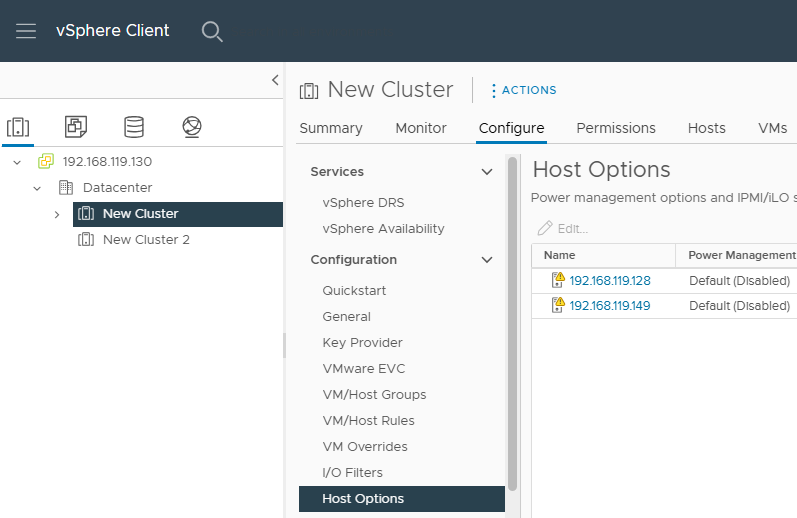
Once you’re inside vCenter, look at the left-hand side and click on “Hosts and Clusters.” This is where you manage your physical servers (ESXi hosts) and virtual machines.
Create a New Cluster:
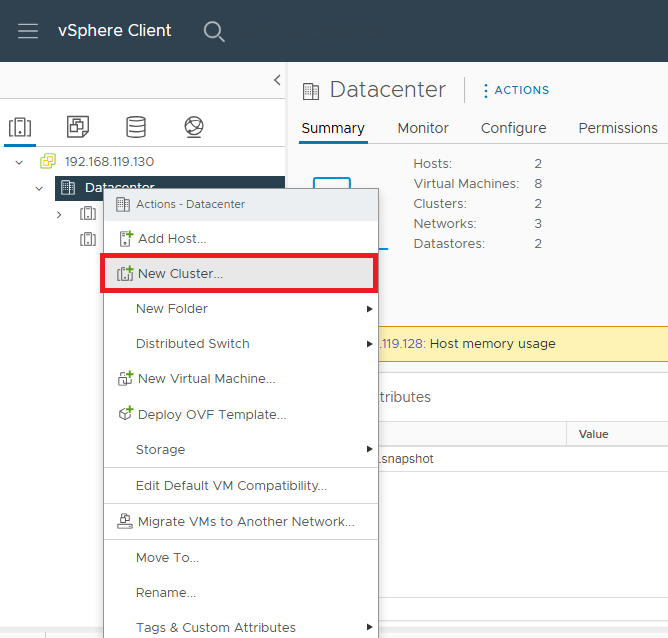
Right-click on your Datacenter name (this is usually at the top level) and choose “New Cluster.”
Give It a Name & Enable Features:
A setup wizard will open. Type a name for your new cluster (for example, “Production-Cluster”).
✅ Check the boxes for:
vSphere HA (for automatic VM restart if a host fails). Click NEXT without enabling HA yet.
Add Your ESXi Hosts to the Cluster:
After the cluster is created, right-click on it and choose “Add Host.” Enter the IP address or name of each ESXi host and login details. Repeat for all hosts.

Review & Finish:
Go through the summary page to confirm your settings. Click “Finish” when you’re done. Your cluster is now ready with HA enabled.


Enable HA on Cluster
Right click Cluster Settings.
Navigate to vSphere Availability vSphere HA
Click EDIT
Turn ON “vSphere HA”
Accept default settings for now
Click OK to Apply changes.
🧠 VM Monitoring – What It Does
This feature focuses on the virtual machines (VMs) themselves—not the host. It watches for heartbeat signals from VMware Tools inside each VM. If the heartbeat stops for a while (maybe the VM has frozen or crashed), VMware HA restarts just that VM to bring it back online. It’s like a built-in safety net to make sure your applications are always running.
✅ Why These Settings Matter:
- They help keep your services running even if a server fails or a VM crashes.
- They automate recovery, so you don’t have to restart things manually.
- They reduce downtime, which keeps your users happy and your business running smoothly.
How Admission Control in VMware HA?
Think of it like a safety limit
When you enable High Availability (HA), VMware needs to make sure there’s enough room (CPU and memory) left on other hosts in case one of your ESXi hosts fails. That’s where Admission Control comes in.
What It Does:
Admission Control blocks new virtual machines from being powered on if doing so would prevent HA from being able to restart all VMs in the event of a host failure.
How it Works (in simple terms):
Let’s say you have 3 ESXi hosts and 30 VMs running. Admission Control ensures that if 1 host fails, the remaining 2 can handle all 30 VMs. If you try to power on more VMs than that capacity, it won’t let you to protect HA capability.
Options You Can Choose:
- Host Failures Cluster Tolerates (Most common)
- Example: You set this to 1. It reserves resources so the cluster can survive 1 host failure.
- Percentage of Cluster Resources Reserved
- You set aside a percent (e.g., 25%) of CPU/memory.
- Dedicated Failover Hosts
- You reserve specific hosts just for failover.
🚨 What is Isolation Response?
🧰 Imagine a host is still running—but disconnected
Sometimes a host loses its connection to the rest of the cluster (e.g., due to network issues), but it hasn’t crashed. VMware HA must decide what to do in this “isolation” scenario.
👇 Isolation Response Options:
- Power Off and Restart VMs (Recommended for most setups)
- HA powers off the VMs on the isolated host and restarts them elsewhere.
- Leave VMs Powered On
- VMs keep running, but this can cause data conflicts.
- Shutdown and Restart VMs
- Tries to shut down gracefully before restarting on another host.
🧠 Tip:
Choose “Power Off and Restart” unless you have shared storage and advanced clustering apps that can handle split-brain situations.
Configuring VMware DRS
Automation Levels:
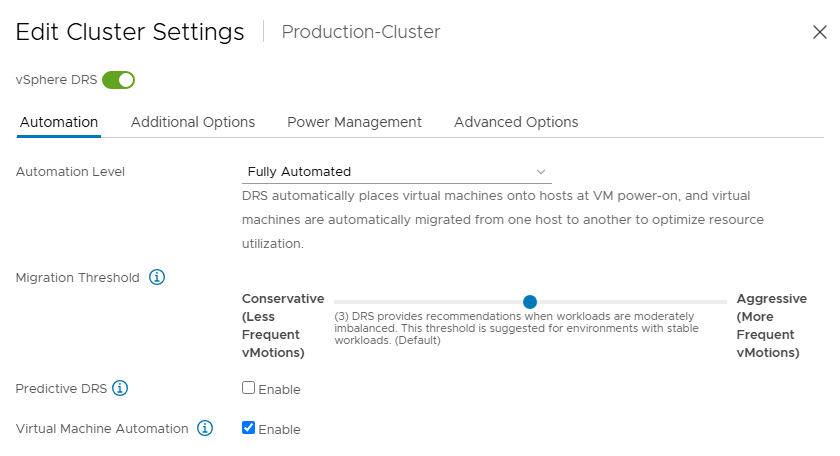
Manual: You make all decisions yourself. DRS gives placement and migration suggestions, but you must take action manually. This is ideal for testing or environments where automatic movement is risky.
Partially Automated: Initial VM placement is automatic when powering on. Migration suggestions are made, but you must approve them. This suits medium-trust environments or periods with strict change control.
Fully Automated: DRS automatically places VMs at power-on and migrates them as needed to balance the load. Perfect for production clusters with consistent workloads and trusted configuration.
Migration Threshold:
Set the threshold to control sensitivity (1 = Conservative, 5 = Aggressive).
Affinity Rules:
Affinity Rules in VMware DRS are used to control the placement of virtual machines to meet specific workload or compliance requirements.
- VM-VM Affinity: ensures that certain virtual machines are always placed on the same host. This is useful when VMs need low-latency communication or are part of a tightly coupled application.
- VM-Host Affinity: ties specific VMs to specific ESXi hosts. This is typically used for licensing compliance, performance optimization, or regulatory requirements, ensuring those VMs only run on designated hardware.
| DRS Level | Initial VM Placement | VM Migration (Load Balancing) | Admin Control |
|---|---|---|---|
| Manual | You decide | You decide | 100% manual |
| Partially Automated | Automatic | You decide | 50% manual |
| Fully Automated | Automatic | Automatic | 0% manual |
Advanced Option: Proactive HA
Proactive HA works with hardware monitoring tools (like Dell OpenManage or HPE iLO). It detects hardware issues before they cause failure.
How it Works:
vCenter receives a degradation alert from the hardware. It moves VMs off the affected host.
The host is quarantined or placed in maintenance.
Requirements: Compatible hardware monitoring plugin installed in vCenter.
Pro Tip: Proactive HA is great for preventing issues, but you need a vendor-specific health provider plugin.
Conclusion
VMware vSphere High Availability provides comprehensive protection against various failure scenarios through automated detection and recovery mechanisms. Proper implementation requires careful consideration of admission control policies, monitoring configurations, and advanced settings that align with specific operational requirements.
The evolution of HA capabilities, including proactive monitoring and predictive failure response, demonstrates VMware’s commitment to minimizing unplanned downtime in virtualized environments. Organizations implementing these advanced features can achieve higher availability levels while maintaining operational efficiency.
Success with vSphere HA depends on thorough understanding of its capabilities, careful configuration management, and regular validation of recovery procedures. When properly implemented and maintained, HA serves as a foundational component of enterprise virtualization infrastructure that delivers measurable business value through improved service availability and reduced operational overhead.
Learn more:
- Enable vSphere HA and vSphere DRS in ESXi
- Creating a vSphere DRS and HA cluster using the vSphere Web Client
- vSphere DRS and High Availability
- Enable vSphere HA and vSphere DRS in a Cluster (MSCS)
- Setting Up VMware vSphere DRS and HA
- VMware vSphere HA Configuration: A Step-by-Step Guide
- vSphere HA Configuration Steps
- Difference between HA and DRS in VMware vSphere
- How to Configure a DRS Cluster in VMware
- VMware Distributed Resource Scheduler (DRS) and HA | Liquid Web


