
How to Add USB Devices to a VMware vSphere Virtual Machine
Learn how to connect a USB flash drive, license dongle, smart-card reader or other supported USB device to a virtual machine running on VMware ESXi using the vSphere Client.
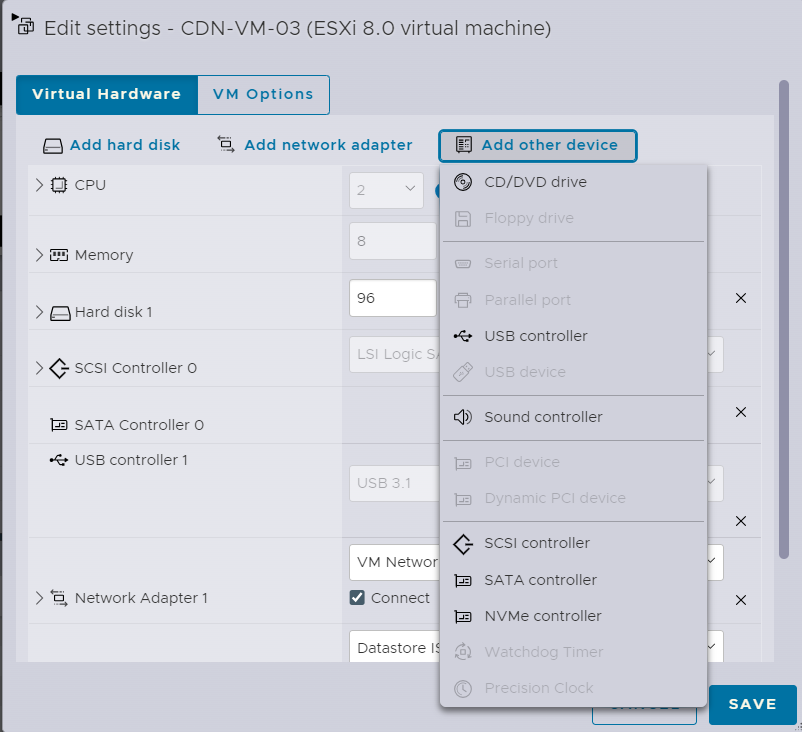
USB passthrough in VMware vSphere allows a virtual machine to access a physical USB device connected to an ESXi host. This is useful when a guest operating system needs direct access to a USB storage device, hardware license dongle, USB-to-serial adapter, smart-card reader or another supported peripheral.
In this guide, you will learn how to add a virtual USB controller, connect a physical USB device from an ESXi host, verify it inside Windows or Linux, and troubleshoot common connection problems. The steps focus on the vSphere Client workflow used with modern ESXi environments, including the vSphere 7.x and 8.x families. Menu labels and supported controller types can vary by release and VM compatibility level.
Key Takeaways
- A virtual machine needs a virtual USB controller before a host USB device can be attached.
- For host-connected passthrough, the physical USB device must be connected to the ESXi host where the VM is running.
- Use Add New Device → Host USB Device in the VM hardware settings to attach the device.
- A USB device attached through standard host USB backing is generally tied to that ESXi host; plan vMotion and host maintenance accordingly.
- Do not disable the ESXi USB Arbitrator as a routine troubleshooting step. It is required for normal USB passthrough.
- Always safely disconnect USB storage from the guest before removing it from the VM.
How USB Passthrough Works in VMware vSphere
When a USB device is physically connected to an ESXi host and assigned to a virtual machine, ESXi uses the USB Arbitrator service to discover and manage eligible USB devices and route the device connection to the VM. The virtual machine also needs a virtual USB controller so its guest operating system can communicate with the attached device.
The device is assigned to one virtual machine at a time. While it is attached to that VM, other VMs on the host cannot claim the same device. When you disconnect it from the VM, it becomes available for another eligible VM.
Three components involved
- Physical USB device: the peripheral plugged into an ESXi host port or supported hub.
- USB Arbitrator: the ESXi service that manages USB device availability and passthrough requests.
- Virtual USB controller: the virtual hardware interface presented to the guest operating system.
Prerequisites and Requirements
Before configuring USB passthrough, check the following items:
- The USB device is physically connected to the ESXi host on which the target VM is running.
- The ESXi host detects and supports the device and its USB controller.
- The VM has a supported virtual hardware compatibility level and a USB controller.
- The guest operating system supports the device and has any required driver installed.
- The account performing the change has the required virtual-machine configuration permissions, including permission to add or remove devices.
- The device is not already assigned to another VM.
- You have reviewed the impact on vMotion, host maintenance and HA restart planning.
Step 1: Add a USB Controller to the Virtual Machine
A USB controller is required before a USB device can be added to the VM. You can normally add the controller through the vSphere Client virtual hardware editor.
- Sign in to the vSphere Client.
- Navigate to Hosts and Clusters or VMs and Templates.
- Locate the target virtual machine.
- Right-click the VM and select Edit Settings.
- Open the Virtual Hardware tab.
- Click Add New Device.
- Select USB Controller from the device list.
- Expand the new USB controller and select the controller type offered by your ESXi and VM compatibility configuration.
- Review any compatibility warning, then click OK or Save.
Choose a controller generation that is supported by the ESXi host, virtual machine compatibility level and guest operating system. For modern guest operating systems, a USB 3.x controller may be appropriate when offered and supported. For older guests or devices with compatibility problems, test a USB 2.0 controller if it is available. Do not assume that every controller type is supported for every passthrough path.
Step 2: Add a USB Device Connected to the ESXi Host
After the virtual USB controller is present, attach the physical device to the VM.
- Connect the USB device to a physical USB port on the ESXi host where the VM is running.
- Return to the vSphere Client and open the VM’s Edit Settings window.
- On the Virtual Hardware tab, click Add New Device.
- Select Host USB Device.
- Expand the newly added USB device entry.
- Choose the required physical USB device from the device drop-down list.
- Review the migration or vMotion support option, if shown. If the VM will not be migrated with this USB device attached, do not enable a migration option unnecessarily.
- Click OK or Save to apply the configuration.
Step 3: Verify the USB Device Inside the Guest Operating System
Power on the VM if it is not already running, then check whether the guest operating system detects the USB device.
Windows guest operating system
- Sign in to Windows inside the virtual machine.
- Open Device Manager.
- Expand the relevant category, such as Universal Serial Bus controllers, Disk drives or the device-specific category.
- For a USB flash drive, open Disk Management and confirm that the disk is detected and has an appropriate partition and drive letter.
- Install the vendor driver if Windows identifies the device but cannot use it correctly.
Linux guest operating system
Open a terminal and run:
lsusb
dmesg | tail -n 40
lsblk
lsusb lists USB devices visible to Linux, dmesg displays recent kernel messages, and lsblk lists block devices such as USB storage. The exact commands available may depend on the guest distribution and installed packages.
Host USB Passthrough vs. Client USB Redirection
vSphere supports different USB connection paths. Do not confuse a USB device physically connected to an ESXi host with a USB device connected to the administrator’s workstation.
| Connection method | Device location | Typical use | Key consideration |
|---|---|---|---|
| Host USB passthrough | Physical USB port on the ESXi host | USB storage, supported dongles and devices needed by a VM | Device is associated with the host and affects VM mobility planning. |
| Client USB redirection | USB port on the computer running the remote console/client | Temporarily redirecting a local peripheral to a remote VM | Depends on the client connection and supported remote-console workflow. |
This article’s main procedure covers host USB passthrough. If your device is connected to your laptop or desktop rather than the ESXi server, use the client USB redirection workflow documented for your vSphere Client and remote-console version.
vMotion Considerations and Limitations
USB passthrough can affect where a virtual machine can run. With standard USB backing, the USB device is physically attached to a particular ESXi host. Broadcom’s API documentation states that standard USB backing does not support vMotion for that USB connection. Remote-host USB backing is a separate configuration path used when configuring vMotion support.
When configuring a VM with multiple USB devices, review the vMotion support setting for every attached device. Broadcom’s configuration guidance notes that all attached USB devices must be enabled for vMotion when migrating a VM with multiple USB devices; individual USB devices cannot be migrated independently in that workflow.
- Plan to keep the VM on the ESXi host to which the USB device is connected unless the configured USB backing and vSphere version explicitly support the migration scenario you need.
- Do not assume that DRS will freely move a VM with a host-local USB device attached.
- Review the impact on maintenance mode, HA restart placement and host failure recovery.
- Disconnect the device cleanly before planned host maintenance if migration support is not configured.
Troubleshooting Common USB Passthrough Problems
1. Host USB Device is missing from the drop-down list
- Confirm the device is physically connected to the ESXi host running the VM.
- Check whether another VM currently owns the device.
- Try another physical USB port and check server firmware settings if the host does not detect USB hardware.
- Confirm the device class is supported for passthrough on your ESXi release.
- Allow time for host and vCenter inventory state to refresh after connecting the device.
2. The VM sees the controller but not the USB device
- Confirm that both the virtual USB controller and the Host USB Device entry are present in VM settings.
- Check the device’s connection state in the VM hardware settings.
- Check the guest OS Device Manager or
lsusboutput. - Install or update the appropriate guest driver.
- Test a different supported USB controller type if the guest or device has compatibility issues.
3. USB storage appears but is not accessible
- In Windows, check Disk Management for an offline disk, missing drive letter or unsupported file system.
- In Linux, inspect
dmesgandlsblkto identify detection or mount issues. - Do not initialize, format or repartition the device unless you intend to erase its data.
- Safely unmount or eject the storage from the guest before disconnecting it from the VM.
4. USB passthrough stops working after changing ESXi services
The ESXi USB Arbitrator is involved in USB passthrough. Broadcom documents that disabling it can remove access to existing passthrough devices and prevent new USB devices from being assigned to VMs. Do not stop or disable this service as a generic troubleshooting action. If it has been changed, follow the applicable Broadcom recovery procedure and verify the impact on all VMs first.
5. VM cannot migrate to another ESXi host
Review the USB backing type and vMotion support configuration for every attached device. A USB device using standard host-local backing can restrict migration. Remove or disconnect the device when appropriate, or redesign the connection using a supported remote-host backing configuration if your version and requirements allow it.
Useful ESXi Host Checks
When troubleshooting at the ESXi layer, use supported host-management methods and consult Broadcom guidance for the exact release. The following commands can help inspect USB hardware and passthrough visibility from an ESXi shell where the commands are available:
lsusb
esxcli hardware usb passthrough device list
Use the output to establish whether the host can see the device and whether it is listed for passthrough. Command availability and output can vary by ESXi release. Avoid changing USB Arbitrator services or VMkernel device ownership unless you understand the impact and are following a release-specific support procedure.
VMware USB Passthrough Best Practices
- Use host USB passthrough only for devices that genuinely need to be presented directly to a VM.
- Check the current Broadcom supported-device guidance before deploying specialist peripherals.
- Use a supported virtual USB controller type that matches the guest OS and device requirements.
- Document which ESXi host physically owns each USB device.
- Plan vMotion, DRS, HA and host-maintenance behavior before attaching host-local devices to production VMs.
- Safely eject USB storage inside the guest before disconnecting it.
- Do not attach one physical USB device to multiple VMs simultaneously.
- Keep ESXi and guest OS drivers updated in accordance with vendor guidance.
- Test passthrough after host updates and VM hardware compatibility changes in a maintenance window.
Conclusion
Adding a USB device to a VMware vSphere virtual machine is straightforward once the virtual USB controller and host-device assignment are configured. The essential workflow is to add a USB controller, connect the physical device to the ESXi host, select Host USB Device in the VM hardware settings, and verify that the guest operating system detects it.
The most important planning point is VM mobility. A USB device connected directly to an ESXi host can tie the VM to that host unless a supported migration-capable USB configuration is used. Validate device compatibility, vMotion requirements and guest drivers before using USB passthrough in production.
Official Documentation and References
- Broadcom KB 369554 — Add USB Devices from an ESXi Host to a Virtual Machine — prerequisites and vSphere Client procedure.
- Broadcom KB 315272 — Supported VMware USB Passthrough Devices — supported and unsupported device categories for the documented ESXi releases.
- Broadcom KB 398992 — USB Devices Not Accessible in Virtual Machines — controller and device configuration troubleshooting.
- Broadcom Virtual Infrastructure API — VirtualUSB — USB backing, device ownership and vMotion behavior.
- Broadcom KB 314362 — Configuring an ESXi Host to Use a USB Storage Device — USB Arbitrator considerations and service impact.