How to Configure VMware vCenter Single Sign-On with Windows Server 2022

VMware vCenter Single Sign-On (SSO) plays a vital role in securing and simplifying access to vSphere components. By centralizing authentication, SSO enables administrators to log in once and gain access to multiple vSphere services without repeated prompts, reducing the need to manage multiple credentials and improving security posture across the virtual infrastructure. It also integrates with external identity sources such as Active Directory, allowing organizations to leverage existing domain credentials for seamless access.
In this post, we will walk through a complete SSO configuration using Windows Server 2022 and VMware vCenter, including practical setup examples from your environment. We’ll cover key steps such as preparing the Windows environment, configuring DNS and time synchronization, installing the vCenter Server with embedded or external Platform Services Controller (PSC), and connecting SSO to Active Directory for domain integration. Additionally, we will explore common troubleshooting tips, certificate management best practices, and how to manage identity sources and user roles effectively within the vSphere Client. Whether you’re setting up SSO for a new deployment or optimizing an existing one, this guide will help ensure a secure and efficient authentication setup tailored to your infrastructure needs.
Table of Contents
What is Single Sign-On (SSO)?
Single Sign-On (SSO) is an authentication process that allows users to access multiple applications or systems with a single set of credentials. Once authenticated, users can navigate across services without being prompted to log in again.
In the context of VMware vCenter, SSO is a core component of the vSphere Platform Services Controller (PSC) that authenticates users to access vSphere, vRealize Suite, and other VMware tools securely.
Why Use SSO in VMware vCenter?
SSO in vCenter centralizes the authentication mechanism for:
- vSphere Web Client
- vSphere Client
- vRealize Operations
- vRealize Orchestrator
- vCenter Server Appliance (VCSA)
Instead of managing users locally in vCenter, SSO allows integration with Microsoft Active Directory to manage access centrally.
Step-by-Step Guide: Configure SSO with Windows Server 2022 and vCenter
Pre-requisites
- ✅ Windows Server 2022 configured as a Domain Controller (vmorecloud.com)
- ✅ DNS configured with forward and reverse lookup zones
- ✅ vCenter Server Appliance (VCSA) installed and reachable
- ✅ Proper time synchronization between AD and vCenter
Step-by-Step Guide: Configure SSO with Windows Server 2022 and vCenter
Install Windows Server 2022 and promote it to a domain controller. Enables centralized user management and authentication using Active Directory for the vmorecloud.com domain. I have assigned IP address of 192.168.119.166 to DNS Server.
After installation of windows server and Active Directory. Our Next step is to configure DNS.
Configure DNS Forward/Reverse Lookup. Ensures proper name-to-IP and IP-to-name resolution for vcenter.vmorecloud.com (192.168.119.130) and other domain resources. To do this go to DNS and click on server and then open the forward Lookup zone and right click to create A record for your vcenter appliance, so that vcenter.vmorecloud.com points to its IP 192.168.119.130
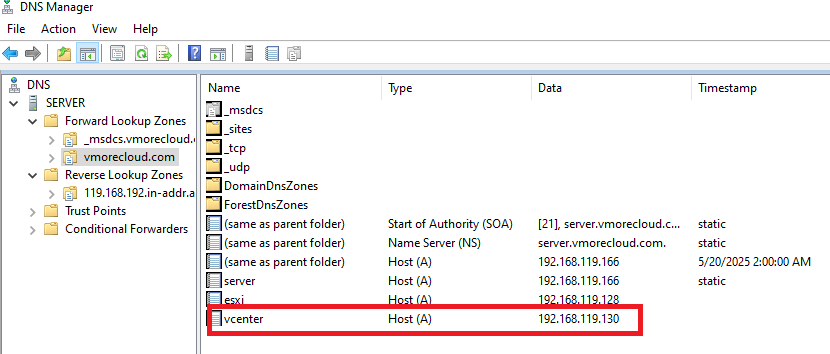
This allows clients and AD domain to communicate with vCenter using its FQDN. This is crucial for certificate validation and communication between systems. Also add reverse DNS entry. Some services perform reverse DNS lookups to validate identities. This entry ensures the IP 192.168.119.130 maps back to vcenter.vmorecloud.com.
Configure DNS for vCenter
Add DNS records in vmorecloud.com zone
Creating an A record for your vCenter appliance so that vcenter.vmorecloud.com points to its IP 192.168.119.130. This allows clients and the AD domain to communicate with vCenter using its FQDN.
nslookup 192.168.119.130
Add reverse DNS entry
Some services perform reverse DNS lookups to validate identities. This entry ensures the IP 192.168.119.130 maps back to vcenter.vmorecloud.com
On vCenter (via SSH):
nslookup vmorecloud.com
Update /etc/resolv.conf on vCenter if necessary:
nameserver 192.168.119.130
Join vCenter to Active Directory
Open your browser and navigate to the vSphere Client. Login to vSphere Client (https://192.168.119.130).This is the IP address of your vCenter Server Appliance (VCSA).
Ensure you’re accessing it via HTTPS.
You may see a certificate warning—this is expected if you’re using a self-signed certificate. Accept and continue.
Login Credentials:
Password: (password set during vCenter deployment)
Username: administrator@vmorecloud.com (SSO admin)
Add Active Directory as an Identity Source
Navigate to:
Menu > Administration > Single Sign-On > Configuration
Go to Identity Sources tab. Here you will see a warning message like this.
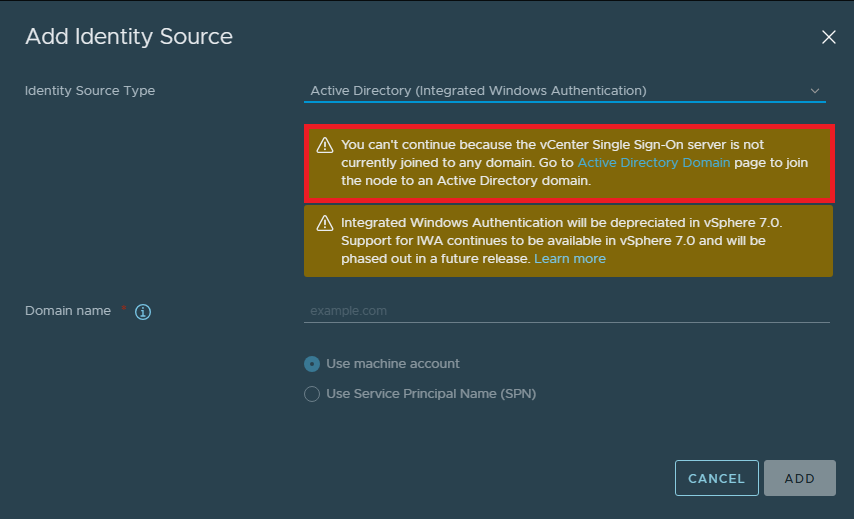
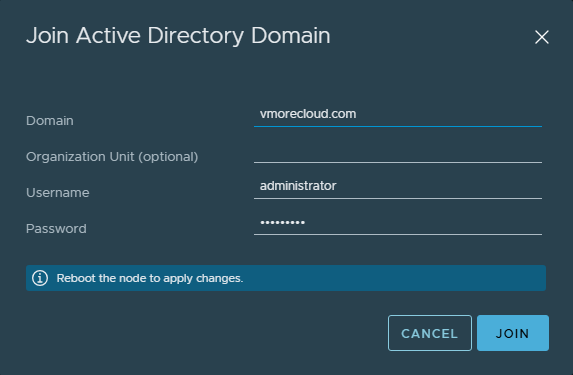
Since we didn’t joint vCenter to Active Directory. We go back and click on active directory domain, and type credentials.
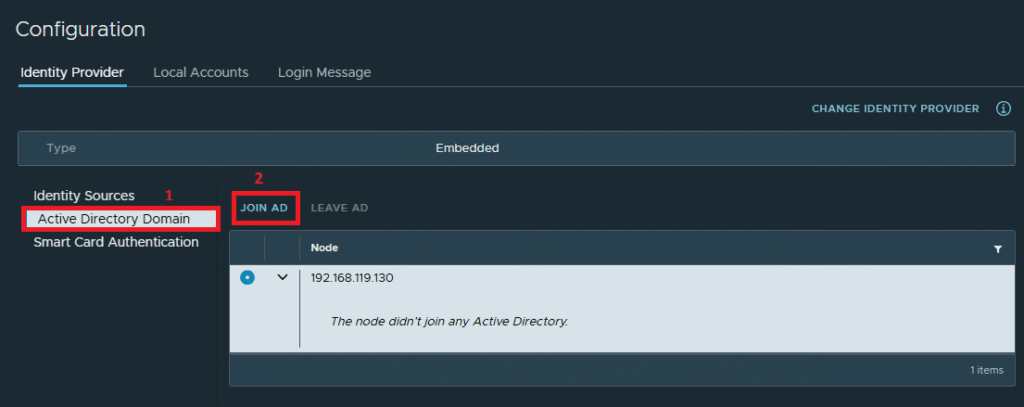
Click JOIN AD to join vCenter to Windows Server Active Directory.
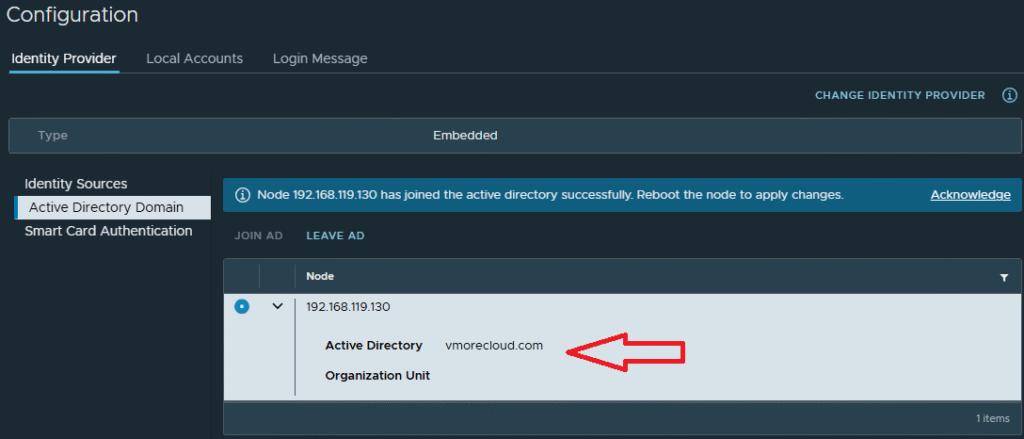
Now our vCenter has joined Active Directory.
One more thing I would like to mention is that vcenter by default name is localhost. But we are changing it to vcenter. For this purpose, we login to vCenter through ssh and type this command to change hostname to FQDN. Reboot it if ask for.
hostnamectl set-hostname vcenter.vmorecloud.com

Our vCenter hostname has been changed to vcenter.vmorecloud.com
Now go back and click on the identity sources and select:
- Identity Source Type: Active Directory (Integrated Windows Authentication)
- Domain Name: vmorecloud.com
- Alias: vmorecloud
Click Add. Now, Active Directory users/groups are recognized in vCenter.
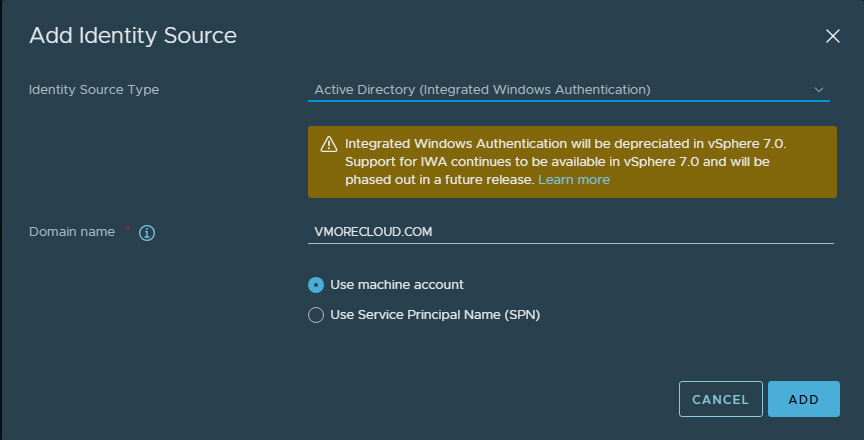
Assign Active Directory Permissions
Go to Menu > Administration > Access Control > Global Permissions
Click Add
Select:
- Domain:
vmorecloud.com - User or Group: Select appropriate AD user/group
- Role: Administrator (or custom role)
- Propagate to children: ✅ Checked
Click OK. This enables AD users to log into vCenter with assigned permissions.
Testing SSO Configuration
Log out from vSphere Client. Log in using an AD user:
Username: vmorecloud\administrator
Password: ********
You should be authenticated via SSO and gain access based on assigned role.
Conclusion
Configuring VMware vCenter SSO with Windows Server 2022 enhances security and streamlines access across your virtual infrastructure. It centralizes authentication, simplifies user management, and supports compliance with security best practices.
With your domain vmorecloud.com and properly set DNS and IP structure, integrating SSO ensures smoother management of users and infrastructure at scale.
