Physical Address
304 North Cardinal St.
Dorchester Center, MA 02124
Physical Address
304 North Cardinal St.
Dorchester Center, MA 02124
Managing identity and access in the cloud is critical for any modern organization. With Azure Active Directory (Azure AD), you can set up dedicated tenants to separate environments, control access, and manage users efficiently.
In this guide, we’ll walk you through the process of creating a new Azure AD tenant for your organization.
In Microsoft Azure, a tenant is essentially your organization’s dedicated instance of Azure Active Directory (Azure AD).Think of it as a container for identity and access management:It stores your users, groups, applications, and security settings.It provides a secure boundary for managing resources. Each tenant is unique and isolated from other tenants.
When you sign up for Azure, Microsoft 365, or another Microsoft cloud service, a tenant is automatically created for your organization.
1. Unique Domain – Every tenant has a unique domain name like yourorg.onmicrosoft.com.
2. Isolated Environment – Your tenant is separate from other organizations’ tenants.
3. Single Identity System – It manages authentication and authorization for users and apps.
4. Global Administrator Role – The person who creates the tenant becomes the first Global Admin.
5. Multiple Tenants Possible – You can create more than one tenant, e.g., one for production and one for development.
Example:
Suppose your company is Contoso Ltd.When you create a tenant, Azure gives you something like:contoso.onmicrosoft.comInside this tenant, you can add employees as users, create groups, and assign apps like Microsoft 365, Dynamics, or custom business apps.
🔹 Azure TenantA tenant is your organization’s instance of Azure Active Directory (Azure AD). It represents your company’s identity boundary in the Microsoft cloud.It manages users, groups, apps, and authentication. Every tenant has a unique domain like yourcompany.onmicrosoft.com.It’s free to have a tenant (you don’t pay for just having a tenant).
👉 Think of a tenant as the identity and access management container.
A subscription is the billing and resource container in Azure. It defines what services you can use and how you pay for them. A subscription is tied to a tenant for identity.You can have multiple subscriptions under a single tenant (e.g., one for development, one for production). Subscriptions contain Azure resources like VMs, databases, storage, etc.
👉 Think of a subscription as the wallet + resources container.
🔹 Example to Understand Easily
Your company Contoso Ltd. signs up for Azure.Microsoft creates a tenant: contoso.onmicrosoft.com. Inside this tenant, you create:Subscription 1 (Production) → pay for VMs, storage, SQL DB.Subscription 2 (Development) → used by devs for testing.
Both subscriptions belong to the same tenant (so they share users & identity).
Before creating a tenant, make sure you:
Follow these steps to create a tenant in the Azure portal:
Go to portal.azure.com and sign in with your administrator account.
Click on + Create a resource or search for Azure Active Directory.
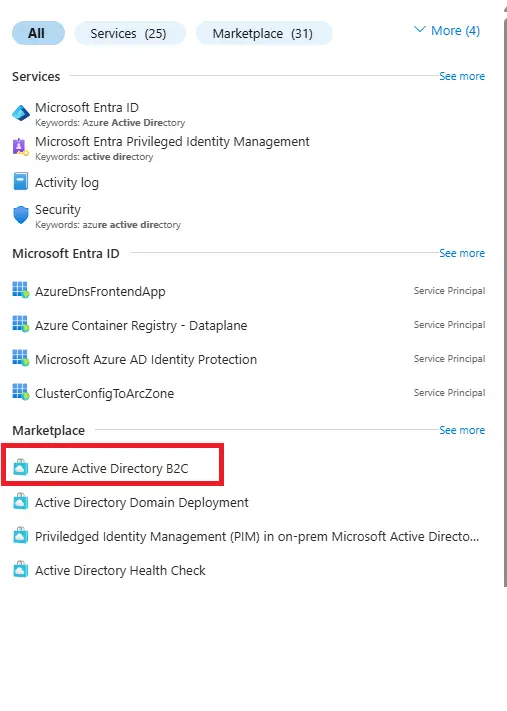
Select Manage tenants.
When you go into the Azure Portal and select Manage tenants, you’re essentially viewing and controlling the different Azure Active Directory (AAD) environments you have access to. A tenant in Azure represents an isolated instance of Azure Active Directory, which acts as your organization’s identity boundary. At this stage, you are presented with two options: Azure Active Directory tenant or Azure Active Directory (B2C) tenant.
An Azure Active Directory tenant is the standard option used by organizations to manage internal users, groups, roles, permissions, and applications. It’s what companies rely on for handling employee logins and access to services like Microsoft 365, Teams, and other Azure resources. This tenant is ideal for scenarios where you want centralized control over your workforce and IT environment.
On the other hand, an Azure Active Directory (B2C) tenant is designed for customer-facing applications. Unlike the standard tenant that manages employees, a B2C tenant manages external users such as customers or clients. It provides capabilities like self-service sign-up, login, password reset, and even social account integration through providers like Google, Facebook, Microsoft, or LinkedIn. This makes it especially useful if you’re building public applications or e-commerce platforms where end users need seamless and secure authentication.
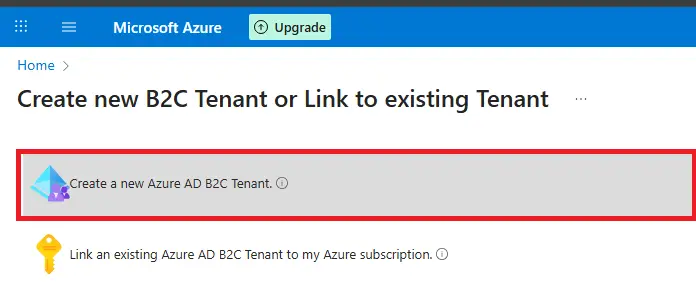
👉 For most scenarios, choose Azure Active Directory tenant.
Go to the Configuration tab.
Fill in the required details:
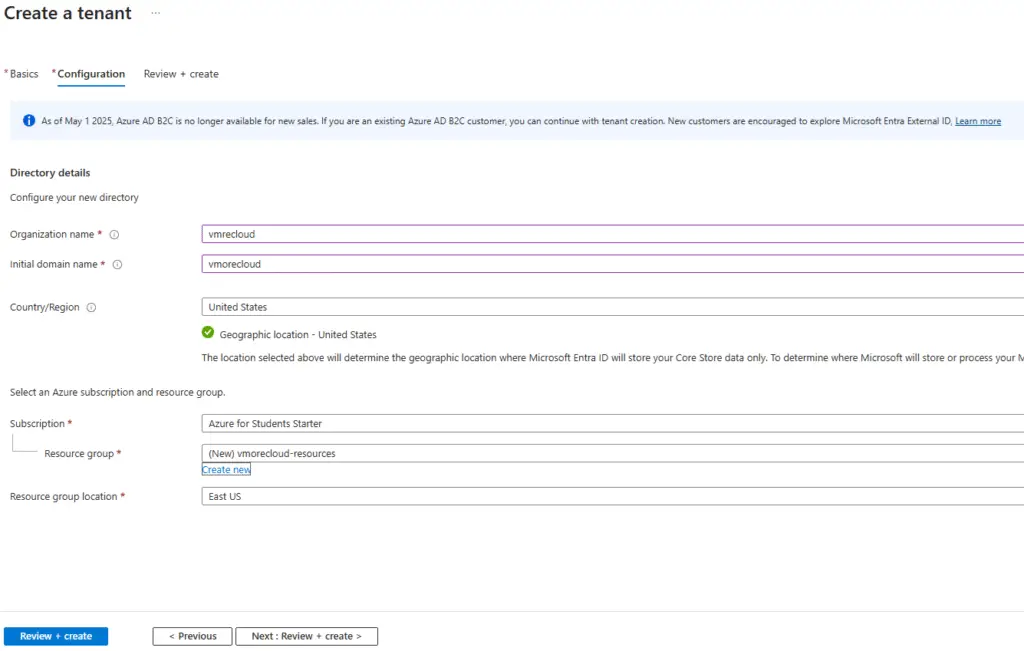
⚠️ Important: Once you select a region, you cannot change it later. The chosen location will host the original directory and its primary replica.
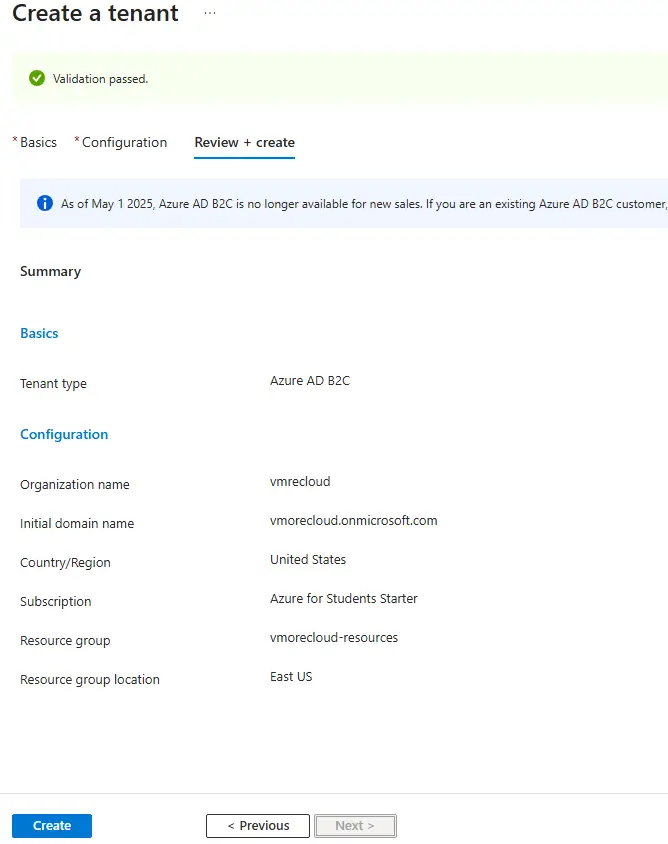
By following these steps, you can easily create a new tenant in Azure Active Directory. Whether you’re separating development and production environments or setting up a fresh directory for a new project, tenants help maintain security and organization.
With the right planning, you’ll have a clean and scalable identity management setup that supports both internal and external users.
✅ Pro Tip: If you’re learning Azure, consider creating a test tenant first. This allows you to experiment with features like conditional access, identity protection, and app registrations without affecting your production environment.