

Table of Contents
Introduction
This article provides a comprehensive guide on how to update vCenter, covering the entire process from pre-implementation considerations to post-update steps. Readers will learn the implementation procedures for both appliance and server patches, how to leverage the built-in Update Planner for streamlined upgrades, and the importance of data protection through each update stage. Whether you’re looking to perform a vCenter update using a URL, a CD, or require guidance on manual VCSA patching with a Patch ISO, this guide offers step-by-step instructions to ensure a successful update, minimizing downtime and maintaining your VMware environment’s integrity.
Pre-Implementation Steps
Before initiating the upgrade of the vCenter Server appliance, it is crucial to prepare adequately to ensure a smooth transition and to minimize potential disruptions. Here are the essential steps to follow:
Downloading the ISO
First, download the ISO installation image of vCenter 7 from the VMware website if it has not been downloaded yet. Mount the ISO image to a virtual DVD drive or extract the files to a custom directory. For Windows users, navigate to the U:\vcsa-ui-installer\win32\ directory and run installer.exe. Linux users should go to vcsa-ui-installer/lin64/ and execute. /installer.
Creating a Snapshot
Creating a snapshot of the vCenter Server Appliance is a critical precautionary step. Ensure that you correctly attach the ISO image to the CD/DVD drive of the vCenter Server appliance. Additionally, ensure to take a powered-off snapshot of the appliance to safeguard against any failure during the patching process.
Running the GUI Upgrade
The GUI upgrade process is divided into two stages. The first stage involves using the Deployment wizard to deploy the OVA file of the new appliance on the target ESXi host or vCenter Server instance. After the deployment of the OVA file, proceed to the second stage by logging into the vCenter Server Management Interface of the newly deployed appliance at https://FQDN_or_IP_address:5480 to continue with the setup wizard. This stage involves selecting the data types to transfer from the old appliance to the new one and concludes with the new appliance assuming the network settings of the old appliance after the data transfer.
Implementation Procedure
Stage One: Deploying the OVA File
- Begin by downloading and mounting the vCenter Server installer. Navigate to the appropriate directory based on the operating system and initiate the installer executable file.
- Deploy the OVA file, then log into the vCenter Server Management Interface of the newly deployed appliance to proceed with the next stage of restoration or upgrade.
Stage two: Transferring Data and Setting Up
- Review the introduction to stage two of the deployment process and click ‘Next’ to begin the data transfer from the old appliance.
- Select the types of data to transfer. For minimal downtime and storage requirements, opt to transfer only the configuration data. If using an external Oracle database, consider migrating historical and performance metrics data in the background after deployment.
- Wait for the pre-upgrade check to complete. Address any errors by reading the messages and downloading a support bundle for troubleshooting if necessary. If there are warnings, ensure the system meets the requirements stated before proceeding.
- On the ‘Ready to complete’ page, review settings, acknowledge the backup, and click ‘Finish’. Read and acknowledge the shutdown warning before the final data transfer begins.
- Monitor the data transfer and setup process. Once completed, you will be redirected to the vCenter Server Getting Started page.
- Confirm the successful upgrade and initialization of services on the new vCenter Server appliance. The old appliance will be powered off, and the new one will start operating with enhanced features and security.
Post-implementation steps
To ensure that the vCenter Server upgrade or migration has been successful, several verifications and validations are crucial.
Verifying the Upgrade
- Log into the upgraded or migrated vCenter Server instance using the credentials established pre-upgrade. This is necessary to access the system and perform checks.
- Confirm that the IP address, Active Directory registration, Network registration, and Domain settings are correctly configured as before the upgrade.
- Check the validity of the certificates and ensure that the inventory data has been correctly migrated.
- Review the events history, performance charts, and the configurations of users, permissions, and roles to ensure all data reflects the updated status accurately.
Validation Steps and Common Issues
- After ensuring that all system settings and data are correctly updated, confirm the upgrade or migration’s success by comparing the post-upgrade configurations with your required information or CLI template reference.
- In case of unexpected behaviour, troubleshoot by reviewing logs. For serious issues, consider a rollback to the source configuration.
- Always make sure that backups and offline snapshots of the appliance have been taken before initiating the update.
- Verify that the root password has not expired and that local SSO Administrator Credentials are available for use.
- If the environment includes external Platform Service Controllers (PSCs), ensure these are patched first before the vCenter Server Appliance (vCSA).
- Should a patching task fail, immediately collect a log bundle from the failure node using Command Line for analysis.
By following these steps, one can not only verify the success of the upgrade but also address and pre-empt potential issues that might compromise the system’s functionality or security.
Update vCenter Appliance Using URL
To update the vCenter Appliance using a URL, one must first access the vCenter Server Appliance Management Interface. This can be achieved by logging into the interface at https://appliance-IP-address-or-FQDN:5480 using the root account . It is crucial to ensure that the session remains active, as it will expire if left idle for more than 10 minutes.
Once logged in, navigate to the Update tab where one can select the target patch for vCenter. It is advisable to use the CHECK UPDATES button to select CD ROM + URL for a comprehensive search of available updates. After selecting the desired patch, click on “Stage and Install” to begin the update process. One can also choose “Stage Only” if planning to install the update at a later time.

Now click on the Stage and Install button to start the process.

Accept the License agreement and click Next.

After clicking on the Next button, the system will start checking the Pre update check.

Make sure to back up the vCenter before updating. Click Finish to start updating the vCenter. The screenshot below give you estimated down time to complete the update process.

Once click on the Finished button the update will start.

The update will take time. Once it completed reboot the vCenter Server to take effect.

Before proceeding with the patch installation, the system performs a pre-check to verify that the patches can be successfully installed. This check ensures that all requirements are met and that the system is ready for the update. During this phase, you must read and accept the End User License Agreement and confirm that you have backed up the vCenter Server.
The system initiates the update process upon confirming all prerequisites and backup verifications. The system completes patching once it displays the message “Installation succeeded,” indicating a successful update.
Update vCenter Appliance Using CD
Downloading and mounting the ISO
Start by downloading the patch ISO images from the designated website. Ensure that the correct vCenter patch ISO, ending in “-FP.iso”, is selected for download.
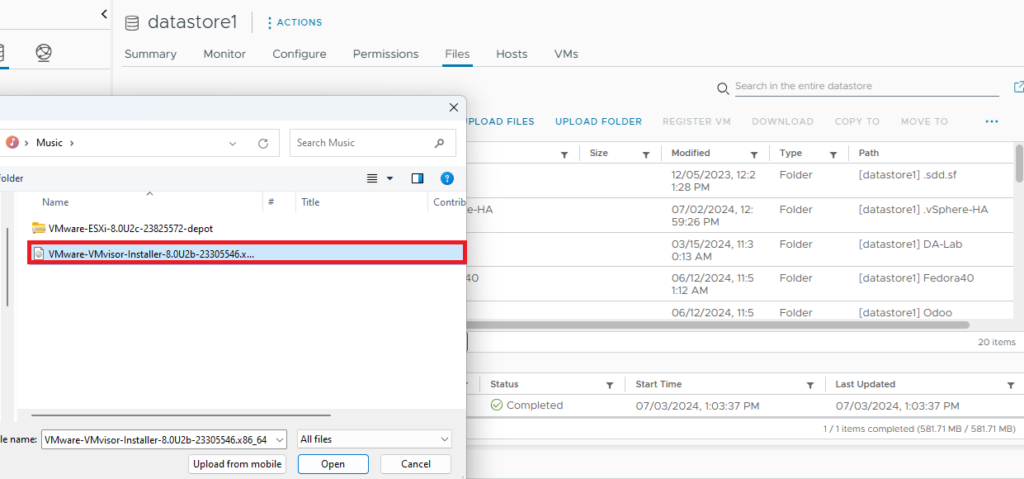
Once the ISO is downloaded, open the vCenter user interface to upload the ISO image to a datastore. Identify which ESXi Host the vCenter Appliance VM is running on and select a datastore that is mounted to this host and has sufficient space for the ISO file.

Browse the datastore files and select the ISO file for upload. Should the upload encounter issues, such as the error message “The operation failed for an undetermined reason,” it is crucial to resolve this by accepting the necessary certificates in a new browser tab before retrying the upload.
After the ISO is successfully uploaded, mount it to the vCenter Server Appliance. Right-click on the Appliance VM, navigate to ‘Edit Settings’, expand the CD/DVD Drive settings, and select ‘Datastore ISO File’. Browse to select the uploaded ISO file and confirm by clicking ‘OK’.

Executing the Update Procedure
Log into the vCenter Server Appliance Management Interface using the root account at https://appliance-IP-address-or-FQDN:5480 . Navigate to the ‘Update’ tab and select ‘Check CD ROM’ under ‘CHECK UPDATES’ to allow the system to detect the mounted ISO image.
Once the system recognizes the ISO, proceed with staging the ISO by entering the command software-packages stage --iso into the appliance shell. This will prepare the system for the update by staging the patches contained within the ISO.
After staging, review and accept the license agreement, then initiate the update installation by entering software-packages install --staged. During this process, the vCenter Server Appliance will require the SSO administrator credentials for authentication.
The installation process may take some time as it goes through various phases. Once completed, a confirmation message indicating “Installation succeeded” will appear, signalling that the update has been successfully applied.
Finally, relog into the upgraded vCenter to verify that all changes have been applied correctly and the system is functioning as expected.
Necessary Data Protection
Batch Backup VMs Managed by vCenter Server
vCenter Server does not inherently provide virtual machine backup capabilities, making third-party backup software a necessary choice for protecting VM data. AOMEI Cyber Backup, for example, allows administrators to batch backup large numbers of VMs managed by vCenter Server. This can be achieved by accessing the AOMEI Cyber Backup web client, navigating to Source Device > VMware, and adding a vCenter or standalone ESXi host. Subsequently, administrators can navigate to Backup Task > + Create New Task, where they can set the task name, backup type, device, target, schedule, and cleanup options. This process ensures that all critical VM data managed under vCenter can be safely backed up to local or network storage destinations.
Verifying Backup Integrity
To ensure the reliability of backups, it’s crucial to verify their integrity. The Veeam Backup Validator is a useful tool for this purpose. It operates by recalculating checksums for data blocks in the backup file and comparing them against the initial checksum values attached during the backup creation. If the recalculated and initial checksums match, the integrity of the backup file is confirmed, indicating that the backup is viable and has not been corrupted during processes such as storage or transfer. This validation step is essential for maintaining the trustworthiness of backups and ensuring that they will be effective when needed for recovery.
Using the Built-in Update Planner
Launching Update Planner
When administrators log into the vSphere Client, from the vCenter Server Summary page, they can quickly identify new updates. By clicking on alerts such as “View Updates” or “Updates Available,” the vCenter Server Update Planner is activated. This tool displays the available update along with crucial details such as Release Date, Version, Build, Type, Severity, whether a Reboot is Required, and access to Release Notes.
Conducting Pre-Checks and Compatibility
The Update Planner automates several key steps to ensure a smooth update process. It begins by discovering the current vSphere version and details, then verifies compatibility with the target vCenter Server version. Interoperability with other products is also checked to ensure seamless integration. Administrators can run Pre-Update Checks to confirm that the system meets the minimum requirements for an upgrade. This proactive approach helps in addressing potential issues before they impact the update process.
Additionally, the Update Planner generates detailed reports that list actions needed to guarantee a successful upgrade. These reports include interoperability considerations and compatibility requirements with other VMware products present in the environment. Using this information, administrators can apply necessary patches and updates, further enhancing the system’s stability and performance.
Manual VCSA Patching with Patch ISO
Downloading the Patch ISO
First, one must log into the vCenter Server Appliance Management Interface to check for available updates for the VCSA. The interface can be accessed at https://your_appliance_ip_or_dns:5480. Following this, the patch .iso file can be downloaded from the VMware portal by navigating to https://my.vmware.com/de/group/vmware/patch#search . It is crucial to ensure that the correct patch .iso file is selected, such as VCSA 6.5.0.5300 Build Number 5178943, for the specific version of the vCenter Server Appliance in use.
Using SSH for Patching
After downloading and attaching the patch .iso to the VCSA, one must enable the SSH service and the Bash Shell. Detailed instructions for activating these services can be found at https://docs.vmware.com/en/VMware-vSphere/6.5/com.vmware.vsphere.vcsa.doc/GUID-D58532F7-E48C-4BF2-87F9-99BA89BF659A.html . Once SSH and the Bash Shell are activated, they can connect to the VCSA using an SSH client like Putty.
Upon successfully logging into the VCSA CLI, the next step involves staging the packages located in the patch .iso file using the command software-packages stage --iso. After accepting the terms and conditions, the staging process should complete successfully, as indicated by the message “Staging process completed successfully”.
To verify the packages that have been staged, one can use the command software-packages list --staged . Once confirmed, the installation of the staged packages can proceed with the command software-packages install --staged. This command will install the staged packages to the VCSA, and upon successful completion, a message stating “Packages upgraded successfully, Reboot is required to complete the installation” will be displayed.
Staging and Applying Patches
Staging the Patches
To initiate the staging of patches, users can employ the software-packages utility, which allows for staging from both local and remote repositories. For local staging, one should attach an ISO image previously downloaded from the VMware patch portal to the CD/DVD drive of the vCenter Server appliance. This ISO image should be configured as a datastore ISO file using the vSphere Client. If staging from a remote repository, it is crucial to ensure that the repository settings are correctly configured and that the repository URL is accessible.
During the staging process, the vCenter Server Management Interface validates the authenticity of the VMware patch, checks for sufficient free space in the staging area, and ensures that the patches have not been altered. If any issues arise that prevent successful staging, the process suspends, allowing users to address the errors and resume staging from the point of interruption
Applying and Verifying Updates
Once patches are staged, they can be installed using the Appliance Management Interface (VAMI). Users should log into the vCenter Server Appliance Management Interface, navigate to the Update tab, and select the “Stage and Install” option. It is important to keep the ISO image attached to the CD/DVD drive throughout this process.
To verify that the patches can be successfully installed, the system performs a pre-check. This check confirms the backup of the vCenter Server and ensures all prerequisites are met. After reading and accepting the End User License Agreement, users should sign in with the vSphere SSO Administrator password to commence the patching.
Patching concludes successfully when the “Installation succeeded” message is displayed, indicating that the updates have been applied correctly.
Stage One: Deploy New VCSA
- Begin by downloading and mounting the vCenter Server installer. Navigate to the appropriate directory based on the operating system and initiate the installer executable file.
- Deploy the OVA file, then log into the vCenter Server Management Interface of the newly deployed appliance to proceed with the next stage of restoration or upgrade.
Deployment Steps
- Deploy the OVA file included in the vCenter Server GUI installer or by using the vSphere Client.
- If restoring from a backup with a vCenter Server product patch, download the full ISO of that patch.
- Ensure the target ESXi host is not in lockdown, maintenance mode, or part of a fully automated DRS cluster.
- Verify the ESXi host in a DRS cluster is available and not in lockdown or maintenance mode.
- Configure forward and reverse DNS records if assigning a static IP address to the appliance.
- Power off any running vCenter Server instance before starting the restore operation.
Setting Up Configuration
- After deploying the vCenter Server appliance, consider post-installation options before adding inventory.
- Plan the ESXi environment topology according to VMware guidelines.
- Configure all vSphere components to use an NTP server for synchronized time.
- Enable FQDN resolution when deploying the vCenter Server.
- Configure the network settings, including a static IP address and DNS entries.
- Set up the vSphere Authentication Proxy service and other necessary configurations.
Stage Two: Data Migration and Finalization
Transferring Data
- When the OVA deployment is completed, the user is redirected to stage two of the upgrade process to transfer data from the old appliance to the new, upgraded vCenter Server appliance.
- At this stage, users must choose the types of data to transfer. For minimal downtime and storage requirements on the new appliance, it’s advisable to transfer only the configuration data. However, if using an external Oracle database, one can opt to migrate historical and performance metrics data in the background after deploying and starting the new vCenter Server appliance.
- It is crucial to be aware that migrating a 6.7.x vCenter Server system to vCenter Server 7.x might fail if non-ASCII data is present, particularly when exporting events and tasks data. Users see an error such as
UnicodeEncodeErrorduring this process. - To avoid such issues, users can select the default option Configuration and Inventory at the end of stage one, which excludes tasks and events data, or clean the data in the events tables before running the migration again.
Final Validation and Reboot
- After selecting the data migration options, users should wait for the data transfer and setup process to finish. Once completed, they will be redirected to the vCenter Server Getting Started page, indicating that the vCenter Server appliance upgrade has been successful, and the old appliance is powered off.
- Make a snapshot of the appliance before applying updates. In case of any issues, this allows for a quick restoration to the previous state. Remember to delete the snapshot after a successful upgrade to conserve resources.
- Finally, verify the successful upgrade or migration by checking that all services are running correctly, and the new appliance has started with the expected configurations.
Conclusion
By exploring the comprehensive guide on how to update vCenter, readers equip themselves with the knowledge to navigate the update process efficiently, ensuring their VMware environments remain secure, stable, and performing optimally. By carefully following the outlined pre-implementation steps, implementation procedures, and post-implementation steps, organizations can minimize downtime and maximize the utility of their VMware infrastructure. The guide underscores the importance of data protection during updates and the utilization of tools like the built-in Update Planner and manual VCSA Patching with Patch ISO, facilitating a smooth and successful vCenter update.
The broader implications of keeping vCenter updated reflect not only on enhanced system security and performance but also on the overall health of IT infrastructures in organizations leveraging VMware solutions. This guide serves as a crucial resource for system administrators and IT professionals looking to maintain an edge in managing and securing their virtual environments. As the landscape of IT infrastructure continues to evolve, staying informed and prepared for updates becomes essential, and this article contributes significantly to that preparedness. For advancing beyond the current state of knowledge, engaging with further research or peer discussions on vCenter updates could uncover additional insights and best practices.
FAQs
1. What are the steps to update vCenter? To update vCenter, begin by downloading the latest version from the VMware Cloud Console under the Downloads section. If your vCenter is configured for high availability (HA), you should remove this configuration before updating. Once the update is complete, you can reconfigure HA for vCenter.
2. How can I upgrade my vCenter to the most recent version? To upgrade your vCenter to the latest version, open a web browser and navigate to http://vCenterServer:5480/ or https://vCenterServer:5480/. Log in using your credentials at the VMware vCenter Server Appliance web interface. Navigate to the Update tab, select ‘Check update’, then ‘Install Updates’. You will need to read and agree to the End User License Agreement (EULA) to proceed.
3. Can you guide me through upgrading vCenter from version 6.5 to 6.7? To upgrade from VCSA 6.5 to 6.7, connect to the VCSA via the VAMI interface and go to the Update tab, then click on Settings. Use the VCSA management interface to update vCenter. Proceed to update VCSA via the User Interface, stage, and update VCSA after accepting the end-user license agreement. Ensure you back up your vCenter before starting the upgrade process.
4. What is the procedure to update vCenter from version 7.0.3 to 8.0.2? Currently, specific steps to update vCenter from version 7.0.3 to 8.0.2 are not provided. It is recommended to consult VMware’s official documentation or support for detailed guidance tailored to this version upgrade.

[…] backup performance in ESXi environments. It delves into various aspects of optimization, including Veeam backup proxy configuration, network optimization techniques, and storage considerations. The article also covers advanced […]