Table of Contents
In today’s cloud-driven IT world, high availability (HA) is no longer a luxury—it’s a necessity. Downtime can lead to lost revenue, customer dissatisfaction, and even security vulnerabilities. Microsoft Azure provides several mechanisms to ensure that workloads remain resilient, and one of the most fundamental of these is the Availability Set.
In this post, we’ll cover what Availability Sets are, why they matter, and how you can configure them in your Azure environment. We’ll also perform a step-by-step lab tutorial to help you gain hands-on experience.
What is an Availability Set in Azure?
An Availability Set is a logical grouping of two or more virtual machines (VMs) in Azure that helps you keep your applications running during planned or unplanned maintenance.
Here’s the key concept: Azure spreads your VMs across fault domains and update domains so that no single point of failure can take down your entire workload.
- Fault Domain (FD): Think of this as a rack in a data center with independent power, cooling, and networking. Placing VMs in different fault domains ensures resilience against hardware failures.
- Update Domain (UD): Azure periodically performs maintenance. By distributing VMs across update domains, Azure ensures that not all your VMs are rebooted simultaneously.
Benefits of Using Availability Sets
- High Availability: Ensures uptime by protecting against hardware and maintenance failures.
- Cost-Effective: No extra charge for Availability Sets; you only pay for the VMs inside them.
- Easy Integration: Works seamlessly with Azure Load Balancer for application resiliency.
- 99.95% SLA: Microsoft guarantees a 99.95% uptime SLA when you deploy VMs across Availability Sets.
Availability Sets vs. Availability Zones
It’s important not to confuse Availability Sets with Availability Zones.
- Availability Sets: Provide HA within a single data center (spread across racks and servers).
- Availability Zones: Provide HA across multiple data centers within the same Azure region.
If your application requires zone-level resilience, consider Availability Zones. But if you just need protection against hardware or host-level failures, Availability Sets are an excellent starting point.
Deploying Virtual Machines in an Availability Set
Now, let’s roll up our sleeves and build a lab in Azure to understand how Availability Sets work. This lab assumes you have an Azure subscription.
Step 1: Log in to Azure Portal
- Go to https://portal.azure.com.
- Use your Azure account credentials to sign in.
Step 2: Create an Availability Set
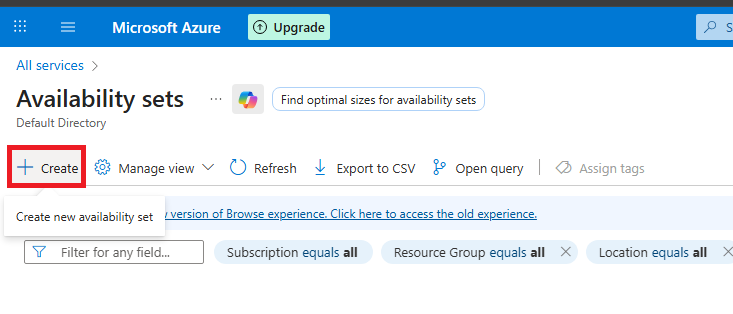
When you log in to the Azure Portal, you need to create an Availability Set before placing any VMs inside it. Here’s how:
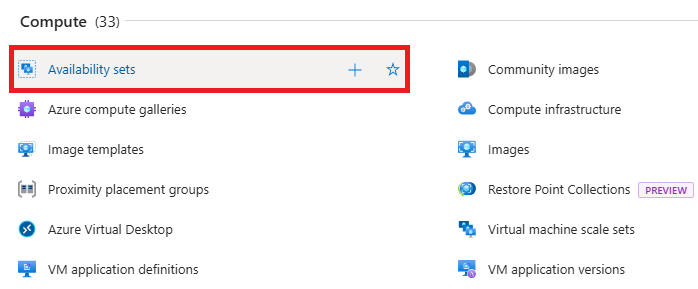
Search for “Availability Set” – In the search bar at the top of the “Create a resource” page, type Availability Set. Azure will display it as a resource you can deploy.

Click on “Create a resource” – This option is available on the left-hand menu of the Azure Portal. It’s your starting point whenever you want to provision a new Azure service (VMs, storage, networking, etc.).

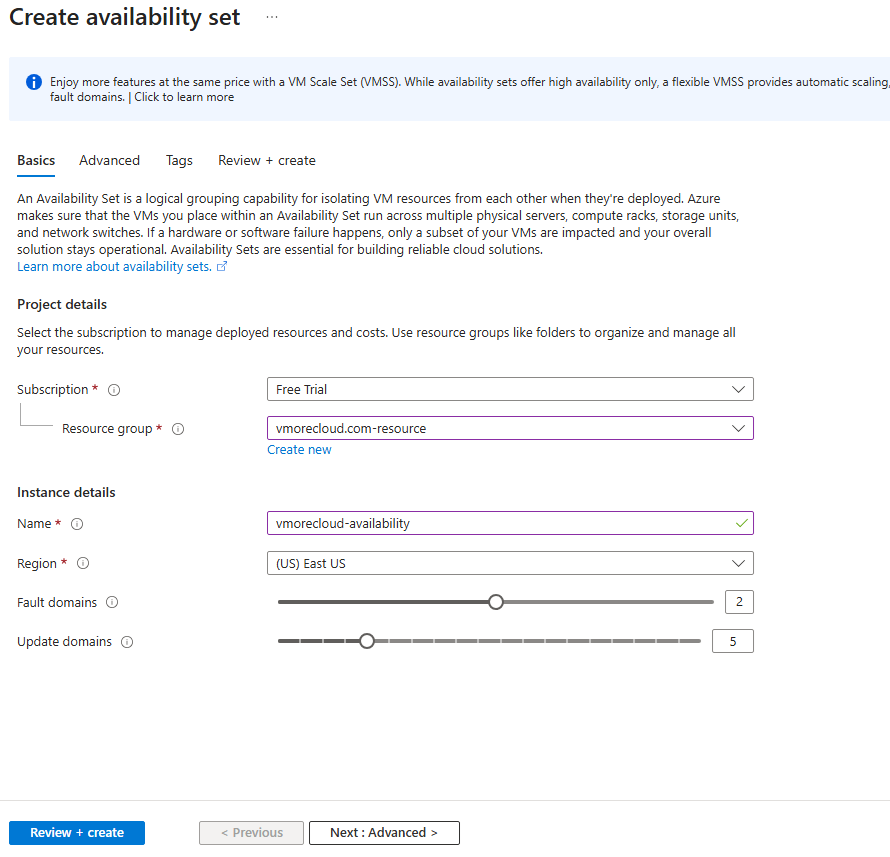
- Enter the following details:
- Resource Group: Select or create a new one (e.g.,
RG-HA-Demo). - Name: Enter
AS-HA-Demo. - Region: Choose your desired Azure region.
- Fault Domains: Select 2.
- Update Domains: Select 5 (recommended).
- Resource Group: Select or create a new one (e.g.,
- Click Review + Create → Create.

Step 3: Create Virtual Machines inside the Availability Set
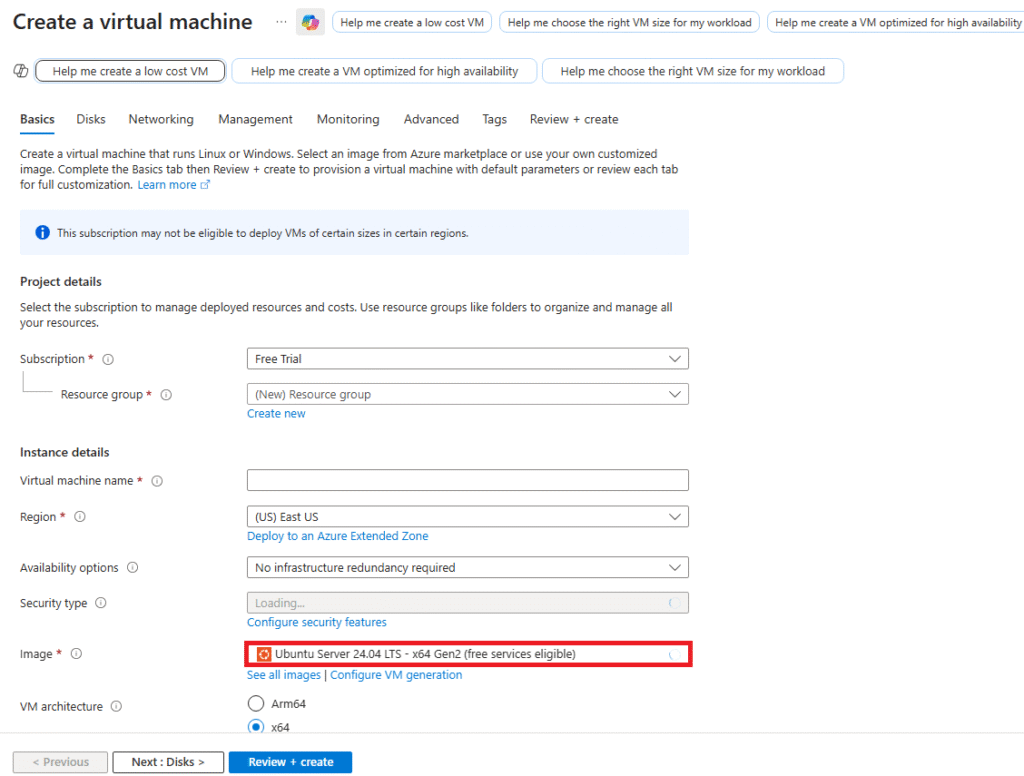
In the Azure Portal, go to Virtual Machines → + Create.
Fill in VM details (e.g., VM1).

Under Availability Options, select Availability Set.
Choose the AS-HA-Demo set created earlier.
Complete the remaining VM setup (OS image, size, credentials).
Repeat the process to create at least two VMs (VM1 and VM2) inside the same Availability Set.
Step 4: Verify VM Distribution
- Go to the Availability Set (AS-HA-Demo) in the portal.
- Navigate to the Instances tab.
- Verify that your VMs (
VM1andVM2) are spread across different fault domains and update domains.
Step 5: (Optional) Configure Load Balancer
To fully utilize the Availability Set, deploy an Azure Load Balancer:
- Create a Load Balancer in the same resource group.
- Add both VMs (
VM1,VM2) to the backend pool. - Configure a health probe and load balancing rule (e.g., for HTTP traffic on port 80).
This setup ensures traffic is evenly distributed and automatically redirected if one VM goes down.
Best Practices for Availability Sets
- Always deploy at least two or more VMs in an Availability Set to gain HA benefits.
- Combine Availability Sets with Managed Disks for better reliability.
- Use Azure Load Balancer to distribute traffic between VMs.
- For mission-critical apps, consider Availability Zones or even Azure Site Recovery for disaster recovery.
Conclusion
Availability Sets are one of the simplest and most effective tools in Azure to achieve high availability for your workloads. By intelligently distributing your VMs across fault and update domains, Azure minimizes downtime and ensures service continuity.
Whether you’re running a web application, database servers, or backend services, deploying them in an Availability Set is a must for achieving 99.95% SLA without additional costs.
If you’re just starting with Azure, this lab is an excellent first step to understand high availability concepts before diving into more advanced options like Availability Zones or Azure Kubernetes Service (AKS) with HA clusters.
- Design


