Physical Address
304 North Cardinal St.
Dorchester Center, MA 02124
Physical Address
304 North Cardinal St.
Dorchester Center, MA 02124
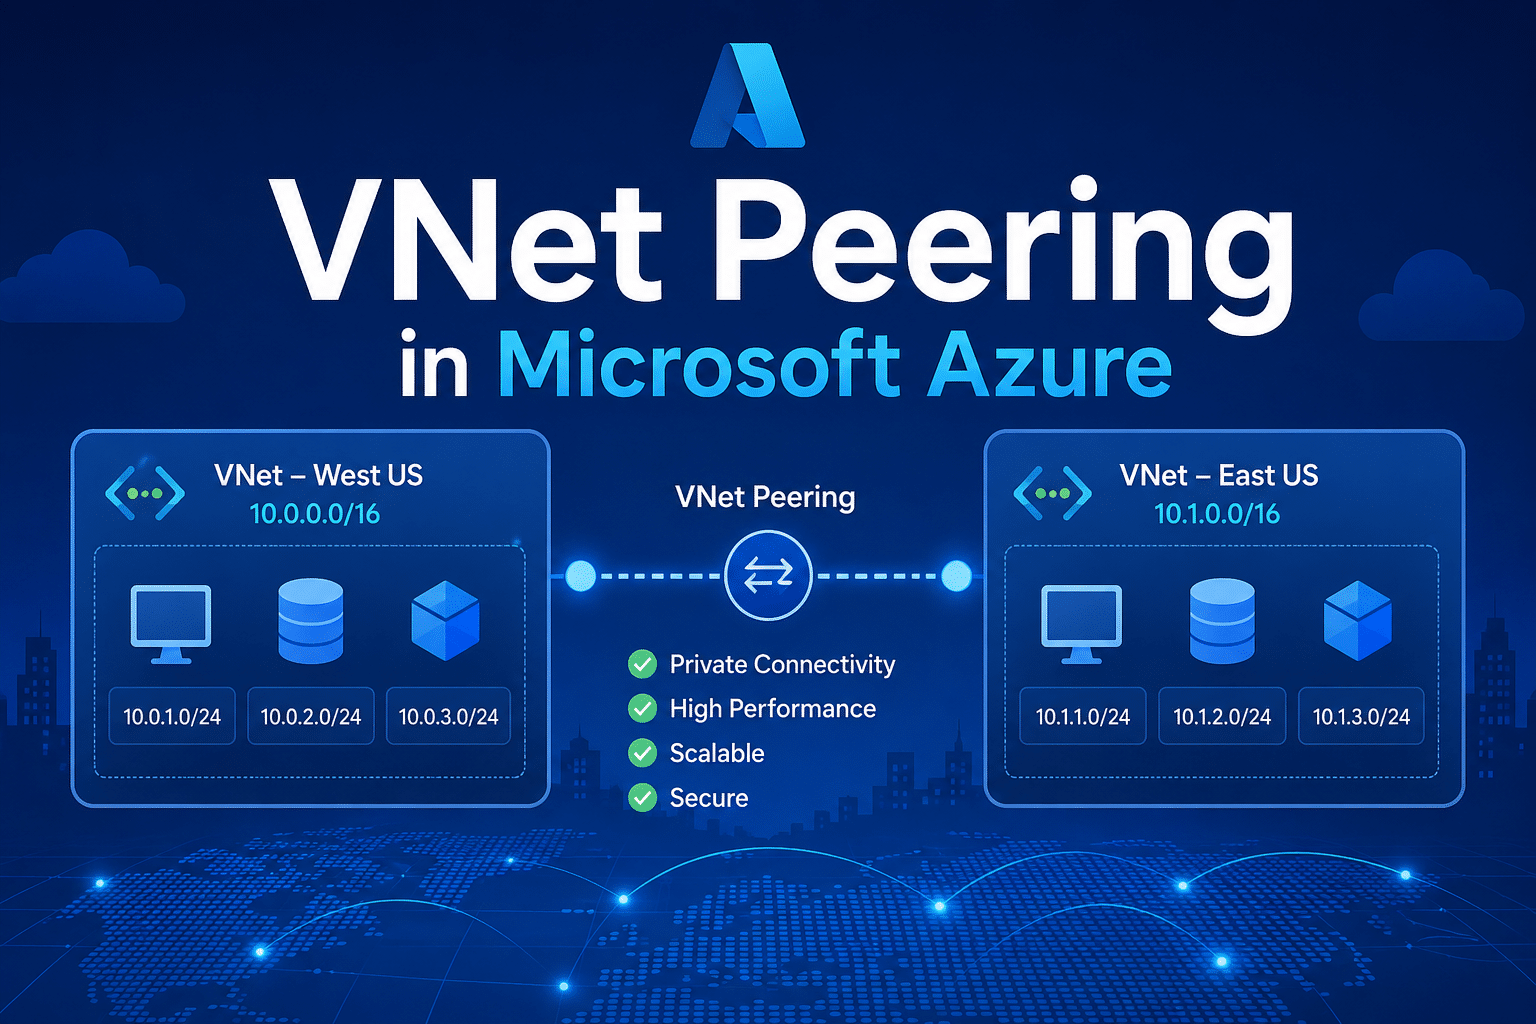
Azure Virtual Network (VNet) Peering is a Microsoft Azure networking feature that enables seamless, low-latency connectivity between two Azure Virtual Networks. Rather than routing traffic through the public Internet or through VPN gateways, VNet Peering connects networks directly through Microsoft’s private backbone infrastructure, resulting in extremely low latency comparable to resources within the same network.
Whether you are preparing for the AZ-104 Microsoft Azure Administrator certification or designing production cloud architectures, mastering VNet Peering is a critical skill. In this comprehensive lab guide, we will configure peering between two geographically separated virtual networks:
You will learn to create both VNets from scratch, configure bidirectional peering, test connectivity, and understand the underlying concepts that appear on the AZ-104 exam.
Azure VNet Peering creates a direct Layer 3 connection between two virtual networks using Microsoft’s global backbone network. Traffic between peered VNets does not traverse the public Internet, is not encrypted (it uses Azure’s physically secure backbone), and benefits from ultra-low latency and high bandwidth.
| Feature | VNet Peering | VPN Gateway |
| Latency | Extremely Low (backbone) | Higher (encryption overhead) |
| Bandwidth | No restriction (network-limited) | Gateway SKU dependent |
| Encryption | Not encrypted (physically secure) | IPsec encrypted |
| Cost | Ingress/Egress charges apply | Gateway + data transfer cost |
| Setup Complexity | Low | Moderate to High |
| Cross-region | Yes (Global Peering) | Yes |
| Transitivity | Non-transitive | Can be transitive via NVA |
Global VNet Peering — Peers VNets across different Azure regions (our lab scenario: East US to West US). Standard bandwidth and latency charges apply for cross-region
Important — Non-Transitivity Rule Azure VNet Peering is non-transitive. If VNet A is peered with VNet B, and VNet B is peered with VNet C, resources in VNet A CANNOT communicate with VNet C unless a direct peering exists between A and C. This is a common AZ-104 exam question.
When you create a peering link, you control two important settings on each side:
| Before You Begin — Requirements |
| Active Azure Subscription (Free trial or Pay-As-You-Go) |
| Access to the Azure Portal (portal.azure.com) or Azure CLI installed |
| Basic understanding of IP addressing and CIDR notation |
| Contributor or Owner role on the Azure subscription or Resource Group |
| Recommended: AZ-104 exam study materials for exam context |
All resources in this lab will be created inside a single Resource Group to simplify management and cleanup after the lab.
# Login to Azure
az login

# Create the Resource Group
az group create \
  --name AZ104-VNetPeering-RG \
  --location eastus

# Expected Output:
# { "id": "/subscriptions/.../resourceGroups/AZ104-VNetPeering-RG",
#   "location": "eastus", "name": "AZ104-VNetPeering-RG", "provisioningState": "Succeeded" }
The Main VNet uses a large address space of 192.168.0.0/16, giving us 65,536 available IP addresses across potential subnets. We will create one subnet named MainSubnet using 192.168.0.0/24.
In the Azure Portal search bar, type Virtual Networks and select it
Click + Create
On the Basics tab, configure:

Region: (US) East US
# Create AZ104-Main-VNet in East US with address space 192.168.0.0/16
az network vnet create \
  --name AZ104-Main-VNet \
  --resource-group AZ104-VNetPeering-RG \
  --location eastus \
  --address-prefix 192.168.0.0/16 \
  --subnet-name MainSubnet \
  --subnet-prefix 192.168.0.0/24

# Verify creation
az network vnet show \
  --name AZ104-Main-VNet \
  --resource-group AZ104-VNetPeering-RG \
  --query '{name:name, location:location, addressSpace:addressSpace.addressPrefixes}' \
  --output table
The Remote VNet uses a smaller, more specific address space of 192.168.1.0/24 and is located in the West US region, simulating a geographically distributed network — exactly the scenario you will encounter in real enterprise Azure environments
In the Azure Portal, navigate to Virtual Networks and click + Create
On the Basics tab, configure:Resource group: AZ104-VNetPeering-RGVirtual network name: AZ104-Remote-VNet
Region: (US) West US

Click Next: IP Addresses

Set IPv4 address space to: 192.168.1.0/24

Click + Add subnet:Subnet name: RemoteSubnet
Subnet address range: 192.168.1.0/24
Click Add, then Review + Create, then Create
Address Space Note The Remote VNet’s address space (192.168.1.0/24) is a subset of the Main VNet’s address space (192.168.0.0/16). Azure allows this configuration. The critical rule is that peered VNets must NOT have overlapping address spaces. Since 192.168.1.0/24 falls within 192.168.0.0/16, they technically overlap — in a production environment, use completely non-overlapping ranges such as 10.0.0.0/16 and 10.1.0.0/16. For this lab, we use the specified ranges as instructed.
# Create AZ104-Remote-VNet in West US with address space 192.168.1.0/24
az network vnet create \
  --name AZ104-Remote-VNet \
  --resource-group AZ104-VNetPeering-RG \
  --location westus \
  --address-prefix 192.168.1.0/24 \
  --subnet-name RemoteSubnet \
  --subnet-prefix 192.168.1.0/24

# Verify creation
az network vnet show \
  --name AZ104-Remote-VNet \
  --resource-group AZ104-VNetPeering-RG \
  --query '{name:name, location:location, addressSpace:addressSpace.addressPrefixes}' \
  --output table
VNet Peering in Azure is always bidirectional — it requires TWO peering links: one from Main to Remote, and one from Remote to Main. You cannot create a one-way peering link and expect traffic to flow in both directions. Azure will automatically prompt you to configure both sides simultaneously through the portal.
Step 1 — Initiate Peering from AZ104-Main-VNet:
Navigate to Virtual Networks and click on AZ104-Main-VNet
In the left-hand menu, scroll to Settings and click Peerings

Click + Add
In the Add peering panel, configure the following:
| Setting | Value | Notes |
| This virtual network — Peering link name | Main-to-Remote | Name for the link from Main VNet side |
| Allow virtual network access | Enabled | Required for connectivity |
| Allow forwarded traffic | Enabled | Recommended for flexibility |
| Allow gateway transit | Disabled | No gateway in this lab |
| Remote virtual network — Peering link name | Remote-to-Main | Name for the link from Remote VNet side |
| Virtual network deployment model | Resource Manager | Both VNets use ARM |
| Subscription | Your subscription | Both VNets in same subscription |
| Virtual network | AZ104-Remote-VNet | Select from dropdown |
| Allow virtual network access (remote) | Enabled | Required on both sides |
| Use remote gateways | Disabled | No gateway in this lab |
Click Add and wait for the peering status to show Connected


# Get the Resource IDs of both VNets (needed for peering)
MAIN_VNET_ID=$(az network vnet show \
  --name AZ104-Main-VNet \
  --resource-group AZ104-VNetPeering-RG \
  --query id --output tsv)

REMOTE_VNET_ID=$(az network vnet show \
  --name AZ104-Remote-VNet \
  --resource-group AZ104-VNetPeering-RG \
  --query id --output tsv)

echo "Main VNet ID: $MAIN_VNET_ID"
echo "Remote VNet ID: $REMOTE_VNET_ID"

# ── Create Peering: Main --> Remote ──────────────────────────────
az network vnet peering create \
  --name Main-to-Remote \
  --resource-group AZ104-VNetPeering-RG \
  --vnet-name AZ104-Main-VNet \
  --remote-vnet $REMOTE_VNET_ID \
  --allow-vnet-access \
  --allow-forwarded-traffic
az network vnet peering create \
  --name Remote-to-Main \
  --resource-group AZ104-VNetPeering-RG \
  --vnet-name AZ104-Remote-VNet \
  --remote-vnet $MAIN_VNET_ID \
  --allow-vnet-access \
  --allow-forwarded-traffic

# ── Verify Peering Status ─────────────────────────────────────────
echo '=== Main-to-Remote Peering Status ==='
az network vnet peering show \
  --name Main-to-Remote \
  --resource-group AZ104-VNetPeering-RG \
  --vnet-name AZ104-Main-VNet \
  --query 'peeringState' --output tsv

echo '=== Remote-to-Main Peering Status ==='
az network vnet peering show \
  --name Remote-to-Main \
  --resource-group AZ104-VNetPeering-RG \
  --vnet-name AZ104-Remote-VNet \
  --query 'peeringState' --output tsv

# Both should output: Connected
To validate that VNet Peering is functioning correctly, deploy one lightweight virtual machine in each VNet and test connectivity using ping and curl commands.
# Deploy a small B1s VM in the Main VNet (East US)
az vm create \
  --name MainVM \
  --resource-group AZ104-VNetPeering-RG \
  --location eastus \
  --image Ubuntu2204 \
  --size Standard_B1s \
  --vnet-name AZ104-Main-VNet \
  --subnet MainSubnet \
  --admin-username azureadmin \
  --admin-password 'P@ssw0rd2025!' \
  --authentication-type password \
  --public-ip-address MainVM-PublicIP \
  --nsg MainVM-NSG
# Get the private IP of MainVM
MAIN_VM_PRIVATE_IP=$(az vm show -d \
  --name MainVM \
  --resource-group AZ104-VNetPeering-RG \
  --query privateIps --output tsv)
echo "MainVM Private IP: $MAIN_VM_PRIVATE_IP"
# Deploy a small B1s VM in the Remote VNet (West US)
az vm create \
  --name RemoteVM \
  --resource-group AZ104-VNetPeering-RG \
  --location westus \
  --image Ubuntu2204 \
  --size Standard_B1s \
  --vnet-name AZ104-Remote-VNet \
  --subnet RemoteSubnet \
  --admin-username azureadmin \
  --admin-password 'P@ssw0rd2025!' \
  --authentication-type password \
  --public-ip-address RemoteVM-PublicIP \
  --nsg RemoteVM-NSG

# Get the private IP of RemoteVM
REMOTE_VM_PRIVATE_IP=$(az vm show -d \
  --name RemoteVM \
  --resource-group AZ104-VNetPeering-RG \
  --query privateIps --output tsv)
echo "RemoteVM Private IP: $REMOTE_VM_PRIVATE_IP"
# Allow ICMP inbound on Main NSG
az network nsg rule create \
  --name Allow-ICMP-Inbound \
  --nsg-name MainVM-NSG \
  --resource-group AZ104-VNetPeering-RG \
  --priority 1000 \
  --direction Inbound \
  --access Allow \
  --protocol Icmp \
  --source-address-prefix 192.168.1.0/24 \
  --destination-address-prefix '*' \
  --source-port-range '*' \
  --destination-port-range '*'

# Allow ICMP inbound on Remote NSG
az network nsg rule create \
  --name Allow-ICMP-Inbound \
  --nsg-name RemoteVM-NSG \
  --resource-group AZ104-VNetPeering-RG \
  --priority 1000 \
  --direction Inbound \
  --access Allow \
  --protocol Icmp \
  --source-address-prefix 192.168.0.0/16 \
  --destination-address-prefix '*' \
  --source-port-range '*' \
  --destination-port-range '*'
Now test the connection using the Azure CLI Run Command feature, which allows executing commands inside a VM without SSH:
# Test ping from MainVM --> RemoteVM (substitute $REMOTE_VM_PRIVATE_IP with actual IP)
az vm run-command invoke \
  --name MainVM \
  --resource-group AZ104-VNetPeering-RG \
  --command-id RunShellScript \
  --scripts "ping -c 4 $REMOTE_VM_PRIVATE_IP"

# Expected Output (success):
# PING 192.168.1.4 (192.168.1.4) 56(84) bytes of data.
# 64 bytes from 192.168.1.4: icmp_seq=1 ttl=64 time=11.2 ms
# 64 bytes from 192.168.1.4: icmp_seq=2 ttl=64 time=10.8 ms
# 64 bytes from 192.168.1.4: icmp_seq=3 ttl=64 time=11.1 ms
# 64 bytes from 192.168.1.4: icmp_seq=4 ttl=64 time=10.9 ms
# 4 packets transmitted, 4 received, 0% packet loss
# Test ping from RemoteVM --> MainVM (substitute $MAIN_VM_PRIVATE_IP with actual IP)
az vm run-command invoke \
  --name RemoteVM \
  --resource-group AZ104-VNetPeering-RG \
  --command-id RunShellScript \
  --scripts "ping -c 4 $MAIN_VM_PRIVATE_IP"
# Expected Output (success):
# PING 192.168.0.4 (192.168.0.4) 56(84) bytes of data.
# 64 bytes from 192.168.0.4: icmp_seq=1 ttl=64 time=18.3 ms
# --- 192.168.0.4 ping statistics ---
# 4 packets transmitted, 4 received, 0% packet loss

# Note: Latency is slightly higher for cross-region (East US <--> West US)
# This is expected and normal for Global VNet Peering
One of the best ways to verify VNet Peering is to inspect the effective routes on a VM’s NIC. When peering is active, you will see the remote address space appearing as a VNet Peering route:
# Get the NIC name for MainVM
NIC_NAME=$(az vm show \
  --name MainVM \
  --resource-group AZ104-VNetPeering-RG \
  --query 'networkProfile.networkInterfaces[0].id' --output tsv | awk -F'/' '{print $NF}')

# Show effective routes on MainVM NIC
az network nic show-effective-route-table \
  --name $NIC_NAME \
  --resource-group AZ104-VNetPeering-RG \
  --output table

# Look for a route like:
# Source         State    Address Prefix    Next Hop Type     Next Hop IP
# VNetPeering    Active   192.168.1.0/24   VNetPeering       -
# This confirms peering is working correctly
Azure VNet Peering is one of the most frequently tested topics on the AZ-104 exam and one of the most commonly used networking features in real enterprise Azure deployments. Understanding how to configure, troubleshoot, and architect around VNet Peering is a foundational skill for any Azure Administrator.
We have detected that you are using extensions to block ads. Please support us by disabling these ads blocker.