Auto Create Map Network Drive for all Users using Active Directory on Windows Server 2025

Table of Contents
Introduction
Managing shared storage across an organization is crucial for smooth workflow and data accessibility. In Windows Server 2025, mapping network drives allows users to seamlessly access shared folders without manually connecting to them each time they log in. By automating this process using Active Directory Group Policy, IT administrators can ensure consistent access across the entire network.In this guide, we’ll discuss:
- What is a mapped network drive?
- What is it used for?
- Benefits of mapping network drives.
- A detailed lab tutorial on how to auto-map network drives using Active Directory and Group Policy.
- Additional tips and best practices.
What is a Mapped Network Drive?
A mapped network drive is a shortcut to a shared folder on a remote server. Instead of navigating to a network location manually, users can access it via an assigned drive letter (e.g., Z:\). This simplifies file access and ensures that users have quick access to company resources without needing technical expertise.
What is a Mapped Network Drive Used For?
Mapped network drives are primarily used to:
Provide centralized access to shared folders within an organization.
Enable collaborative work by allowing multiple users to access the same files.
Ensure secure access control by setting permissions through Active Directory.
Improve workflow efficiency by automating access to commonly used resources.
Reduce IT workload by standardizing file access across multiple users.
Benefits of Using a Mapped Network Drive
Centralized Data Management
All files are stored in one location, reducing redundancy and version conflicts.Easy data backup and disaster recovery.
2. Simplified User AccessUsers don’t have to remember network paths; they can access files via a familiar drive letter.Seamless integration with applications requiring file paths.
3. Security and Access ControlPermissions can be enforced using Active Directory security groups.Prevents unauthorized access and data breaches.
4. Improved IT AdministrationReduces support requests related to lost or inaccessible files.Automates the process, ensuring all users get the right drive mappings based on their department.
Lab Tutorial: Auto Create Map Network Drive for All Users Using Active Directory in Windows Server 2025
In this step-by-step tutorial, we’ll configure Group Policy Objects (GPOs) in Active Directory to automatically map network drives for users when they log in.
Step 1: Set Up the Shared Folder on the Server
Login to Windows Server 2025 with administrative privileges.
Open File Explorer and create a new folder (e.g., CompanyData).

Right-click the folder and select Properties > Sharing. Click Advanced Sharing > Check Share this folder.
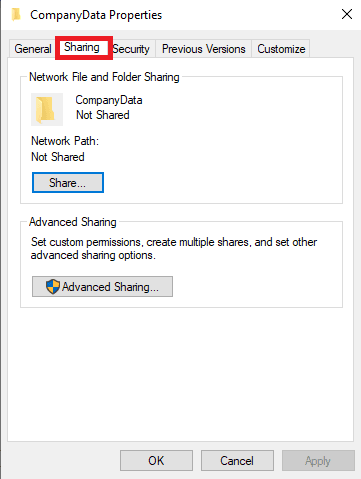

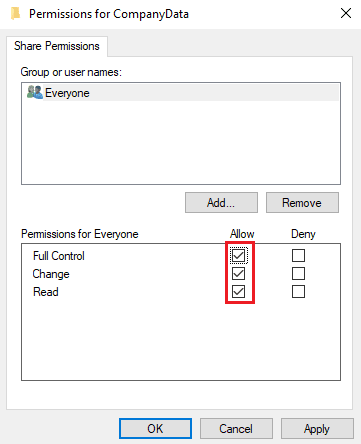
Click Permissions, select Everyone, and choose Full Control (modify as needed). When you’re setting up a shared folder in Windows (like in Windows Server 2025), you’ll find a “Permissions” button in the Sharing tab.
This opens a window where you can control who can access the folder and what they can do with it
Note the network path (e.g., \\Deploy\CompanyData). This is a UNC path. \\ tells Windows this is a network location. Deploy is the name of the computer or server that’s sharing the folder, and CompanyData is the the shared folder name on that server.

Step 2: Create a Group Policy Object (GPO) in Active Directory
Open Group Policy Management (gpedit.msc).

To begin, open the Group Policy Management Console on your Windows Server. In the left-hand panel, expand your domain (for example, vmorecloud.com), then navigate to the Group Policy Objects section. This is where all the Group Policy Objects (GPOs) are stored and managed. Right-click on Group Policy Objects and select New from the context menu. In the dialog box that appears, enter a name for the new GPO AutoMapNetworkDrive and click OK. This creates a new GPO that you can configure to automatically map a network drive for users in your domain.

Step 3: Configure Drive Mapping in Group Policy
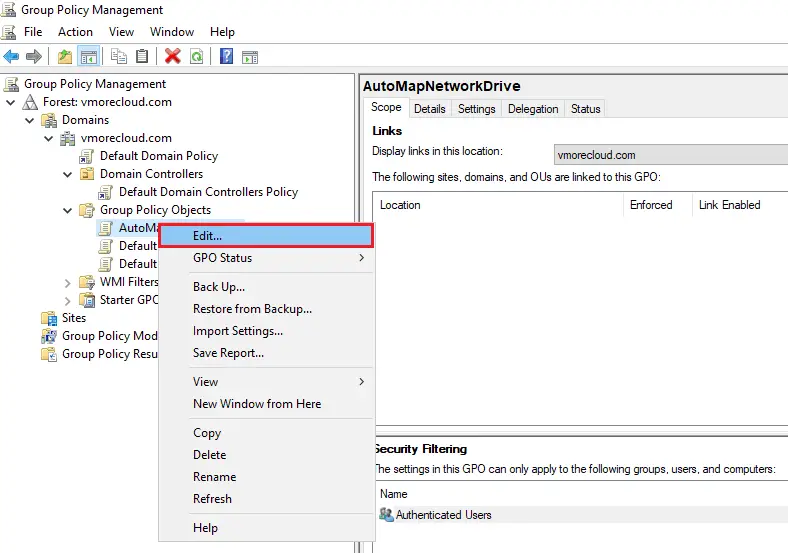
Right-click the new AutoMapNetwork Drive policy and select Edit.
Navigate to User Configuration > Preferences > Windows Settings > Drive Maps.
Right-click and select New > Mapped Drive.

Configure the following settings:
As our server name is deploy and shared folder name is company data. So our location path becomes Location: \\deploy\CompanyData
Reconnect: Enabled. Label as: Company Data. Drive Letter: Choose an available letter (e.g., Z:).
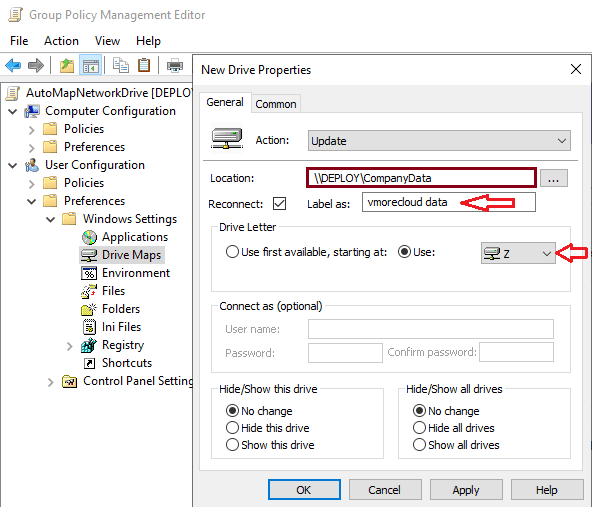
Click the Common tab and check Run in logged-on user’s security context.

Click OK and close the editor.
Step 4: Link the GPO to an Active Directory OU
In Group Policy Management, navigate to your Users OU. Right-click the OU and select Link an Existing GPO. Select AutoMapNetworkDrive and click OK
Step 5: Update Group Policy and Verify
Open Command Prompt on a client machine and run:
gpupdate /force

Restart the client machine and log in. Open File Explorer and verify that the mapped drive appears under This PC.

Troubleshooting Tips
Mapped drive not appearing?
Run gpresult /r to check if the policy is applied.
Permissions issue?
Ensure users have the correct access rights to the shared folder.
Not mapping on some devices?
Make sure they are part of the correct Active Directory OU.
Best Practices for Network Drive Mapping
Use Active Directory security groups to restrict access to sensitive folders.
Implement redundancy using DFS (Distributed File System) for high availability.
Regularly audit access logs to ensure security compliance.
Educate users on best practices for file storage and avoid saving locally.
Conclusion
Automatically mapping network drives for all users in Windows Server 2025 streamlines file access, security, and IT management. By leveraging Active Directory and Group Policy, administrators can ensure that users always have quick access to shared resources without manual intervention.
If you found this tutorial helpful, share your thoughts in the comments below! Also, explore more of our Windows Server 2025 guides for IT administrators.





Perfect work you have done, this web site is really cool with superb information.