How to Check GPU Info in DXDiag

Table of Contents
Pull up a chair and let me share something that’ll save you tons of time and frustration. You know that moment when you’re trying to figure out what graphics card is actually running inside your PC? Maybe you’re troubleshooting a game that won’t launch, checking if your system meets the requirements for that shiny new software, or simply curious about your hardware specs.
Well, I’ve got great news for you – Windows has a built-in diagnostic tool that’s been hiding in plain sight, and today we’re diving deep into how to use DXDiag to get all the GPU information you need.
What Exactly is DXDiag? (And Why Should You Care?)
Let me paint you a picture. DirectX Diagnostic Tool, or DXDiag as we tech folks call it, is like having a backstage pass to your computer’s performance. It’s Microsoft’s own system information utility that’s been quietly sitting in every Windows installation since the late ’90s, just waiting to spill all the secrets about your hardware.
Think of DXDiag as your system’s personal biography writer – it knows everything about your graphics card, from its name and manufacturer to how much memory it has and what drivers it’s running. And the best part? You don’t need to download anything or spend a dime.
The Lightning-Fast Way to Launch DXDiag
Alright, let’s get our hands dirty. Here are three super-quick methods to fire up DXDiag:
Method 1: The Run Command (My Personal Favorite)
Press Windows key + R simultaneously
Type dxdiag and hit Enter

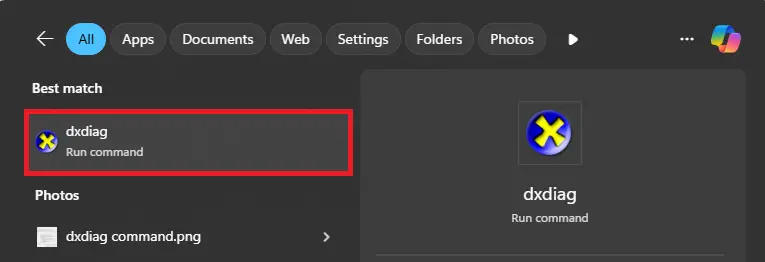
Method 2: The Search Route
Click the Windows Start button
Type “dxdiag” in the search bar

Click on “dxdiag” when it appears
Method 3: The Command Line Approach
Open Command Prompt (cmd)
Type dxdiag and press Enter

Pro tip: If you see a prompt asking whether to check if your drivers are digitally signed, just click “Yes” – it’s totally safe and gives you more detailed information.
Navigating DXDiag Like a Pro: Finding Your GPU Goldmine
Once DXDiag opens, you’ll see several tabs at the top. Here’s where the magic happens for GPU information:
The “Display” Tab: Your Graphics Command Center
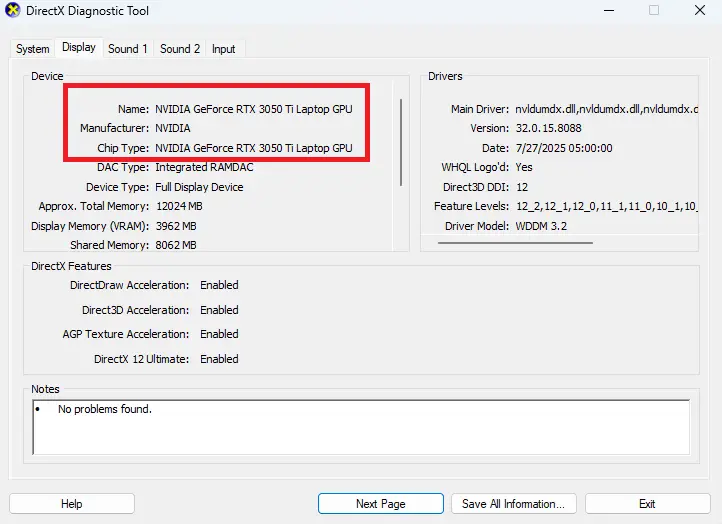
Click on the “Display” tab (or “Display 1” if you have multiple monitors), and feast your eyes on this treasure trove of information:
Device Information:
- Name: Your graphics card’s exact model (like “NVIDIA GeForce RTX 4070” or “AMD Radeon RX 7800 XT”)
- Manufacturer: The company that made your GPU
- Chip Type: The specific GPU chipset
- DAC Type: Digital-to-Analog Converter information
- Device Type: Whether it’s integrated or dedicated graphics

Memory Details:
- Approx. Total Memory: How much video memory (VRAM) your card has
- Current Display Mode: Your current screen resolution and color depth
- HDR Support: Whether your setup supports High Dynamic Range
Driver Information:
- Driver Name: The specific driver file
- Version: Your current driver version number
- Date: When the driver was released
- WHQL Logo’d: Whether Microsoft has certified the driver
Multiple Graphics Cards? No Problem!
If you’re running a laptop with both integrated and dedicated graphics (hello, gaming laptops!), or you have multiple GPUs, you’ll see “Display 1,” “Display 2,” and so on. Each tab represents a different graphics processor, so make sure to check them all.
Decoding What You’re Seeing: Making Sense of GPU Specs
Let me break down what these specifications actually mean for you:
Memory Matters
That “Approx. Total Memory” number? It’s crucial for gaming and professional work. Modern games typically need at least 6-8GB of VRAM for smooth 1440p gaming, while 4K gaming or professional video editing might require 12GB or more.
Driver Dates Tell a Story
If your driver date is more than a few months old, it might be time for an update. Newer drivers often include performance improvements and bug fixes for the latest games and applications.
Understanding Chip Types
- Integrated Graphics (like Intel UHD or AMD Radeon Graphics): Built into your CPU, great for basic tasks
- Dedicated Graphics (like NVIDIA GeForce or AMD Radeon): Separate cards with their own memory, perfect for gaming and intensive work
Troubleshooting Common DXDiag GPU Issues
Sometimes DXDiag might show unexpected results. Here’s what to do:
“Generic PnP Monitor” or Missing GPU Info
This usually means Windows isn’t recognizing your graphics card properly. Try:
- Updating your graphics drivers from the manufacturer’s website
- Checking if your GPU is properly seated in its slot
- Running Windows Update to catch any missing drivers
Multiple Display Adapters Showing
This is normal if you have:
- A laptop with both integrated and dedicated graphics
- Multiple graphics cards in your system
- Virtual display adapters from software like VirtualBox
Outdated Driver Warnings
If DXDiag shows driver issues, head to:
- NVIDIA users: nvidia.com/drivers
- AMD users: amd.com/support
- Intel users: intel.com/content/www/us/en/support
Beyond Basic GPU Info: DXDiag’s Hidden Gems
While you’re in DXDiag, don’t miss these other valuable sections:
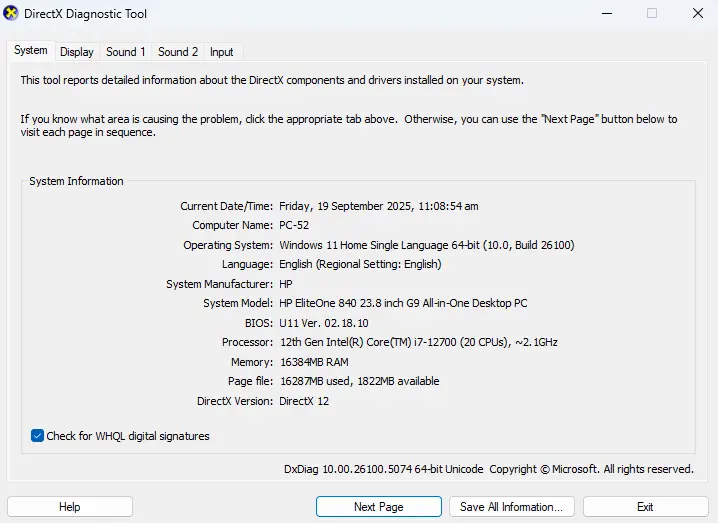
The “System” Tab
Shows your overall system specs, including CPU, RAM, and Windows version – perfect for compatibility checks.
DirectX Features
Check if DirectX features are working properly. Any “Not Available” entries might indicate driver or hardware issues.
Sound Tab
If you’re having audio issues with games or media, the Sound tab can help diagnose problems.
When to Use DXDiag vs. Other GPU Detection Tools
DXDiag is fantastic for quick checks and built-in convenience, but here’s when you might want alternatives:
Use DXDiag when you need:
- Quick GPU identification
- Driver version checking
- Basic troubleshooting information
- A tool that’s already on every Windows PC
Consider other tools for:
- GPU-Z: More detailed technical specifications
- MSI Afterburner: Real-time monitoring and overclocking
- HWiNFO64: Comprehensive system monitoring
Saving and Sharing Your DXDiag Information
Need to save this information or share it with tech support? DXDiag has you covered:
- Click “Save All Information” in the DXDiag window
- Choose where to save the text file
- The file contains everything – perfect for troubleshooting or system documentation
The Bottom Line: DXDiag is Your GPU Detective
There you have it! DXDiag is like having a computer technician built right into Windows. Whether you’re a gamer trying to optimize performance, a content creator checking system requirements, or just someone curious about their hardware, DXDiag gives you the GPU information you need in seconds.
The beauty of this tool lies in its simplicity and availability – no downloads, no installations, no subscriptions. Just press Windows+R, type “dxdiag,” and you’re golden.
Quick Recap: Your DXDiag Action Plan
- Launch DXDiag: Windows+R, type “dxdiag”
- Navigate to Display tab: Find your GPU information
- Check multiple display tabs: If you have multiple graphics adapters
- Note key specs: GPU name, memory, driver version, and date
- Save information: Use “Save All Information” if needed
Ready to become your own GPU detective? Fire up DXDiag right now and explore what’s powering your digital world. Trust me, once you start using this tool regularly, you’ll wonder how you ever managed without it.


