
Upgrade VMware ESXi 7.0 to 7.0 U3u via vCenter Server: Complete Step-by-Step Guide
VMware has released vSphere 7.0 Update 3u (U3u), which includes critical security patches, bug fixes, and performance enhancements. To maintain a stable and secure environment, it’s essential to keep your ESXi hosts updated. In this article, we’ll walk you through upgrading ESXi 7.0 to 7.0 U3u using vCenter Server, with a detailed, step-by-step process.
We’ll also cover the three primary methods to upgrade ESXi hosts and explain when and why to use each method.
Why Upgrade to ESXi 7.0 U3u?
Upgrading to 7.0 U3u offers:
- Security patches for known vulnerabilities
- Enhanced hardware compatibility
- Better performance and bug fixes
- Support for newer vSAN and NSX versions
Available Methods to Upgrade ESXi 7.0 to 7.0 U3u
There are three officially supported ways to upgrade ESXi hosts:
| Method | Best For |
|---|---|
| 1. vCenter Lifecycle Manager | Centralized upgrade of multiple hosts |
| 2. ESXCLI Command-Line | Scripted/manual upgrade of single host |
| 3. Interactive ISO Installer | Lab/test environments or offline hosts |
Let’s start with the most efficient method: vCenter Lifecycle Manager.
Method 1: Upgrade Using vCenter Lifecycle Manager (LCM)
This method is recommended for production environments where multiple ESXi hosts are managed via vCenter Server.
🔧 Prerequisites:
- vCenter Server must be upgraded and operational
- ESXi hosts should be connected and managed by vCenter
- Backup vCenter and configuration of ESXi hosts
- Internet connectivity (for online patching)
- Put hosts in Maintenance Mode during upgrade
Step-by-Step Guide:
Step 1: Login to vSphere Web Client
- Open browser →
https://<vcenter-fqdn>/ui - Log in with administrator credentials
Step 2: Go to Lifecycle Manager
Lifecycle Manager (LCM) is the tool inside vSphere used to manage and apply updates or patches. “Check for Updates” ensures you’re using the latest list of available patches from VMware.
Click Menu >Click Menu (top-left) > Lifecycle Manager

Under Updates, click Check for Updates
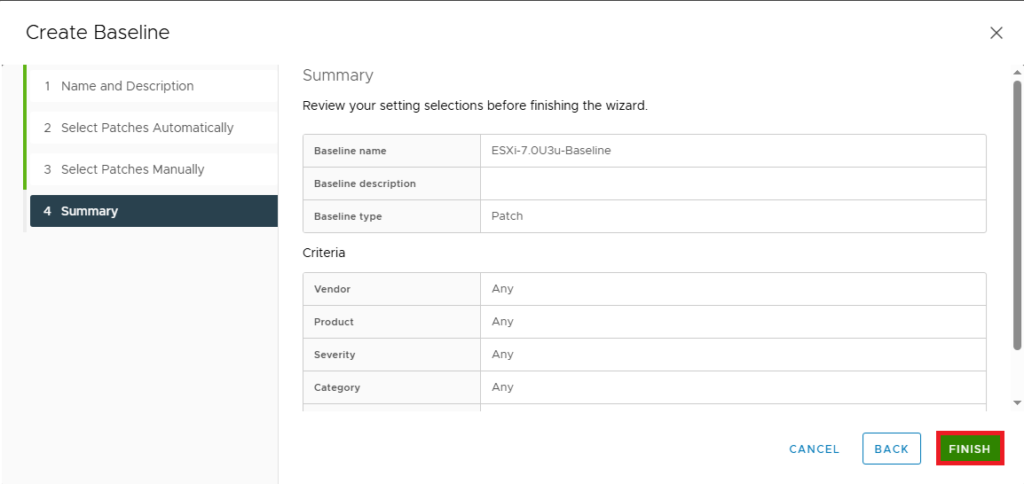
Step 3: Create a New Baseline
A baseline is like a checklist that tells vCenter what updates should be applied. You’re creating one specifically for the ESXi 7.0 U3u patch so you can apply it consistently.
Navigate to Baselines > New. Choose Patch as baseline type
Name it: ESXi-7.0U3u-Baseline
Select the appropriate patch (7.0 U3u build). Review the summary, if everything is okay click finish and save the settings.
Step 4: Attach Baseline to Cluster or Host
This step links your patch baseline to the host or cluster that needs to be updated. Without this, Lifecycle Manager won’t know which machines should be updated.
Now Go to Hosts and Clusters. Select the host or cluster. Navigate to Updates > Baselines
Click Attach and select your created baseline
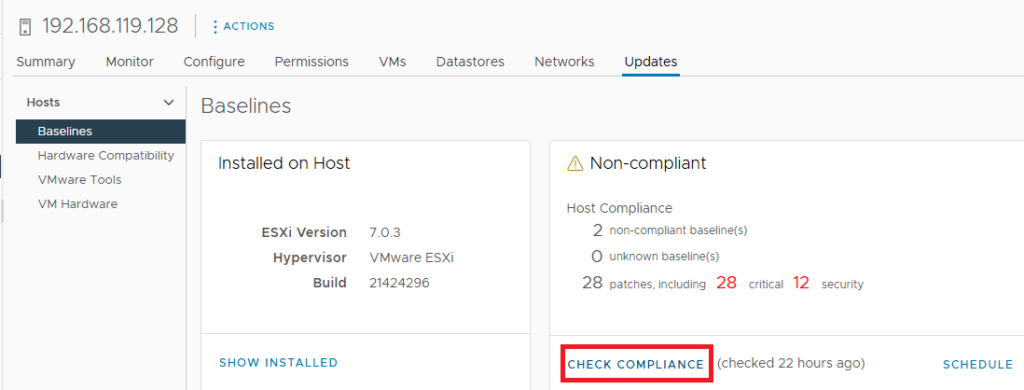
Step 5: Pre-check Remediation
This checks if your ESXi host already meets the requirements of the new patch (in this case, 7.0 U3u). If it’s not compliant, that means it needs to be updated. It may also show warnings that should be resolved before updating.
Click Check Compliance. Fix any reported issues before proceeding
Step 6: Put the Host into Maintenance Mode
Putting a host in maintenance mode ensures no virtual machines are running on it during the update. It’s a safety step to avoid VM crashes or data loss during the patching process.
Right-click the host → Enter Maintenance Mode
Step 7: Remediate
This is the actual update step. It applies the patch (7.0 U3u) to the host. The system will reboot the host to complete the installation.
Click Remediate to begin the upgrade. The process will reboot the host automatically.

Step 8: Exit Maintenance Mode
This brings the host back online so it can run virtual machines again. At this point, the upgrade is finished and the host is ready for use.
- After reboot and confirmation, right-click host → Exit Maintenance Mode
Your ESXi host is now upgraded to 7.0 U3u!
Method 2: Upgrade via ESXCLI (Command-Line Method)
This method is useful for upgrading standalone hosts or in automated environments without vCenter.
🔧 Prerequisites:
- SSH access or direct console
- Backup the host configuration
- Maintenance Mode is recommended
🔹 Online Upgrade Steps:
esxcli network firewall ruleset set -e true -r httpClient
esxcli software profile update -p ESXi-7.0U3u-XXXX -d https://hostupdate.vmware.com/software/VUM/PRODUCTION/main/vmw-depot-index.xml
reboot
Replace XXXX with the correct build profile name.
Offline Upgrade Steps:
- Download the offline bundle ZIP from VMware Customer Connect
- Upload the bundle to a datastore
- Run the following command:
esxcli software profile update -d /vmfs/volumes/datastore1/ESXi700-Update03u.zip -p ESXi-7.0U3u-XXXX
reboot
Method 3: Upgrade via ISO Installer (Interactive Method)
This approach is ideal for manual upgrades or test environments.
🔹 Steps:
Download ESXi 7.0 U3u ISO from VMware portal
Mount ISO using iLO/iDRAC or burn to USB
Boot ESXi host from the ISO
Choose Upgrade Existing Installation
Follow the on-screen instructions
Reboot after the upgrade completes
Post-Upgrade Best Practices
After upgrading the host:
Confirm ESXi version in vSphere Client
Re-enable HA/DRS and other features
Validate VM connectivity and storage access
Update firmware and drivers if necessary
Monitor logs for anomalies
Final Thoughts
Upgrading ESXi to 7.0 U3u is essential to maintain a secure and high-performing infrastructure. If you’re managing multiple hosts, using vCenter Lifecycle Manager is the most efficient method. For individual upgrades, ESXCLI or ISO-based methods work well.
- Design