Windows Server 2025 Packer Build for VMware vSphere
I have been working the last few days on my Windows Server 2025 packer build for VMware vSphere now that Windows Server 2025 has now been released as GA. It did require quite a few tweaks from the previous way I built Windows Server 2022. So, hopefully this will give anyone a look at how you can quickly get up to speed to update your packer build templates for VMware vSphere.
What is Packer?
In case you don’t know, Hashicorp Packer is a small utility that is a single binary that allows you to be able to use automation to build your virtual machine templates. It is hands down the best tool I have used for building images for deployment.
Also, you can use it in a CICD pipeline which is what I am doing in GitLab to automate the build of Windows Server and Ubuntu Server operating systems. What I do is schedule GitLab to run a CICD pipeline very week to create a new template with the latest updates, etc. In this way, you will always have an updated Windows Server or Linux virtual machine template which is extremely handy and saves tons of time.
What you need
Most will not start at a full CICD pipeline to deploy their packer templates. However, I highly recommend it. To get started in the most simple way, you need to download Packer. You can do that here:
I also highly recommend working with your Packer files using Visual Studio Code, which you can download here:
You can also download the Windows Assessment and Deployment Kit (WADK) here that allows easily creating unattend answer files for your Packer deployment:
Files to create
Once you have the tools you need and are ready to work with Packer in Visual Studio Code, you will need to create the following.
- variables.pkr.hcl
- windowsserver2025.auto.pkrvars.hcl
- windowsserver2025.json.pkr.hcl
- autounattend.xml
- setup.ps1
This is what my files and directory structure look like. ***Note*** the Gitlab pipeline file is a file for running the build as a CI/CD pipeline which is out of the scope of this post, but definitely something I would recommend.

Let’s take a look at each of the files and what they need to contain.
variables.pkr.hcl
Below is the variables file for the Packer configuration:
variable "cpu_num" {
  type    = string
  default = ""
}

variable "disk_size" {
  type    = string
  default = ""
}

variable "mem_size" {
  type    = string
  default = ""
}

variable "os_iso_path" {
  type    = string
  default = ""
}

variable "vmtools_iso_path" {
  type    = string
  default = ""
}

variable "vsphere_compute_cluster" {
  type    = string
  default = ""
}

variable "vsphere_datastore" {
  type    = string
  default = ""
}

variable "vsphere_dc_name" {
  type    = string
  default = ""
}

variable "vsphere_folder" {
  type    = string
  default = ""
}

variable "vsphere_host" {
  type    = string
  default = ""
}

variable "vsphere_portgroup_name" {
  type    = string
  default = ""
}

variable "vsphere_server" {
  type    = string
  default = ""
}

variable "vsphere_template_name" {
  type    = string
  default = ""
}

variable "vsphere_user" {
  type    = string
  default = ""
}

variable "winadmin_password" {
  type      = string
  default   = ""
  sensitive = true
}

variable "vm_disk_controller_type" {
  type        = list(string)
  description = "The virtual disk controller types in sequence. (e.g. 'pvscsi')"
  default     = ["pvscsi"]
}
windowsserver2025.auto.pkvars.hcl
Below is the variables file that will contain the actual values of the variables that are set. Configure the file with the values from your VMware vSphere environment.
vsphere_server = "vcsa.cloud.local"
vsphere_user = "administrator@vsphere.local"
vsphere_password = "password"
vsphere_template_name = "Win2025clone_november2024"
vsphere_folder = "Templates"
vsphere_dc_name = "Your DC Name"
vsphere_compute_cluster = "clustername"
vsphere_host = "hostname.yourdomain.com"
vsphere_portgroup_name = "portgroupname"
vsphere_datastore = "datastorename"
cpu_num = 4
mem_size = 4096
disk_size = 102400
os_iso_path = "[datastorename] ISO/en-us_windows_server_2025_x64_dvd_b7ec10f3.iso"
vmtools_iso_path = "[datastorename] ISO/windows.iso"
vm_disk_controller_type = ["pvscsi"]
windowsserver2025.json.pkr.hcl
This is the file that actually does the work of creating the virtual machine. It uses the variables and other information from the files we created above.
# This file was autogenerated by the 'packer hcl2_upgrade' command. We
# recommend double checking that everything is correct before going forward. We
# also recommend treating this file as disposable. The HCL2 blocks in this
# file can be moved to other files. For example, the variable blocks could be
# moved to their own 'variables.pkr.hcl' file, etc. Those files need to be
# suffixed with '.pkr.hcl' to be visible to Packer. To use multiple files at
# once they also need to be in the same folder. 'packer inspect folder/'
# will describe to you what is in that folder.

# Avoid mixing go templating calls ( for example ```{{ upper(`string`) }}``` )
# and HCL2 calls (for example '${ var.string_value_example }' ). They won't be
# executed together and the outcome will be unknown.

# All generated input variables will be of 'string' type as this is how Packer JSON
# views them; you can change their type later on. Read the variables type
# constraints documentation
# https://www.packer.io/docs/templates/hcl_templates/variables#type-constraints for more info.

packer {
  required_version = ">= 1.7.0"
  required_plugins {
    vsphere = {
      version = ">= 1.3.0"
      source  = "github.com/hashicorp/vsphere"
    }
  }
}

locals {
  vsphere_plugin_path = "${path.root}/plugins/packer-plugin-vsphere_v1.4.2_x5.0_linux_arm64"
}

# source blocks are generated from your builders; a source can be referenced in
# build blocks. A build block runs provisioner and post-processors on a
# source. Read the documentation for source blocks here:
# https://www.packer.io/docs/templates/hcl_templates/blocks/source
source "vsphere-iso" "autogenerated_1" {
  CPUs                 = var.cpu_num
  RAM                  = var.mem_size
  RAM_reserve_all      = true
  cluster              = var.vsphere_compute_cluster
  communicator         = "winrm"
  winrm_timeout        = "1h" # Waits up to 1 hour
  convert_to_template  = "true"
  datacenter           = var.vsphere_dc_name
  datastore            = var.vsphere_datastore
  disk_controller_type = var.vm_disk_controller_type
  firmware             = "efi-secure"
  floppy_files         = ["setup/win25/efi/autounattend.xml", "setup/setup.ps1"]
  folder               = var.vsphere_folder
  guest_os_type        = "windows2019srvNext_64Guest"
  host                 = var.vsphere_host
  insecure_connection  = "true"
  iso_paths            = ["${var.os_iso_path}", "${var.vmtools_iso_path}"]

  boot_wait = "3s"
  boot_command = [
    "<spacebar><spacebar>"
  ]

  network_adapters {
    network      = var.vsphere_portgroup_name
    network_card = "vmxnet3"
  }

  storage {
    disk_size             = var.disk_size
    disk_thin_provisioned = true
  }
  username       = var.vsphere_user
  vcenter_server = var.vsphere_server
  password       = var.vsphere_password
  vm_name        = var.vsphere_template_name
  winrm_password = var.winadmin_passwword
  winrm_username = "Administrator"
}

# a build block invokes sources and runs provisioning steps on them. The
# documentation for build blocks can be found here:
# https://www.packer.io/docs/templates/hcl_templates/blocks/build
build {
  sources = ["source.vsphere-iso.autogenerated_1"]

  provisioner "windows-shell" {
    inline = ["dir c:\\"]
  }

}
autounattend.xml
The unattend file creates answers for typical inputs that the admin has to give when installing things manually. You can also use the Windows System Image Manager from the Windows Assessment and Deployment Toolkit to create the XML file and add sections to it easily.
Below is an example of my autounattend.xml file I am using with my Windows Server 2025 installation. It does things like:
- Configure the drive configuration for EFI
- Set the language
- Enable RDP
- Set firewall groups to allow RDP
- Runs the setup.ps1 script for provisioning
Be sure to match the “password” set in the unattend file with the winrm password that is configured in your packer configuration.
<?xml version="1.0" encoding="utf-8"?>
<unattend xmlns="urn:schemas-microsoft-com:unattend">
<settings pass="windowsPE">
<component name="Microsoft-Windows-International-Core-WinPE" processorArchitecture="amd64" publicKeyToken="31bf3856ad364e35" language="neutral" versionScope="nonSxS" xmlns:wcm="http://schemas.microsoft.com/WMIConfig/2002/State" xmlns:xsi="http://www.w3.org/2001/XMLSchema-instance">
<SetupUILanguage>
<UILanguage>en-US</UILanguage>
</SetupUILanguage>
<InputLocale>en-US</InputLocale>
<SystemLocale>en-US</SystemLocale>
<UILanguage>en-US</UILanguage>
<UserLocale>en-US</UserLocale>
</component>
<component name="Microsoft-Windows-Setup" processorArchitecture="amd64" publicKeyToken="31bf3856ad364e35" language="neutral" versionScope="nonSxS" xmlns:wcm="http://schemas.microsoft.com/WMIConfig/2002/State" xmlns:xsi="http://www.w3.org/2001/XMLSchema-instance">
<DiskConfiguration>
<Disk wcm:action="add">
<CreatePartitions>
<CreatePartition wcm:action="add">
<Type>EFI</Type>
<Size>512</Size>
<Order>1</Order>
</CreatePartition>
<CreatePartition wcm:action="add">
<Extend>false</Extend>
<Type>MSR</Type>
<Order>2</Order>
<Size>128</Size>
</CreatePartition>
<CreatePartition wcm:action="add">
<Order>3</Order>
<Type>Primary</Type>
<Extend>true</Extend>
</CreatePartition>
</CreatePartitions>
<ModifyPartitions>
<ModifyPartition wcm:action="add">
<Format>FAT32</Format>
<Order>1</Order>
<PartitionID>1</PartitionID>
</ModifyPartition>
<ModifyPartition wcm:action="add">
<Order>2</Order>
<PartitionID>2</PartitionID>
</ModifyPartition>
<ModifyPartition wcm:action="add">
<Format>NTFS</Format>
<Label>Windows</Label>
<Order>3</Order>
<PartitionID>3</PartitionID>
</ModifyPartition>
</ModifyPartitions>
<DiskID>0</DiskID>
<WillWipeDisk>true</WillWipeDisk>
</Disk>
</DiskConfiguration>
<ImageInstall>
<OSImage>
<InstallFrom>
<MetaData wcm:action="add">
<Key>/IMAGE/NAME</Key>
<Value>Windows Server 2025 Standard (Desktop Experience)</Value>
</MetaData>
</InstallFrom>
<InstallTo>
<DiskID>0</DiskID>
<PartitionID>3</PartitionID>
</InstallTo>
<WillShowUI>OnError</WillShowUI>
<InstallToAvailablePartition>false</InstallToAvailablePartition>
</OSImage>
</ImageInstall>
<UserData>
<AcceptEula>true</AcceptEula>
<ProductKey>
<WillShowUI>Never</WillShowUI>
<Key>TVRH6-WHNXV-R9WG3-9XRFY-MY832</Key>
</ProductKey>
</UserData>
</component>
</settings>
<settings pass="specialize">
<component name="Microsoft-Windows-Shell-Setup" processorArchitecture="amd64" publicKeyToken="31bf3856ad364e35" language="neutral" versionScope="nonSxS" xmlns:wcm="http://schemas.microsoft.com/WMIConfig/2002/State" xmlns:xsi="http://www.w3.org/2001/XMLSchema-instance">
<TimeZone>Central Standard Time</TimeZone>
</component>
<component name="Microsoft-Windows-Deployment" processorArchitecture="amd64" publicKeyToken="31bf3856ad364e35" language="neutral" versionScope="nonSxS" xmlns:wcm="http://schemas.microsoft.com/WMIConfig/2002/State" xmlns:xsi="http://www.w3.org/2001/XMLSchema-instance">
<RunSynchronous>
<RunSynchronousCommand wcm:action="add">
<Description>disable product key request</Description>
<Order>1</Order>
<Path>reg add "HKEY_LOCAL_MACHINE\SOFTWARE\Microsoft\Windows\CurrentVersion\Setup\OOBE" /v SetupDisplayedProductKey /t REG_DWORD /d 1 /f</Path>
</RunSynchronousCommand>
</RunSynchronous>
</component>
<component name="Microsoft-Windows-TerminalServices-LocalSessionManager" processorArchitecture="amd64" publicKeyToken="31bf3856ad364e35" language="neutral" versionScope="nonSxS" xmlns:wcm="http://schemas.microsoft.com/WMIConfig/2002/State" xmlns:xsi="http://www.w3.org/2001/XMLSchema-instance">
<fDenyTSConnections>false</fDenyTSConnections>
</component>
<component name="Networking-MPSSVC-Svc" processorArchitecture="amd64" publicKeyToken="31bf3856ad364e35" language="neutral" versionScope="nonSxS" xmlns:wcm="http://schemas.microsoft.com/WMIConfig/2002/State" xmlns:xsi="http://www.w3.org/2001/XMLSchema-instance">
<FirewallGroups>
<FirewallGroup wcm:action="add" wcm:keyValue="RemoteDesktop">
<Active>true</Active>
<Group>Remote Desktop</Group>
<Profile>all</Profile>
</FirewallGroup>
</FirewallGroups>
</component>
<component name="Microsoft-Windows-TerminalServices-RDP-WinStationExtensions" processorArchitecture="amd64" publicKeyToken="31bf3856ad364e35" language="neutral" versionScope="nonSxS" xmlns:wcm="http://schemas.microsoft.com/WMIConfig/2002/State" xmlns:xsi="http://www.w3.org/2001/XMLSchema-instance">
<SecurityLayer>2</SecurityLayer>
<UserAuthentication>1</UserAuthentication>
</component>
<component name="Microsoft-Windows-ServerManager-SvrMgrNc" processorArchitecture="amd64" publicKeyToken="31bf3856ad364e35" language="neutral" versionScope="nonSxS" xmlns:wcm="http://schemas.microsoft.com/WMIConfig/2002/State" xmlns:xsi="http://www.w3.org/2001/XMLSchema-instance">
<DoNotOpenServerManagerAtLogon>true</DoNotOpenServerManagerAtLogon>
</component>
</settings>
<settings pass="oobeSystem">
<component name="Microsoft-Windows-Shell-Setup" processorArchitecture="amd64" publicKeyToken="31bf3856ad364e35" language="neutral" versionScope="nonSxS" xmlns:wcm="http://schemas.microsoft.com/WMIConfig/2002/State" xmlns:xsi="http://www.w3.org/2001/XMLSchema-instance">
<AutoLogon>
<Password>
<Value>password</Value>
<PlainText>true</PlainText>
</Password>
<LogonCount>2</LogonCount>
<Username>Administrator</Username>
<Enabled>true</Enabled>
</AutoLogon>
<FirstLogonCommands>
<SynchronousCommand wcm:action="add">
<Order>1</Order>
<CommandLine>powershell -ExecutionPolicy Bypass -File a:\setup.ps1</CommandLine>
<Description>Enable WinRM service</Description>
<RequiresUserInput>true</RequiresUserInput>
</SynchronousCommand>
</FirstLogonCommands>
<UserAccounts>
<AdministratorPassword>
<Value>password</Value>
<PlainText>true</PlainText>
</AdministratorPassword>
</UserAccounts>
<OOBE>
<HideEULAPage>true</HideEULAPage>
<HideLocalAccountScreen>true</HideLocalAccountScreen>
<HideOEMRegistrationScreen>true</HideOEMRegistrationScreen>
<HideOnlineAccountScreens>true</HideOnlineAccountScreens>
</OOBE>
</component>
</settings>
<cpi:offlineImage cpi:source="wim:c:/wims/install.wim#Windows Server 2025 SERVERDATACENTER" xmlns:cpi="urn:schemas-microsoft-com:cpi" />
</unattend>setup.ps1
The setup.ps1 file is the provisioning configuration that happens when the Windows Server 2025 virtual machine is installed and configured. Note that this script is optional as it isn’t required to simply install Windows Server 2025. However, it will do things like installing updates and VMware Tools or anything else you need it to do. The script that I have below:
- Installs the latest Windows updates
- Pulls the latest version of VMware Tools and installs it
- Sets the WinRM configuration
- Restarts the virtual machine
Below is a view of the script running Windows updates and then downloading VMware Tools.
$ErrorActionPreference = "Stop"

# Switch network connection to private mode
# Required for WinRM firewall rules
$profile = Get-NetConnectionProfile
Set-NetConnectionProfile -Name $profile.Name -NetworkCategory Private

# Install PS Windows Update Module
Get-PackageProvider -Name nuget -Force
Install-Module PSWindowsUpdate -Confirm:$false -Force

# Install Windows updates without user interaction and suppress reboot promptsequi
Get-WindowsUpdate -MicrosoftUpdate -Install -IgnoreUserInput -AcceptAll -IgnoreReboot | Out-File -FilePath 'C:\windowsupdate.log' -Append

# VMware Tools download and install section
[Net.ServicePointManager]::SecurityProtocol = [Net.SecurityProtocolType]::Tls12
$downloadFolder = 'C:\install\'

# Ensure folder exists
if (-not (Test-Path -Path $downloadFolder)) {
    Write-Verbose "Creating folder '$downloadFolder'"
    New-Item -Path $downloadFolder -ItemType Directory -Force | Out-Null
}
else {
    Write-Verbose "Folder '$downloadFolder' already exists."
}

# Get the latest VMware Tools download link
$url = "https://packages.vmware.com/tools/releases/latest/windows/x64/"
$vmwareLink = Invoke-WebRequest -Uri $url -UseBasicParsing | ForEach-Object {
    $_.Links | Where-Object { $_.href -match '^VM.*' } | Select-Object -ExpandProperty href -First 1
}

if ($vmwareLink) {
    $downloadUrl = "$url$vmwareLink"
    $downloadPath = Join-Path -Path $downloadFolder -ChildPath (Split-Path -Path $vmwareLink -Leaf)

    # Download the file
    try {
        Invoke-WebRequest -Uri $downloadUrl -OutFile $downloadPath -UseBasicParsing
        Write-Host "Downloaded VMware Tools to '$downloadPath'"
    }
    catch {
        Write-Error "Failed to download VMware Tools: $_"
        exit 1
    }

    # Install VMware Tools without reboot
    try {
        Start-Process -FilePath $downloadPath -ArgumentList '/S /v"/qn REBOOT=ReallySuppress" /l c:\windows\temp\vmware_tools_install.log' -Wait
        Write-Host "VMware Tools installation completed."
    }
    catch {
        Write-Error "Failed to install VMware Tools: $_"
        exit 1
    }
}
else {
    Write-Error "No VMware Tools download link found."
    exit 1
}

# WinRM Configuration
winrm quickconfig -quiet
winrm set winrm/config/service '@{AllowUnencrypted="true"}'
winrm set winrm/config/service/auth '@{Basic="true"}'

# Reset auto logon count
Set-ItemProperty -Path 'HKLM:\SOFTWARE\Microsoft\Windows NT\CurrentVersion\Winlogon' -Name AutoLogonCount -Value 0

# Trigger a single reboot at the end
Restart-Computer -Force
What do you do next?
Now that we have all the files in place, what do we need to do after creating the files and moving forward? Run the following commands:
- packer init .
- packer build .
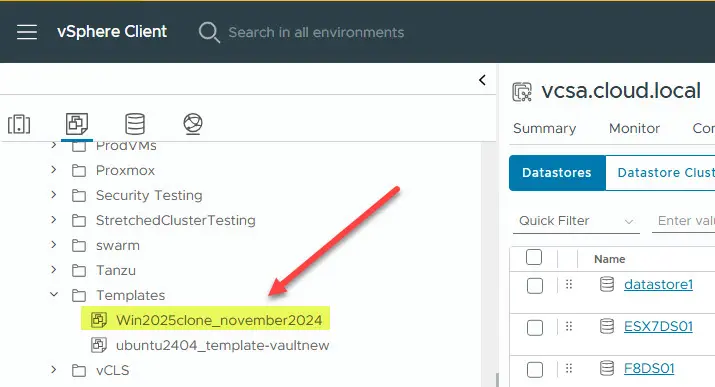
When you run the initialization and build, you will see your Windows Server 2025 virtual machine created in your vSphere inventory:

Wrapping up
Hopefully, this Windows Server 2025 installation will help any who want to get started automating the deployment of Microsoft’s latest operating system in their VMware vSphere environment. If you run into issues please leave a comment or create a DevOps forum post where you can get more detailed help with Packer or any other question you may have.
- Design


[…] updating my VMware vSphere Packer build template for Windows Server 2025 (you can read that here: Windows Server 2025 Packer Build for VMware vSphere), I decided to tackle Proxmox, which wasn’t as straightforward. I wanted to share with you what I […]